

When people search for “making LED strips,” they may be planning a small DIY light project. However, buyers, engineers, buying teams, and OEM teams usually need a different answer: how are LED strips made, and what should be checked before buying or custom work?
A small DIY project may focus on cutting, wiring, soldering, or adding a controller. By contrast, a factory-made LED strip order needs a wider review. Therefore, buyers need to define the strip structure, voltage, LED density, color needs, PCB layout, adhesive, connector style, IP or protection expectations when relevant, packing, and file needs.
In addition, this guide explains the typical LED strip making process in a buyer-friendly way. However, it does not treat every supplier or every product as the same. Instead, it shows which materials and steps matter when you prepare a quote request, compare options, or discuss a custom LED strip project.
LED strips are typically made by getting a flexible PCB, adding solder paste, placing LEDs and other SMT parts, using reflow soldering, checking or testing the strip, and then finishing it with cutting, wire prep, optional coating or another cover method when the design calls for it, and packing. For buyers, the key is to define the needed specs before making.
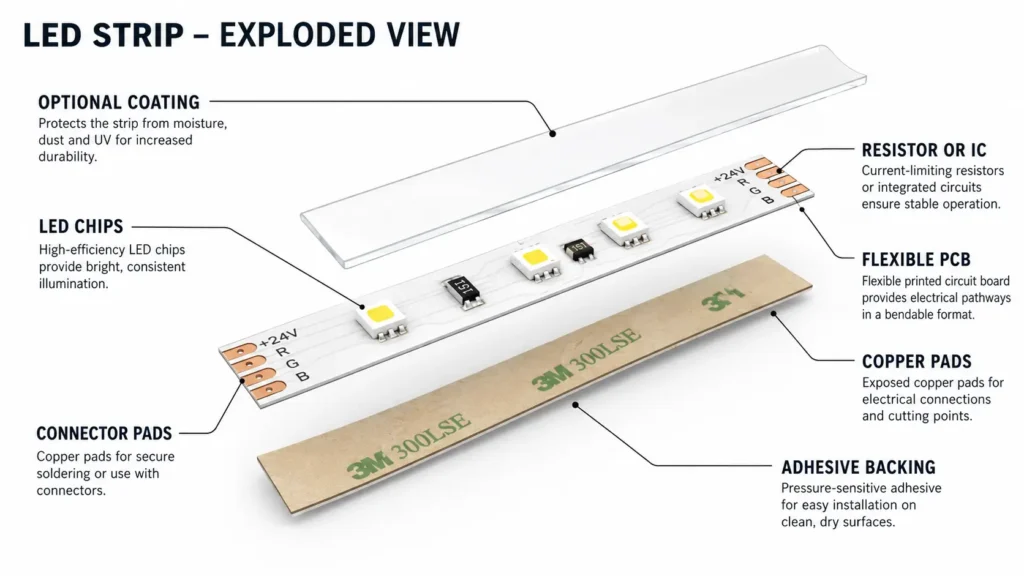
First, before looking at the making steps, it helps to know what is being built. In fact, an LED strip is not just a row of lights. Instead, it is a circuit and mounting product that must fit the final use.
Therefore, buyers should define the main parts and specs before asking for a quote. If these points are unclear, suppliers may quote products that look alike but work differently in the final use. For reference, buyers can also review the ready LED strip light product categories before getting clear needs.
In addition, these parts should not be picked one by one without looking at the whole design. For example, higher LED density, a different voltage, a longer run, or a tight install space can change other choices.
| Spec / Item | Why It Matters | Buyer Should Prepare |
|---|---|---|
| Voltage | Shapes power supply choice, wiring, and layout | Needed voltage, power setup, run length |
| LED density | Changes light look, spacing, and power demand | LEDs per meter or target visual effect |
| PCB width / structure | Sets install space and heat handling limits | Mounting space and shape limits |
| Color need | Guides product choice and final look | CCT, RGB/RGBW, or color tolerance if needed |
| CRI need | Matters for display, retail, and visual check uses | Target CRI if color rendering matters |
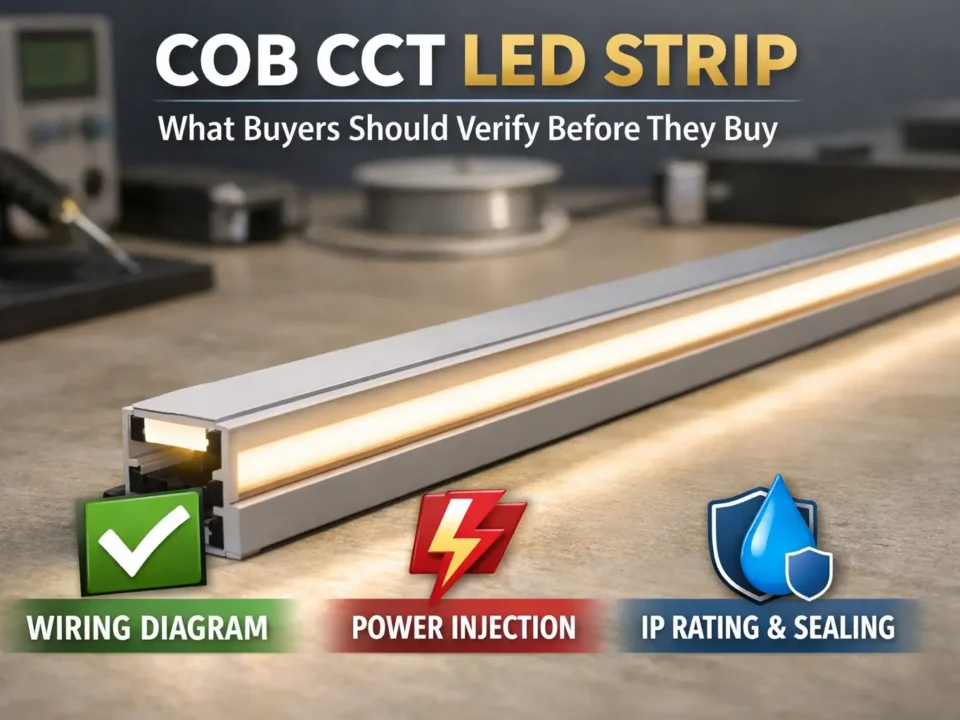
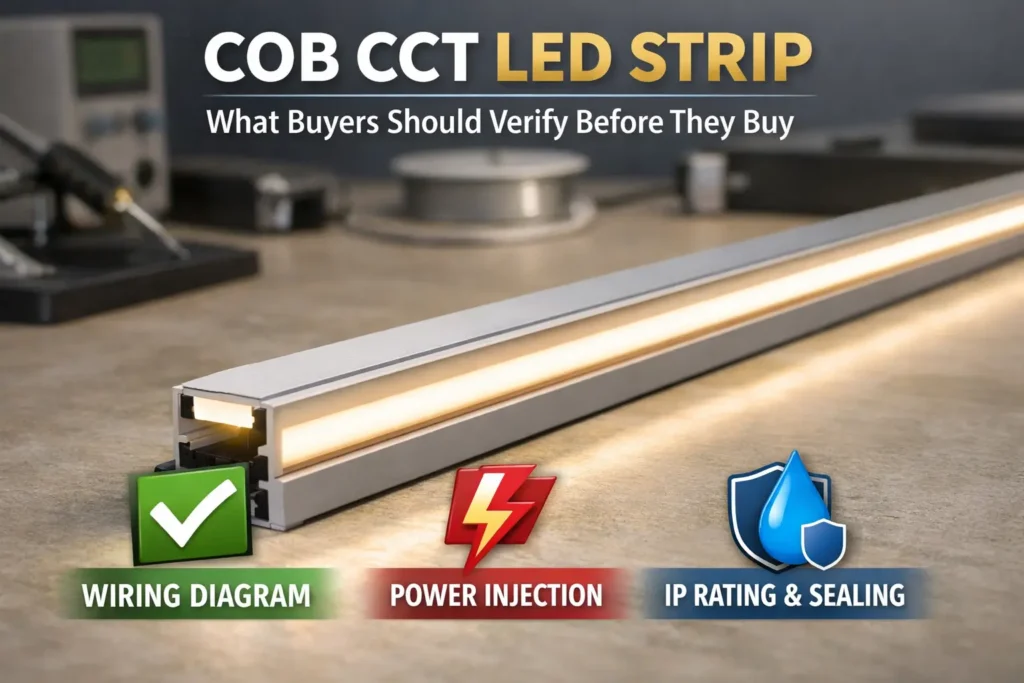
| IP or protection need | Depends on dry, humid, outdoor, or exposed use | Use use area |
| Adhesive / mounting | Helps determine install fit and long-term hold | Mounting surface and install method |
| Wire / connector | Shapes install work and service | Wire or connector type, wire length, and connection method |
| Control method | Needed for dimming or color control | Single color, dimming, RGB, addressable, or controller needs |
| Packing / labels | Matters for distributors or project delivery | Roll length, labels, packing needs |
For standard projects, a buyer may only need a few of these points. However, custom projects often need more info before the supplier can review the request or prepare a useful quote.
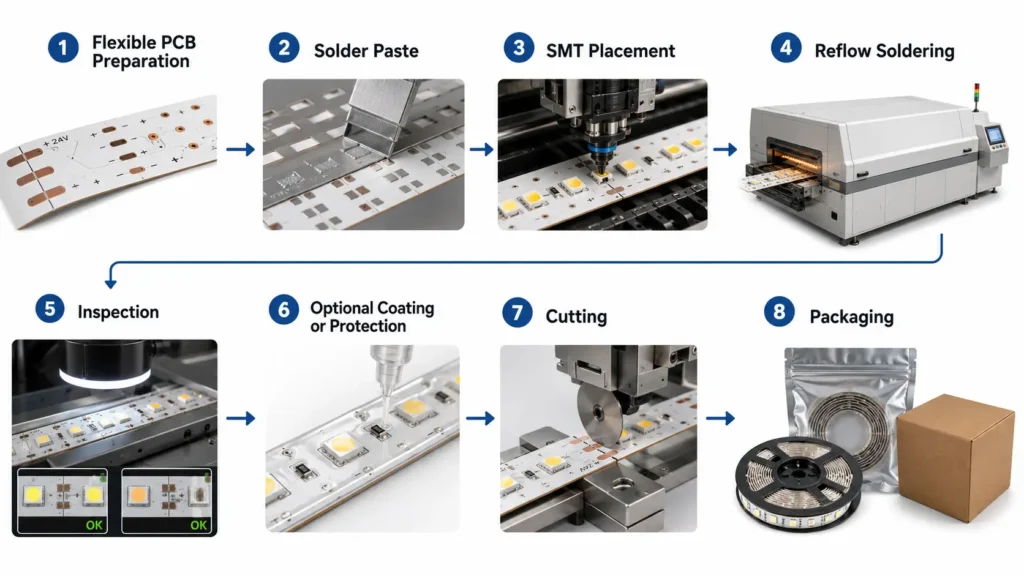
However, the exact workflow can vary by product design, supplier, and order needs. Still, many LED strip making flows use a similar path: prepare the circuit, mount the parts, solder them, check the strip, finish it, and pack it.
To clarify, the notes below are general. They should not be read as a claim that every supplier uses the same process or provides the same test files. As a general electronics guide, many SMT build processes include solder paste printing, machine part placing, and reflow soldering.
First, the process starts with a flexible PCB made for the LED strip layout. Then, this board defines the circuit path, part positions, cut points, solder pads, and strip width.
In practice, this stage matters for buyers because PCB design affects layout and install fit. For example, if the strip needs a narrow width, special bend direction, custom segment length, or a set connector position, those details should be discussed before making.
Next, solder paste is added to the PCB pads where LEDs and other parts will sit. As a result, this prepares the board for part placing and reflow soldering.
However, buyers do not usually need to control this step directly. However, it is useful to know that good build depends on the PCB design, part placing, and soldering control.
Then, LEDs and related parts are placed onto the prepared PCB. For example, depending on the strip design, these parts may include resistors, ICs, or other SMT parts.
At this stage, the product design becomes more clear. In addition, LED type, density, color spec, and control method all affect which parts are used and where they are placed.
Next, the build typically goes through reflow soldering. As a result, the solder paste melts and forms the link between the parts and PCB pads.
For buyers, the main point is not the machine setting itself. Instead, the practical question is whether the supplier can explain how the product is built and what check or test support is ready for the order.
Afterward, the strip may go through check or testing. However, the type of check depends on the product, supplier process, and order needs.
Therefore, buyers should not assume every LED strip is checked in the same way. For buying or OEM projects, ask what check, sample review, or test files are ready for the exact product and order.
Many LED strips are designed with marked cut points, but cutting rules depend on the product design. In addition, some strips may also need wires, connectors, end caps, coating, sleeves, or other finish steps.
Therefore, if the project needs a fixed length, special connector, cover method, or packing format, include it in the RFQ. Otherwise, small finish details can add install work or create fit problems later.
Finally, finished strips are packed based on the product format and order needs. For example, packing may include reels, bags, labels, accessories, or project-specific instructions.
For distributors and OEM buyers, packing is not just cosmetic. In addition, it can affect stock handling, job-site sorting, and after-sales support.
| Process Step | What Happens | Buyer Should Check | Evidence or Sample to Request |
|---|---|---|---|
| PCB design / prep | Circuit layout and strip structure are set | Width, segment length, cut point, voltage, install space | Drawing, sample, or spec sheet if ready |
| Solder paste | Pads are prepared for SMT build | Whether the product design suits the needed layout | General process note if needed |
| Part placing | LEDs and related parts are mounted | LED type, density, color, resistor/IC design, control method | Sample, product spec, or approved reference |
| Reflow soldering | Parts are soldered to the PCB | Whether build matches the product needs | Process note if ready |
| Check / testing | The strip is checked after build | What checks are ready for the project | Check photos, test info, or agreed QC files |
| Cutting / connection | The strip is cut or prepared for install | Length, connector, wire, solder pad, install method | Sample or connection drawing |
| Coating / protection if needed | Added cover may be used based on the design | IP or use use area, mounting conditions | Product spec and file availability |
| Packing | Product is packed for shipment or project use | Roll length, labels, accessories, carton needs | Packing instruction or sample pack if needed |
As a result, this table turns a broad “how is it made?” question into clear buyer checks. In addition, readers comparing supplier options can review the LED strip manufacturer page, then confirm project-specific specs, samples, and file needs before ordering.
In some cases, LED strip projects can be simple. For example, a user may cut a strip at marked points, connect it to a suitable power supply, and mount it in a small indoor space. However, that is not the same as buying LED strips for a product, project, distributor catalog, or OEM build.
In practice, the right path depends on the use, amount, file needs, and tolerance for variation.
| Situation | DIY or Small Build May Be Enough | Factory or Supplier Review May Be Better |
|---|---|---|
| Small decorative project | Simple indoor use with standard strip kits | Not usually needed unless custom length or control is needed |
| Fixed product design | Only when repeatability is not critical | Useful when size, connectors, and appearance need to stay consistent |
| Commercial install | Only if standard products meet the need | Recommended when run length, voltage drop, mounting, or cover needs review |
| OEM product integration | Usually not enough | Needed when drawings, samples, and validation are needed |
| Distributor stocking | Not suitable for full product planning | Helpful when packing, labels, SKU fit, and file needs matter |
| Outdoor or exposed use | Requires caution and product-specific guidance | Suitable when IP rating, sealing method, and site conditions must be reviewed |
Even so, factory-made does not automatically mean suitable for every use. Buyers still need to define the use conditions and check whether the product design fits the job.
Meanwhile, quality language is common in LED strip marketing. However, buyers should look for clear, project-relevant info rather than broad promises. Instead of asking only “Is the quality good?”, ask what can be checked, sampled, or fileed for your order.
| Buyer Question | Why It Helps | Safe Way to Ask |
|---|---|---|
| Which check steps are ready for this product? | Clarifies how the order may be checked | “Can you explain the check process for this strip type?” |
| Can we review a sample before bulk order? | Helps confirm look, size, connection, and mounting | “Can a sample be reviewed before final making?” |
| Which product specs can be provided? | Reduces mismatch between quote and expectation | “Can you provide the relevant product/spec info?” |
| Are any test files ready for this project? | Supports buying review and internal approval | “Which test or check files are ready for this order?” |
| If certification is required, what current files can be shared? | Avoids unsupported compliance assumptions | “Can you provide current files for the required certification, if applicable?” |
| How should custom details be confirmed? | Reduces mistakes before making | “Can drawings, samples, or written specs be confirmed before making?” |
In this way, the discussion stays practical. It also avoids vague claims such as “best quality” or “guaranteed performance.”
In practice, a useful RFQ is more than a message asking for the price of LED strips. Otherwise, if the supplier receives only a photo or a broad keyword, the quote may be incomplete or based on assumptions.
Before requesting a quote, therefore, prepare as many of the following details as possible. For custom projects, buyers can also review the LED strip custom work page and then confirm project-specific needs during quote discussion.
| RFQ Item | What to Provide |
|---|---|
| Application | Indoor, outdoor, cabinet, signage, display, architectural, product integration, or other use |
| Dimensions | Strip length, width limit, bend direction, cut length, or install space |
| Voltage | Needed voltage or power system |
| Color need | Single color, CCT, RGB, RGBW, addressable, or other color/control need |
| Brightness or density target | LED density, visual effect, or reference sample |
| Use area | Dry, humid, exposed, high-touch, enclosed, or heat-sensitive area |
| Protection need | IP or coating expectation if applicable |
| Mounting method | Adhesive, clips, channel, profile, or other mounting condition |
| Wire / connector | Wire length, wire or connector type, solder pads, input direction |
| Amount | Prototype, sample, batch, or forecast amount |
| Drawings / samples | Drawings, photos, existing sample, or product design file if ready |
| Packing | Roll length, labels, accessories, or distributor packing needs |
| Files | Spec sheet, check record, test file, or certificate copy if required |
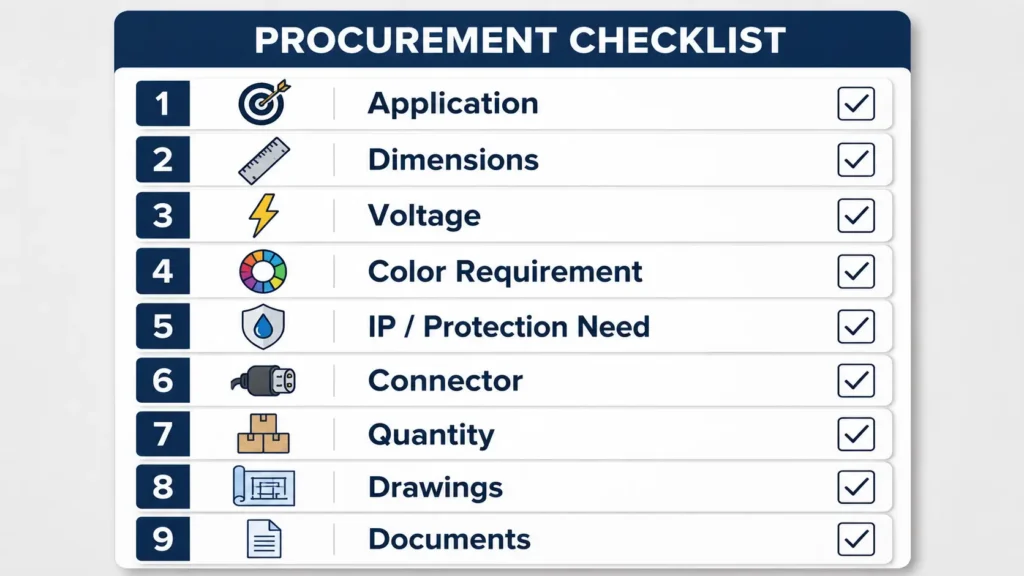
If some details are unknown, however, say that clearly. Then, a technical review can start from partial info, while the final product choice can still be based on confirmed needs.
LED strips are typically made by getting a flexible PCB, adding solder paste, placing LEDs and related parts, using reflow soldering, checking or testing the strip, and then finishing it with cutting, connection prep, optional coating or a cover method when the design needs it, and packing.
For example, common parts include a flexible PCB, LEDs, resistors or ICs based on the design, solder, copper pads or traces, adhesive backing, connectors or wires, and optional coating or other protective material when the use requires it.
Although many LED strips have marked cut points, cutting and soldering rules depend on the product. Therefore, follow the strip’s instructions and confirm voltage, polarity, connection method, and install needs before changing a strip.
However, there is no single best wire for every LED strip. Instead, wire choice depends on voltage, current, run length, layout, and use use area. For project use, confirm the electrical needs and site conditions before selecting wire or connectors.
To start, prepare the use case, dimensions, voltage, color need, LED density or brightness target, use area, protection need, connector or wire need, amount, drawings or samples, packing needs, and any file needs.
Also, ask what check steps, sample review process, product specs, test info, or file support are ready for the specific order. If certification is required, ask for current files instead of assuming compliance from general product descriptions.
Before you start an LED strip buying or custom project, collect the key details first: use case, dimensions, voltage, color need, amount, drawings, connector needs, install use area, and any file needs.
Then, share those details with Elstar so the team can review suitable strip options and the info needed for quote discussion. Also, avoid relying on photos or broad keywords alone when the project has technical or buying needs.


5 Comments
Hi, i was just wondering wrote this? Its for a class project. Thanks!
Hi Ray! What do you need? Maybe we can help with something. 🙂
Damn good article.
My 2x16ft. Strips started to fade out after 6 months use, used them 6 hours a day with 2 independent 12V, 6A Power Supply Units, PSUs.
One faded out near the PSU connection and the other towards the end of the section.
One stopped working last night and was wondering what could be wrong?
Any idea how I can test each portion where it says it is safe to Cut?
Regards.
Hi there, glad you liked our article!
Yes, each segment is cuttable and you can test & cut it by yourself. But then, you will need to re-solder the strip together or connect it with an led strip connector like these.
There are many reasons which may make the led strip failures, they affect PCB board, LED chip, solder pad, resistors, etc. So I guess the best way to find out where goes wrong is going about each cuttable section and see if it works with that section.
Hope this helps.
Nick
We are interested start manufacturing led strip light plant in India,
Pl send us more details total cost of plants, technical details
Best regards
Vijay Mehta