

Before choosing an LED strip light, it helps to understand what is actually happening inside the strip. In practice, many project problems come from the same basic issues: wrong voltage, undersized power supply, poor connector match, long runs with voltage drop, or a controller that does not fit the strip type.
To reduce those risks, this guide explains how LED strip lights work from the power supply to the LED circuit. It also shows what buyers, engineers, and procurement teams should check before selecting a strip or preparing an RFQ.
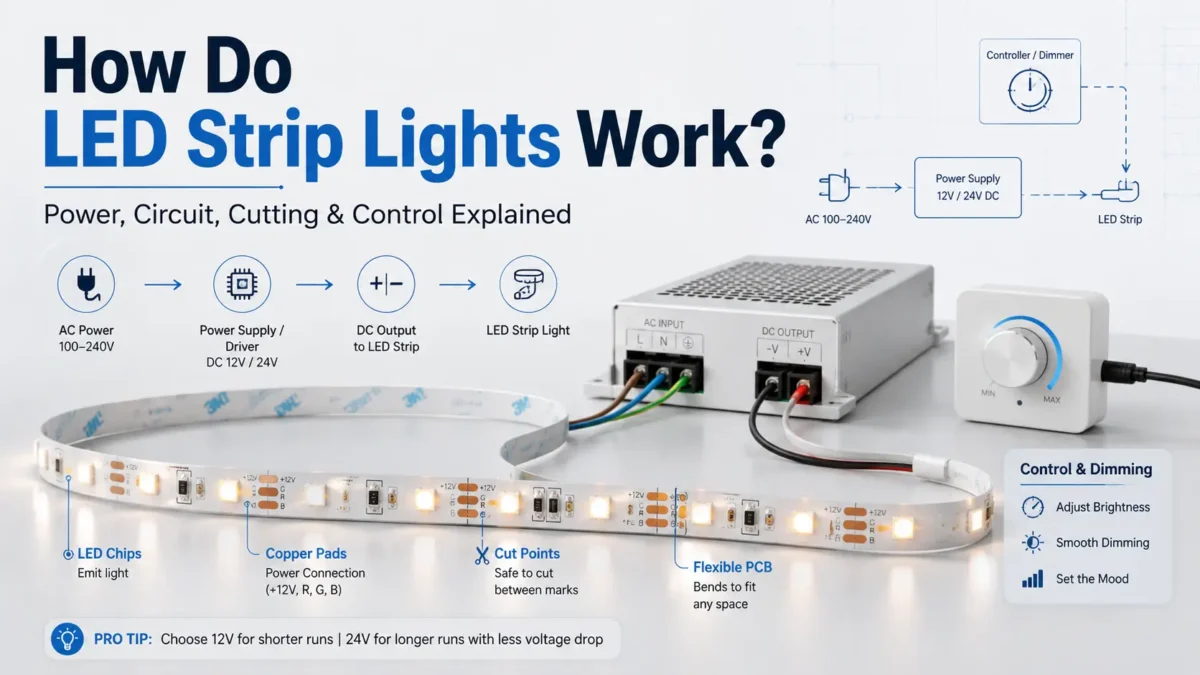
In a typical setup, LED strip lights work by sending suitable DC power through conductive traces on a flexible circuit board. The LED chips mounted along the strip emit light when current passes through them. Meanwhile, a power supply provides the required voltage, and a controller or dimmer may adjust brightness, color, or effects depending on the strip type.
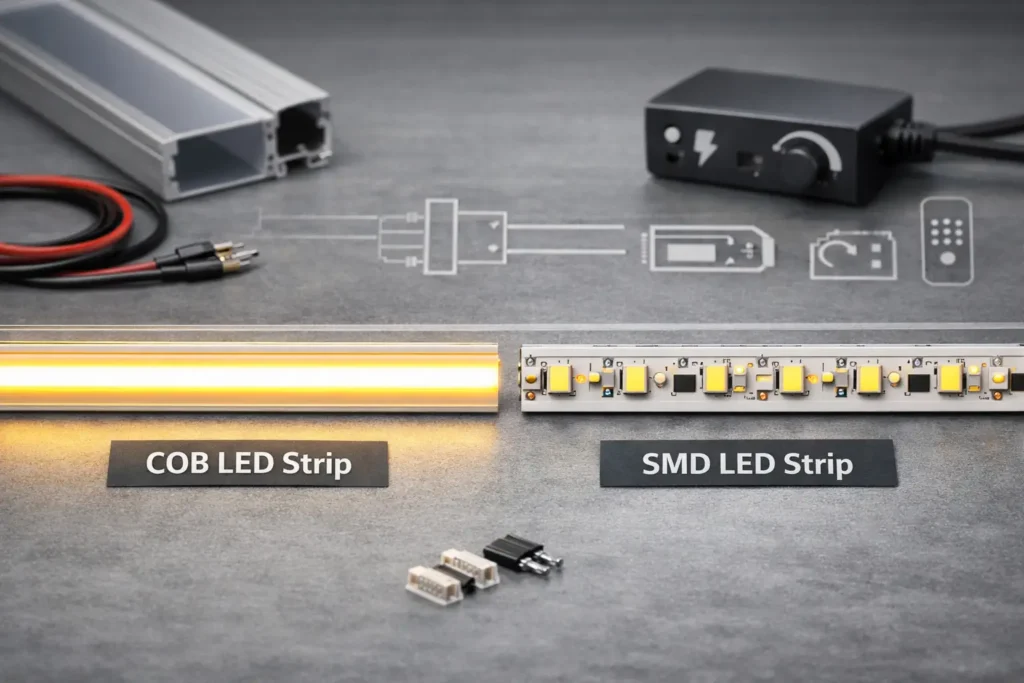
Most LED strip lights are built on a flexible printed circuit board. In addition, along the strip, you will usually see LED emitters, copper pads, conductive traces, and repeated circuit sections. Depending on the strip type, there may also be resistors, control chips, or extra channels for color control.
| Part | What it does | Buyer should check |
|---|---|---|
| LED emitters | Produce light when current passes through the LED device | Color, brightness requirement, LED density |
| Flexible PCB | Holds the LED circuit and allows the strip to bend within its design limits | Width, bend limits, installation surface |
| Copper traces | Carry electrical current along the strip | Run length, voltage drop risk, current load |
| Cut pads / cut marks | Show where the strip can usually be separated | Cut spacing, connector type, polarity marks |
| Resistors or control components | Help manage current or signal behavior depending on design | Strip type and controller compatibility |
| Adhesive backing or mounting channel | Helps position the strip during installation | Surface, heat, environment, mounting method |
A strip light is not just a row of small bulbs. Instead, it is an electrical circuit arranged in a long, flexible format. As a result, that circuit design affects voltage selection, power supply sizing, cutting, reconnection, and control.
In many LED strip installations, power starts from an AC source and is converted by a power supply into the DC voltage required by the strip. Then, the DC output travels to the strip directly or through a dimmer, controller, or amplifier, depending on the system.
A simplified power path looks like this:
| Step | Component | What happens |
|---|---|---|
| 1 | AC power source | Provides incoming power for the lighting system |
| 2 | Power supply / LED driver | Converts power to the DC voltage required by the strip |
| 3 | Controller or dimmer | Adjusts brightness, color channels, or effects when needed |
| 4 | Strip input pads or connector | Transfers power into the strip circuit |
| 5 | Copper traces on PCB | Carry current along the strip |
| 6 | LED groups | Receive current and emit light |
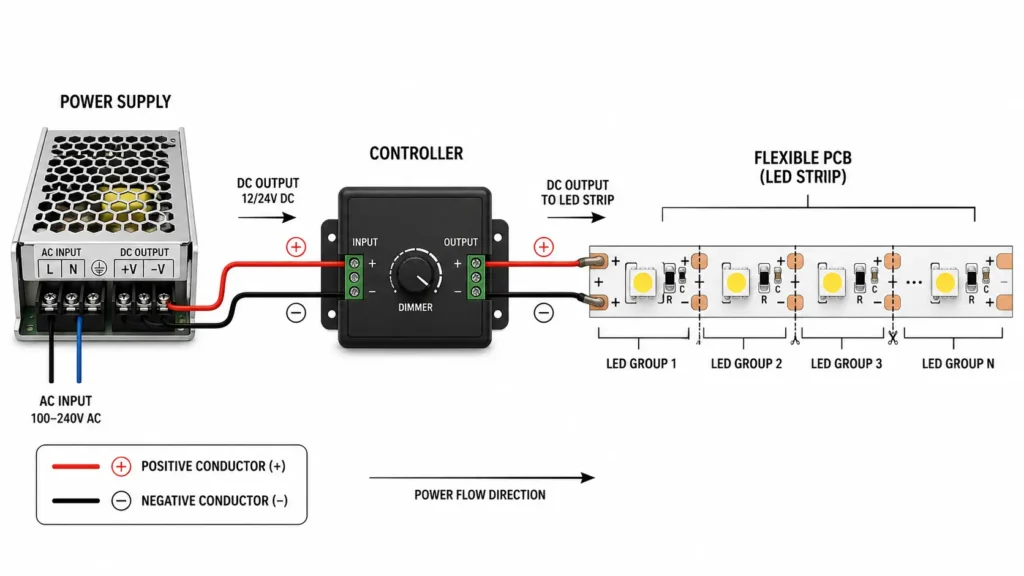
Many common LED strips are designed for low-voltage DC, often 12V or 24V, depending on the product. However, the exact voltage must match the strip. For example, a 12V strip should not be treated as interchangeable with a 24V strip, and the power supply must be selected for the specific strip and project layout.
For buyers, the important point is simple: the strip, power supply, controller, and connectors must be planned as one system.
LED strip lights are sensitive to electrical matching. Therefore, if the voltage is wrong, the strip may not work correctly and can be damaged. Also, if the power supply capacity is too low for the planned length and wattage, the strip may dim, flicker, or fail to operate as expected.
Three basic checks matter before selection:
| Check | Why it matters | What to confirm |
|---|---|---|
| Voltage | The strip must receive the voltage it was designed for | 12V, 24V, or another product-specific voltage |
| Wattage | The power supply must support the total strip load | Wattage per meter or foot × planned length |
| Polarity | DC strips require correct positive and negative connection | Match the strip markings and connector polarity |
Wattage is especially important for longer runs. For example, a short sample strip and a full project layout may have very different power requirements. Therefore, buyers should check the product’s wattage per meter or foot and calculate the total load before choosing a power supply.
In addition, polarity matters. Many LED strips have positive and negative markings near the copper pads. Reversing polarity can prevent the strip from lighting and may cause problems depending on the product and system design.
Many LED strips are designed with repeated circuit sections. Therefore, these sections are separated by marked cut points, often shown with a scissors symbol, copper pads, or printed cut lines.
When the strip is cut at the correct point, each separated section can still contain a complete circuit path for that section. For this reason, a shorter strip segment may continue to work after cutting, as long as it is connected correctly and the product is designed for that type of use.
Cutting rules:
| Rule | Why it matters |
|---|---|
| Cut only at marked cut points | Cutting elsewhere can break the intended circuit path |
| Check copper pads before reconnecting | Pads provide the connection area for soldering or connectors |
| Match polarity | Positive and negative pads must align correctly |
| Use a compatible connector | Connector width, pin count, and strip type must match |
| Confirm whether the strip is cuttable | Not every strip design should be treated the same |
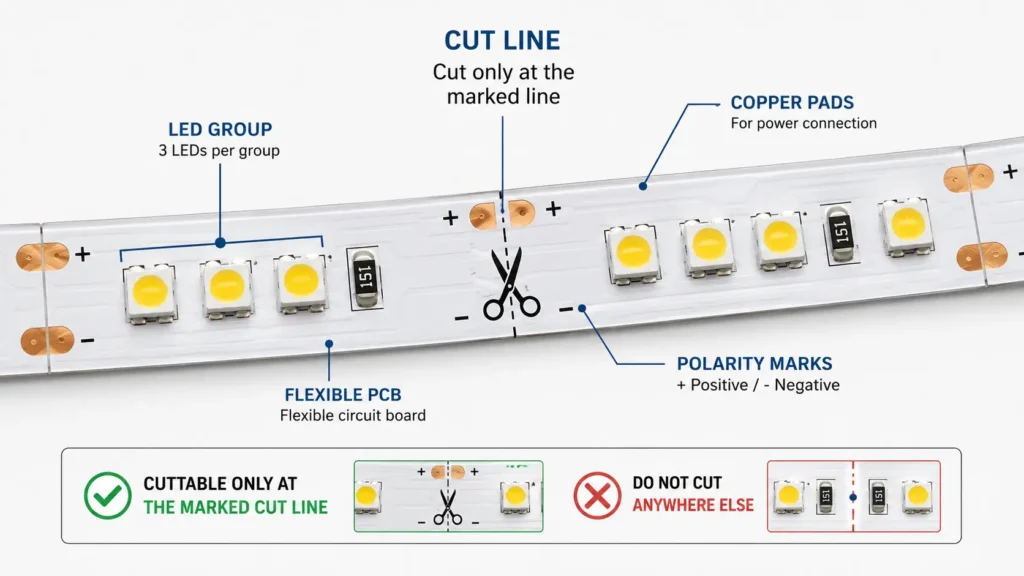
Cutting an LED strip is not just a mechanical step. Instead, it is an electrical decision. If the cut breaks the wrong part of the circuit, the remaining section may not work.
For B2B projects, this affects ordering and installation planning. Therefore, buyers should confirm required segment lengths, cut spacing, connector style, and installation layout before purchase.
In many systems, a controller sits between the power supply and the LED strip. Its role depends on the strip type.
For a single-color strip, the controller may dim the strip using switching-style control. With RGB or RGBW strips, the controller manages separate color channels. In tunable white strips, it may balance warm and cool white channels. By contrast, addressable strips may control individual LEDs or LED groups through data signals, depending on the product design.
| Strip type | How control usually works | Buyer should confirm |
|---|---|---|
| Single-color | Controller or dimmer adjusts brightness | Voltage, wattage, dimming method |
| Tunable white / CCT | Controller adjusts warm and cool white channels | Channel type, controller match |
| RGB | Controller adjusts red, green, and blue channels | Pin count, voltage, controller type |
| RGBW / RGBCCT | Controller manages additional white or CCT channels | Channel count and wiring type |
| Addressable | Data signal controls individual LEDs or groups | Chip type, voltage, controller protocol |
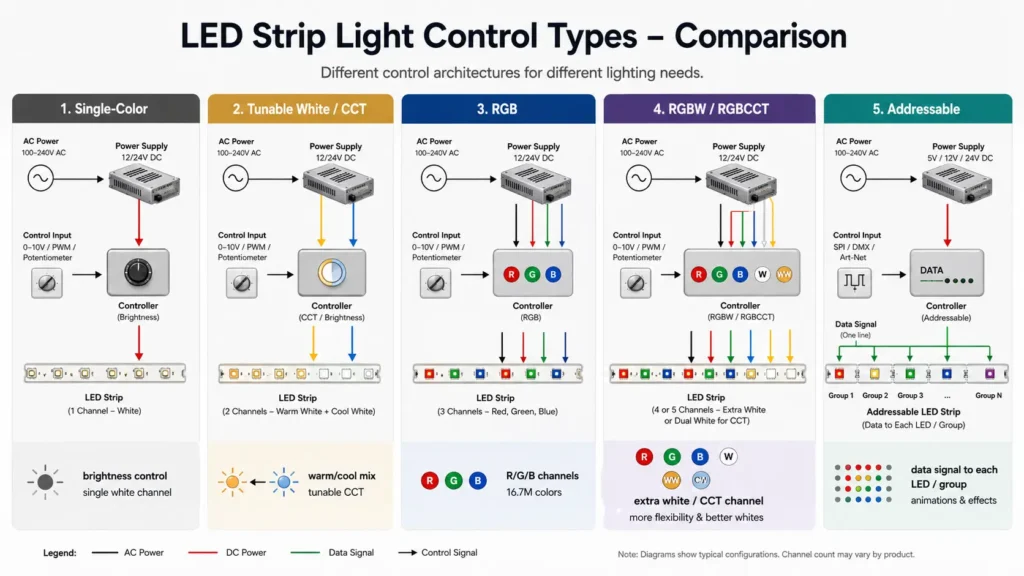
A controller should not be chosen only by appearance or remote-control style. Instead, it must match the strip voltage, channel type, load, wiring, and control method.
As a result, controller mismatch is a common source of project errors. A controller that works for one strip type may not work for another.
Longer LED strip runs can show uneven brightness because voltage can drop along the circuit. As current travels through copper traces, wires, connectors, and joints, some voltage is lost. Therefore, if the far end of the strip receives less voltage than expected, it may look dimmer than the section near the power feed.
However, voltage drop is not the only issue. Wrong voltage, undersized power supply, poor connector contact, reversed polarity, and controller mismatch can also cause problems.
| Symptom | Possible reason | What to check |
|---|---|---|
| Far end looks dimmer | Voltage drop along the strip or wiring | Run length, feed point, wire gauge, strip wattage |
| Strip does not light | Wrong voltage, reversed polarity, loose connection | Power supply output, polarity marks, connector fit |
| Strip flickers | Power supply load issue or poor connection | Total wattage, connector quality, controller load |
| Only one color works | Channel wiring or controller mismatch | Pin order, controller type, strip type |
| Section after cut does not work | Cut point or reconnection issue | Copper pads, polarity, connector compatibility |
| Heat or adhesive problems | Surface, mounting, or installation condition | Mounting channel, ventilation, environment |
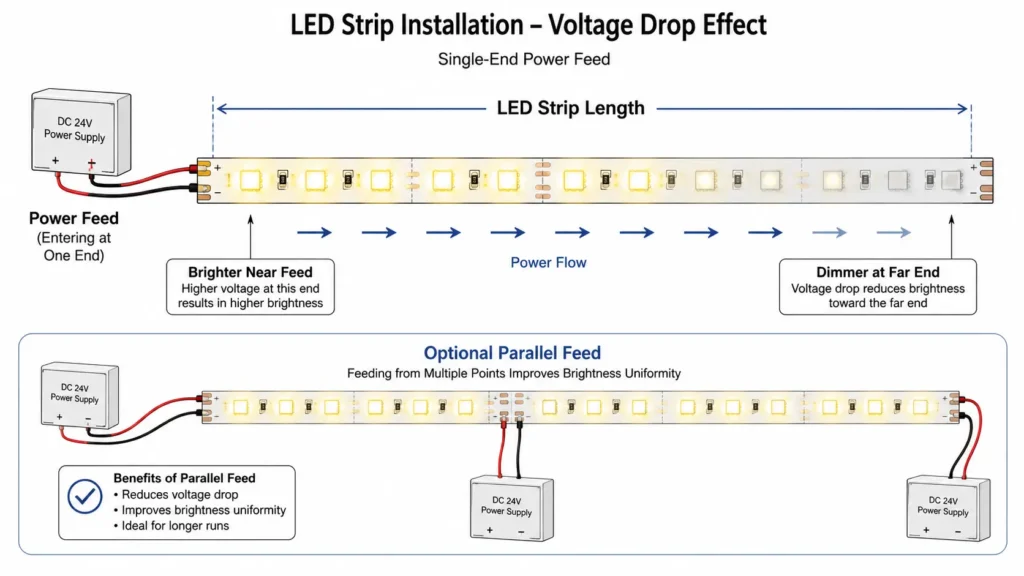
For longer layouts, the strip may need power-feed planning instead of a simple single-end connection. The correct approach depends on strip voltage, wattage, length, installation environment, controller, and layout.
As a result, do not assume that one long continuous run will perform the same as a short sample.
Understanding how LED strips work makes specification easier. Instead of asking only for “LED strip lights,” buyers should prepare project conditions that help a supplier or engineer review the system.
Use this checklist before RFQ:
| RFQ item | Why it matters |
|---|---|
| Required voltage | Must match the strip and power supply |
| Wattage per meter or foot | Needed to size the power supply |
| Total length and segment lengths | Affects voltage drop, cutting, and wiring |
| Color type | Single-color, CCT, RGB, RGBW, RGBCCT, or addressable |
| LED density | Affects appearance, brightness distribution, and power load |
| Installation environment | Indoor, outdoor, humid, dusty, enclosed, or high-contact areas |
| IP or protection requirement | Must match the actual environment if specified |
| Controller needs | Dimming, color control, remote, signal type, or system integration |
| Connector or soldering preference | Affects installation method and reliability |
| Drawings or layout notes | Helps review power feed, run length, and cut points |
| Quantity and packaging needs | Supports quotation and supply planning |
For custom or project-based LED strip work, layout information is often as important as product preference. Without that layout, a supplier cannot reliably review power supply, controller, connector, or cutting requirements.
In basic terms, LED strip lights work by sending suitable DC power through conductive traces on a flexible circuit board. The LED emitters mounted along the strip produce light when current passes through them. A power supply provides the required voltage, and a controller may adjust brightness, color, or effects.
Yes. LED strip lights need a power source. Some use a plug-in adapter, while others connect to a wired power supply or a larger lighting system. However, the correct setup depends on the strip voltage, wattage, controller, and installation design.
Typically, many LED strips receive low-voltage DC power from a power supply. In mains-powered installations, the power supply converts incoming AC power into the DC voltage required by the strip. Then, the output connects to the strip directly or through a controller.
After cutting at marked points, many LED strips can still work because they are arranged in repeated circuit sections. When cut correctly, a section may still contain a complete circuit path and can work if connected correctly. However, cutting outside marked areas can break the circuit.
Over long runs, voltage drop can occur through copper traces, wires, connectors, and joints. When less voltage reaches the far end of the strip, that section may appear dimmer. In addition, layout, strip wattage, wire gauge, feed position, and connection quality can all affect the result.
A controller regulates the output sent to the strip. For single-color strips, it may adjust brightness. With RGB, CCT, RGBW, or addressable strips, it may control separate channels or signals. In each case, the controller must match the strip type and electrical requirements.
The main disadvantages appear when the system is not planned correctly. For example, common issues include voltage drop, wrong power supply selection, poor connector fit, heat or mounting problems, controller mismatch, and environment protection that does not match the installation.
For project selection, prepare the strip voltage, wattage per meter, total length, color or control type, installation environment, connector needs, and any drawings or layout notes. Share these details with your supplier before choosing a power supply, controller, or custom strip option.
As a result, the technical team can review the strip, power path, controller, and installation conditions before quotation or production planning.
