Neon Light Repair Safety
Quick Neon Light Repair Answer
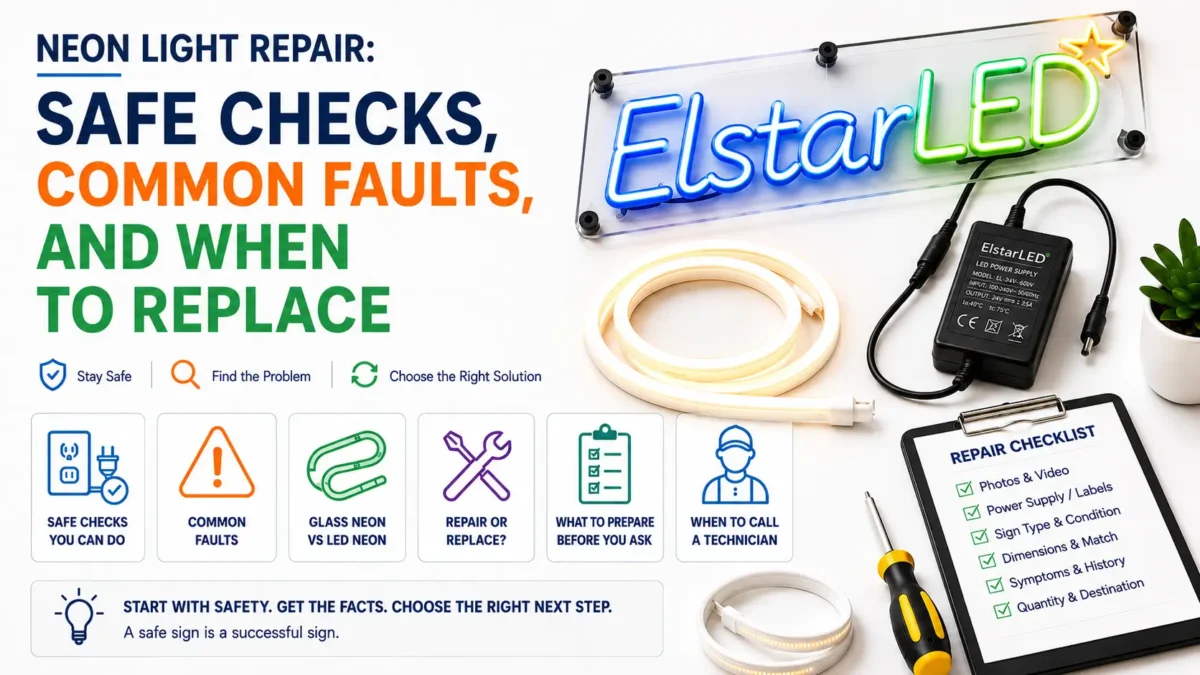
Yes, a trained neon professional can repair some neon lights. However, the safe path depends on whether the sign uses glass neon or LED neon. Basic checks may include the outlet, plug, adapter, controller, remote, cable condition, and outside connectors, with power off and only where you can reach them without opening the sign.
Stop Signs Before Repair Checks
Because broken glass, exposed wiring, transformer faults, gas or tube work, burn smells, and unknown electrical faults can create serious risk, stop before you open the sign. Instead, treat the case as a pro repair or replace review. Also, if the sign is wet, buzzing, hot, cracked, or still connected to power with clear damage, keep people away and record the issue with photos.
Neon Light Repair Starts With Sign Type: Glass Neon or LED Neon
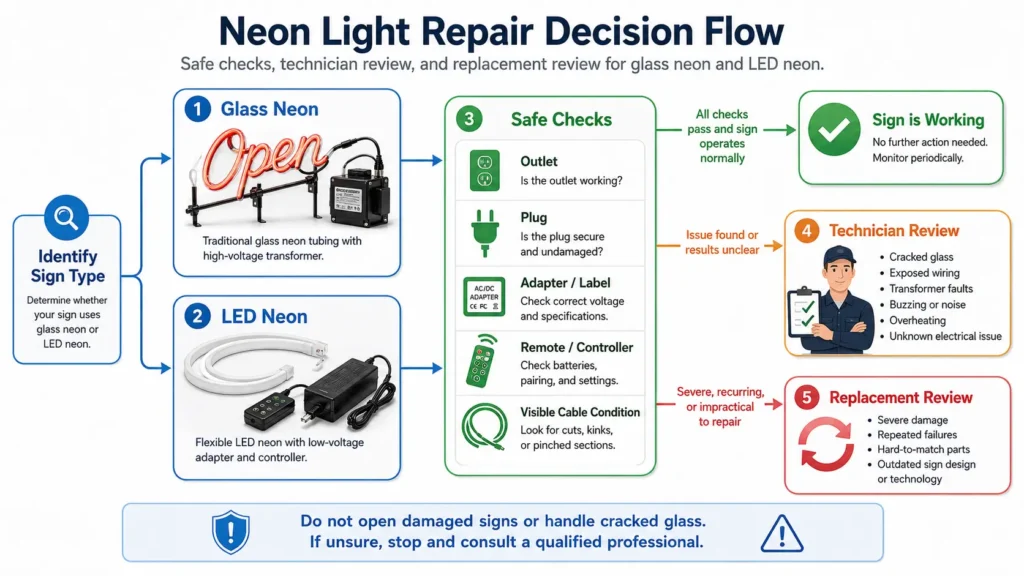
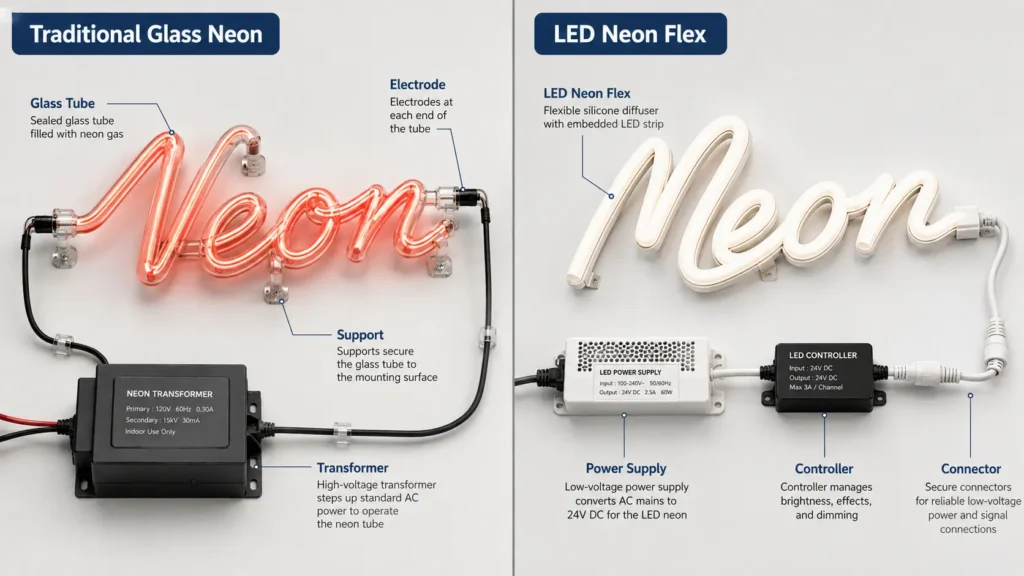
Before troubleshooting, identify the sign type. A good neon light repair decision starts here because the word “neon” can describe different products. Some signs use traditional glass neon tubes filled with gas. In contrast, other signs use LED neon flex, which gives a continuous neon look with LEDs inside a flexible diffuser.
This split matters because traditional neon systems can use high-voltage transformers or power supplies. For technical context, IAEI explains that neon signs and skeleton tubing installations use a transformer or power supply to step voltage up to a high level. Read the IAEI neon transformer context.
Glass Neon Repair Path
First, check whether the sign has rigid glass tubes, visible bends, tube supports, or a transformer box. If you see cracked glass, loose tube supports, dark tube sections, or damage near the tube ends, do not handle the tube. Instead, take photos and ask a trained neon technician to review it.
| Sign type | What you may see | Common failure category | Safe user checks | Technician-only work | Replacement consideration |
|---|---|---|---|---|---|
| Traditional glass neon | Rigid glass tubes, visible bends, tube supports, transformer box, vintage bar sign, or storefront sign | Broken tube, transformer or power supply issue, electrode issue, wiring fault, or gas/tube problem | Look for visible cracks, broken supports, loose mounting, or outside damage without touching damaged parts | Tube repair, gas filling, electrode work, transformer work, exposed wiring, and energized diagnostics | Consider replacement when the tube is broken, matching is difficult, access is poor, or repeated failures cause downtime |
LED Neon Repair Path
Next, check whether the sign has a flexible or molded light line, an adapter, a controller, a remote, or a low-voltage label. If the sign uses LED neon, start with the outside power path. However, do not open sealed parts or rewire the sign unless a qualified person confirms that work is safe.
| Sign type | What you may see | Common failure category | Safe user checks | Technician-only work | Replacement consideration |
|---|---|---|---|---|---|
| LED neon flex / LED neon sign | Flexible silicone or PVC-style light line, adapter, power supply, controller, remote, or low-voltage label on some products | Adapter mismatch, controller issue, connector problem, damaged LED section, voltage drop, or cut-point issue | Check outlet, adapter label, controller, remote, outside plug, visible cable damage, and product label | Internal rewiring, sealed sign opening, soldering, power supply replacement without qualification, and building wiring issues | Consider replacement when sections are damaged, the sign is hard to match, or power/layout problems keep recurring |
Unknown Sign Repair Review
Finally, treat an unclear sign type as a review case. Take photos of the whole sign, the power label, the wiring path, and the damaged area. Then ask a technician or supplier to identify the product type before you choose repair, replacement, or a new LED neon format.
| Sign type | What you may see | Common failure category | Safe user checks | Technician-only work | Replacement consideration |
|---|---|---|---|---|---|
| Unknown or hybrid sign | Looks like neon, but the sign type is unclear | Unknown electrical or component fault | Photograph the sign, label, power supply, wiring path, and damaged area | Any internal work until a qualified person confirms the sign type | Ask for sign identification before choosing repair or replacement |
If your review points toward LED replacement instead of glass neon repair, compare LED neon light options and product formats before asking for supplier review.
Safe Neon Light Repair Checks Before Calling a Technician
The safe neon light repair checks below are non-invasive. They help you describe the issue; they do not turn the sign into a DIY electrical repair project.
Because electrical faults can create shock, fire, and burn risks, keep the checks simple. For general safety context, see the OSHA electrical overview. Also, OSHA’s work-practice rule says only qualified persons may work on electric circuit parts or equipment that have not been deenergized under the required procedures. Read OSHA 1910.333.
Power, Adapter, and Controller Checks
First, check the power path from the outside. Then record what you find so a technician or supplier can understand the failure without asking you to open the sign.
| Situation | User-safe action | Stop-and-call-a-pro trigger | Why it matters |
|---|---|---|---|
| Sign does not turn on | Check whether the outlet, switch, plug, adapter, or power strip is active | Plug, cord, or sign body is damaged, hot, wet, or smells burned | The problem may sit outside the sign, but damaged electrical parts raise safety risk |
| LED neon sign uses an adapter | Compare the adapter label with the sign or product label, if visible | Label is missing, mismatched, overheated, modified, or unclear | LED products can fail or act strangely when power supply voltage or output does not match the product |
| Remote or controller does not respond | Replace remote batteries, check line of sight, and confirm the controller has power | Controller is hot, buzzing, wet, cracked, or wired into building power | Controller faults can look like sign faults |
Glass, Cable, and Sign-Type Checks
Next, look for clear damage without touching broken parts. However, stop as soon as the check would require opening the sign, moving broken glass, or touching exposed wiring.
| Situation | User-safe action | Stop-and-call-a-pro trigger | Why it matters |
|---|---|---|---|
| Only one section is dim or off | Take photos of the lit and unlit sections; note where the failure starts | Glass is cracked, cable is exposed, or the section sits inside a sealed sign | Partial failure can come from connection, power, LED segment, tube, or transformer issues |
| Glass tube is cracked or broken | Keep people away from the damaged area and document it with photos | Any crack, broken tube, loose glass, exposed electrode, or damaged tube area | Traditional neon tube work is not a user-level repair |
| Sign flickers or buzzes | Note whether flickering is constant, intermittent, or linked to a switch or outlet | Burning smell, heat, buzzing transformer, sparks, or building wiring concern | Flickering can point to power, wiring, transformer, controller, or component issues |
| Sign type is unclear | Photograph the sign, power label, wiring path, mounting, and damage | Any internal access would be needed to identify it | Sign identification should come before repair decisions |
Neon Light Repair Troubleshooting by Symptom
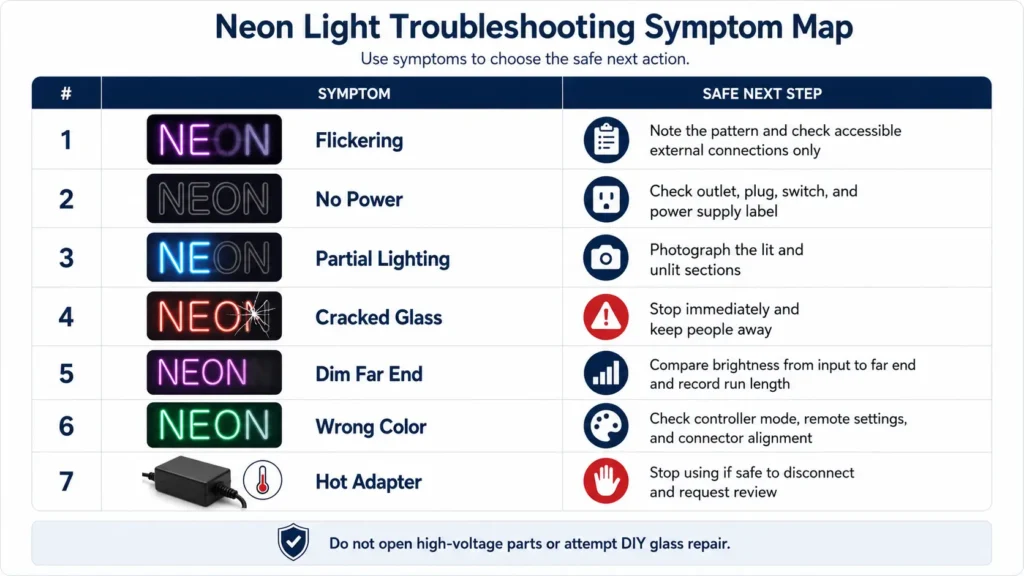
Use this neon light repair troubleshooting section to organize the issue before contacting a technician or supplier. It is not a final diagnosis. Also, it does not replace qualified electrical inspection.
No Power or Flicker Issues
First, separate power-path symptoms from physical damage. Then take clear photos or a short video before the symptom changes.
| Symptom | Likely category | Safe first check | When to stop | What to photograph |
|---|---|---|---|---|
| No light at all | Outlet, plug, adapter, transformer, controller, broken circuit, or internal fault | Check the outlet, switch, plug, power strip, adapter label, and controller status | Stop if you notice heat, burning smell, visible damage, water exposure, or unknown wiring | Whole sign, plug or adapter, power label, controller, and mounting area |
| Flickering light | Loose outside connection, weak power supply, controller issue, voltage drop, transformer issue, or building wiring issue | Note when flickering happens and check accessible outside connectors only with power off and only where you can reach them without opening the sign | Stop if flickering comes with buzzing, heat, burning smell, damaged cable, or transformer noise | Short video of flicker, power supply label, and connection points |
Dim or Dark Section Issues
Next, check whether the issue affects one section or a full run. However, keep the check visual and do not open sealed parts.
| Symptom | Likely category | Safe first check | When to stop | What to photograph |
|---|---|---|---|---|
| One section is dark | LED section issue, connector or cut-point issue, damaged tube, wiring break, or transformer/tube loading issue | Identify whether the dark area starts at a connector, bend, cut point, or glass tube section | Stop if the dark area sits on cracked glass, inside a sealed body, or near exposed wiring | Lit/dark boundary, close-up damage, and back of sign |
| Sign is dim at the far end | Voltage drop, long run, weak power path, weak power supply, aging tube, or layout issue | For LED neon, compare brightness near input and at the far end; then collect run length and power label | Stop if you need to open the sign, rewire it, or inspect building wiring | Full run, power input point, far-end dim area, and label |
Color and Glass Damage Symptoms
Next, check whether the issue points to a control setting or a glass break. However, stop immediately if the sign has cracked glass or exposed parts.
| Symptom | Likely category | Safe first check | When to stop | What to photograph |
|---|---|---|---|---|
| LED neon shows wrong color | Controller, remote, channel mismatch, connector pin alignment, or RGB/RGBW path issue | Check remote settings, controller mode, and visible connector alignment if accessible with power off | Stop if internal wiring or sealed sections must be opened | Controller, remote, connector area, and wrong-color section |
| Glass tube is cracked | Physical breakage, tube failure, or mounting damage | Do not handle the tube; keep the area clear and document the damage | Stop immediately; ask for qualified glass neon repair or replacement review | Overall sign, close-up crack, mounting supports, and transformer area from a safe distance |
Adapter Heat and Repeat Faults
Finally, review power-supply stress and repeat failure patterns. Because repeated symptoms can hide a deeper power or layout issue, record the history before the next review.
| Symptom | Likely category | Safe first check | When to stop | What to photograph |
|---|---|---|---|---|
| Adapter or power supply is hot or buzzing | Power supply fault, overload, mismatch, wiring issue, or age-related failure | Stop using the sign if you can disconnect it safely without touching damage | Stop immediately if heat, smell, swelling, buzzing, or discoloration appears | Adapter label, sign label, cable path, and discoloration |
| Issue repeats after previous repair | Underlying power, layout, tube, installation, connector, or environment issue | Record the repair history and failure pattern | Stop if repeated failures involve electrical parts or glass damage | Previous repair area, power label, and installation environment |
Neon Light Repair for Traditional Glass Neon
Traditional glass neon light repair can work in some cases. However, the repair work is specialized. Broken glass tubes, gas or tube work, transformer problems, electrode issues, exposed wiring, and high-voltage checks need a trained neon technician.
For a business or facility team, the safer role is simple documentation. First, take a photo of the whole sign. Next, take close-up photos of cracks, dark sections, broken supports, or loose mounting. Also, photograph the transformer or power supply label only if you can see it safely.
- Note whether the sign is wall-mounted, window-mounted, ceiling-hung, or built into a larger structure.
- Record whether the sign failed suddenly, flickered first, dimmed over time, or broke during handling or transport.
- Then share the photos and notes with the technician or supplier who will review the next step.
Finally, do not try to seal a glass tube, refill gas, replace a transformer, splice wiring, or test exposed parts. Those actions can create shock, fire, glass, and installation risks.
LED Neon Light Repair Checks
LED neon light repair usually gives buyers more visible checkpoints before escalation. However, that does not make every problem DIY repairable. Keep checks external unless the product manual, supplier, or qualified technician confirms otherwise.
For LED neon, start with the power path. First, check whether the outlet works. Next, check whether the adapter or power supply connects firmly. Then compare the adapter output with the product rating, if both labels are visible.
- Also check whether the controller or dimmer has power.
- Next, replace the remote battery if the remote does not respond.
- Then look for loose or damaged outside connectors, with power off and only where you can reach them without opening the sign.
- Finally, look for visible cable damage, water exposure, crushing, cuts, or burn marks.
For LED strip-based or LED neon systems, use the product label and matched power supply as the first reference. If the product uses low-voltage DC, use a compatible power supply with output that matches the product rating; do not connect low-voltage LED strips directly to wall power.
For LED neon products, review flexible LED neon flex specifications and power planning guidance before you choose a replacement power path.
Neon Light Repair or Replacement? Decision Matrix
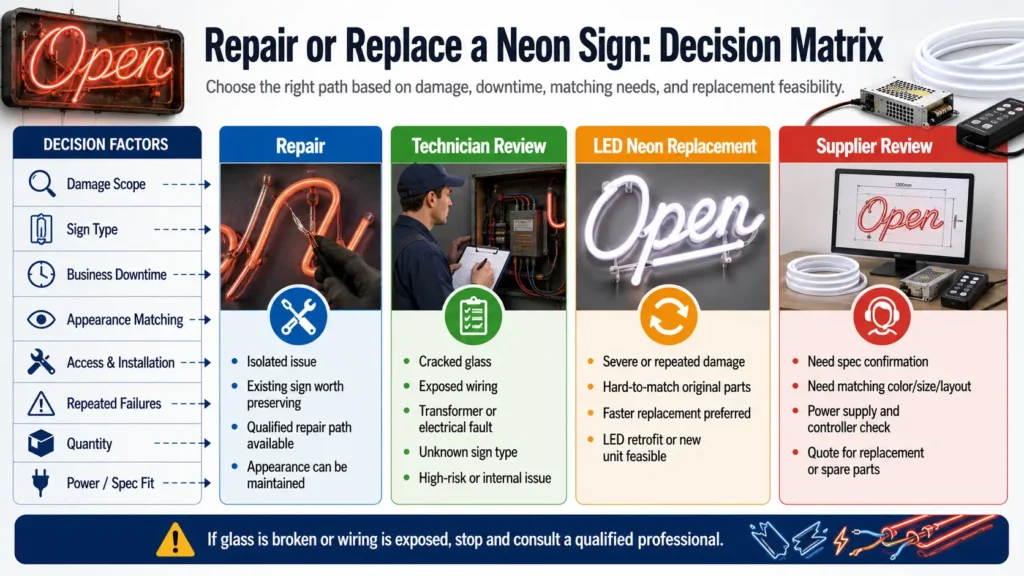
In a commercial neon light repair decision, repair can make sense when the issue is isolated, the sign has brand or historical value, and a qualified repair path exists. However, replacement can make sense when damage spreads, the sign is unsafe, downtime matters, matching is difficult, or repeated faults make another repair uncertain.
Do not base the decision only on the word “repair.” Instead, ask which path returns the sign to safe, useful service with acceptable downtime, appearance, and procurement risk.
Damage, Downtime, and Access Factors
First, review the damage and the business impact. Then collect the details below before you ask for repair or replacement help.
| Decision factor | Repair may make sense when | Replacement may make sense when | Information to collect |
|---|---|---|---|
| Damage scope | One known component or small area is affected and a trained person can inspect it safely | Glass is broken, multiple sections fail, wiring is damaged, or the fault is unknown | Photos of whole sign and damaged area |
| Sign type | A qualified local technician can service the glass neon or LED assembly | The sign type is unclear, obsolete, hard to access, or difficult to repair safely | Sign type, age if known, and label photos |
| Business downtime | The sign is not mission-critical or the repair timing fits the project | Downtime affects storefront visibility, event timing, venue operation, or brand display | Required date, operating hours, and urgency |
| Access and installation | The sign is easy to remove or service | The sign is high-mounted, built-in, sealed, outdoors, or hard to access | Mounting photos, installation height, and indoor/outdoor condition |
Quantity, Repeat Faults, and LED Power Fit
Next, review whether the issue affects one sign or a larger rollout. Also, check whether LED neon power and layout details may affect the replacement choice.
| Decision factor | Repair may make sense when | Replacement may make sense when | Information to collect |
|---|---|---|---|
| Appearance matching | Repair can preserve the existing look, color, and shape | Matching old glass, color, brightness, or a discontinued section is difficult | Desired color, photos when working, and brand requirements |
| Repeated failures | Failure is isolated and the cause is known | The same area, transformer, adapter, controller, or section fails repeatedly | Repair history, failure pattern, and previous parts replaced |
| Quantity | One sign needs review | Multiple signs need consistent appearance, spare units, or standard replacement | Quantity, locations, and rollout schedule |
| LED neon power/spec fit | Existing LED neon can use the right matched power path or accessory | The product is mismatched, damaged, underspecified, or no longer fits the use case | Voltage, watts per meter if known, run length, and controller type |
When replacement is the safer commercial path, use a glass neon vs LED neon comparison to compare repair limits, LED neon options, and project details needed for review.
Neon Light Repair Review: What to Prepare Before Asking for Help
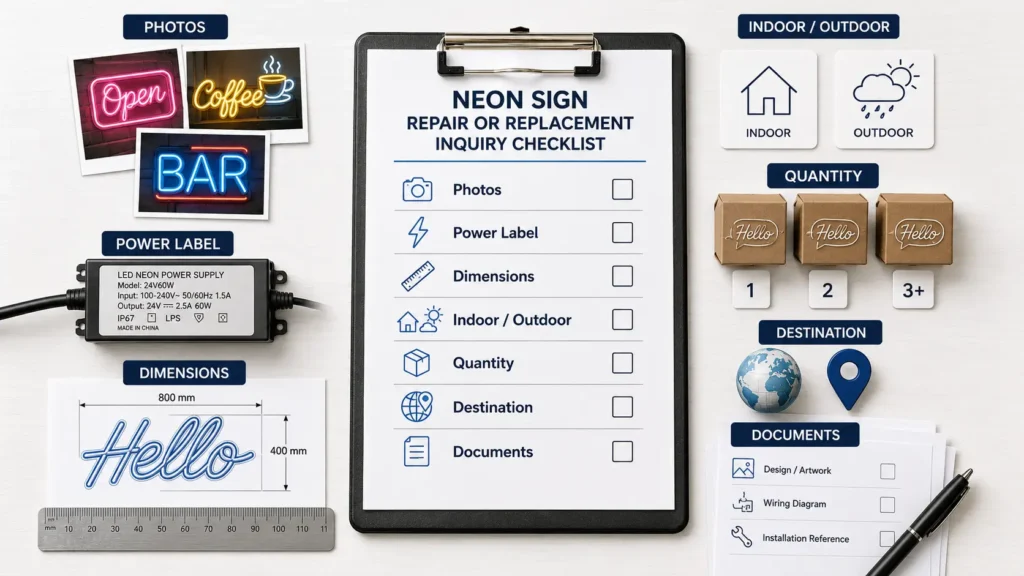
A clear neon light repair inquiry helps a technician or supplier decide what to check first. Also, it reduces back-and-forth when a single photo does not show the full issue.
Prepare the following details before you request help.
1. Photos and Video
- First, include a full front view of the sign.
- Next, include a back view if you can access it safely.
- Also include a close-up of the damaged or dark section.
- Then add a close-up of the power supply, adapter, transformer, or controller label.
- Finally, add a short video of flickering, dimming, color change, or repeat failure.
2. Sign Type and Condition
- State whether the sign is traditional glass neon, LED neon, or unknown.
- Also note indoor or outdoor use.
- Next, list the mounting style, such as wall, window, ceiling, shelf, cabinet, or storefront.
- Then describe cracks, loose mounting, water exposure, heat marks, discoloration, or cable damage.
- Finally, state whether the sign failed suddenly or gradually.
3. Dimensions and Matching Needs
- First, include the overall sign size.
- Next, include letter or shape dimensions if one section needs replacement.
- Also share the color or color-temperature target.
- Then describe brightness and matching needs.
- Finally, include brand, venue, or design limits that may affect replacement.
4. Power and Control Details
- First, share the voltage shown on the sign, adapter, power supply, or controller label.
- Next, list the controller type, dimmer, remote, RGB/RGBW, addressable, or single-color setup.
- Also include the number of runs or sections, if known.
- Then add the run length or layout sketch for LED neon or strip-based systems.
- Finally, note any recent changes to the power supply, controller, plug, or installation.
5. Commercial and Procurement Details
- First, share the quantity.
- Next, share the destination or delivery market.
- Also include the target use date.
- Then state whether you need repair, replacement, spare parts, or technical review.
- Finally, list any document needs and the contact person for technical questions.
FAQ: Neon Light Repair
Can a neon light be repaired?
Sometimes. First, identify whether the sign uses traditional glass neon or LED neon. Then check whether the issue is isolated and whether a qualified repair path exists. However, ask a trained technician to review broken glass, transformer faults, exposed wiring, and unknown electrical issues.
Is it worth repairing a neon sign?
It depends on the sign type, damage, access, downtime, matching needs, and repair path. For example, repair may make sense for valuable, custom, or vintage glass neon. However, replacement may work better when damage spreads, the sign repeatedly fails, or LED neon replacement fits the project requirements.
What happens if a neon sign breaks?
If a traditional glass neon tube breaks, stop using the sign and keep people away from the damaged area. Next, document the damage with photos. However, do not handle broken glass, exposed electrodes, wiring, transformers, or tube parts. Instead, contact a qualified neon technician or supplier for review.
How do you fix an LED neon light that is not working?
First, run non-invasive checks: outlet, plug, adapter or power supply label, controller, remote battery, visible cable condition, and outside connectors, with power off and only where you can reach them without opening the sign. Then, if the product uses low voltage, confirm that the power supply output matches the product rating. However, do not open sealed parts, rewire, solder, or replace internal parts unless qualified.
How can I tell whether my sign is glass neon or LED neon?
Traditional glass neon usually has rigid glass tubing, tube supports, and a transformer or power supply. In contrast, LED neon usually has a flexible or molded diffuser body, an LED-based light path, an adapter, a controller, or a low-voltage power supply. If the sign type remains unclear, take photos and ask a technician or supplier before choosing a repair path.
What safe checks can I do before calling a technician?
First, check whether the outlet works. Next, check whether the plug or adapter connects firmly. Also, check whether the controller or remote has power and whether labels are visible. However, stop if you see cracked glass, exposed wiring, heat, smell, buzzing, water exposure, or any need to open the sign.
How much does neon light repair cost?
Repair cost varies by sign type, damage, access, parts, technician availability, and inspection needs. Therefore, this article does not use fixed price ranges. Instead, compare repair cost with downtime, matching needs, and replacement feasibility for the specific sign.
What should I prepare before asking for repair or replacement help?
First, send clear photos, a short symptom video, sign type, power label, dimensions, installation environment, damage details, quantity, destination, and matching needs. Also, for LED neon or strip-based systems, include voltage, run length, controller type, and a layout sketch when available.
Need Help After Neon Light Repair Checks?
After the first neon light repair checks, you may find that the sign is LED neon or that LED neon replacement is a better path for a broken or hard-to-repair sign. In that case, prepare photos, labels, dimensions, installation details, quantity, and matching needs before you request review.
For traditional glass neon damage, contact a qualified neon technician. For LED neon replacement or specification review, share the prepared details through the contact page so the sign type, power requirements, layout, and replacement feasibility can be reviewed before the next step.

 English
  Spanish
  French
  Arabic