

Connecting several LED strip runs to one power source is possible, but the layout needs more than simply joining every strip end-to-end.
Before wiring, check the strip voltage, total wattage, power supply capacity, controller rating, wire length, and layout. These details decide whether you can use a simple splitter, a distribution block, power injection, or separate power zones.
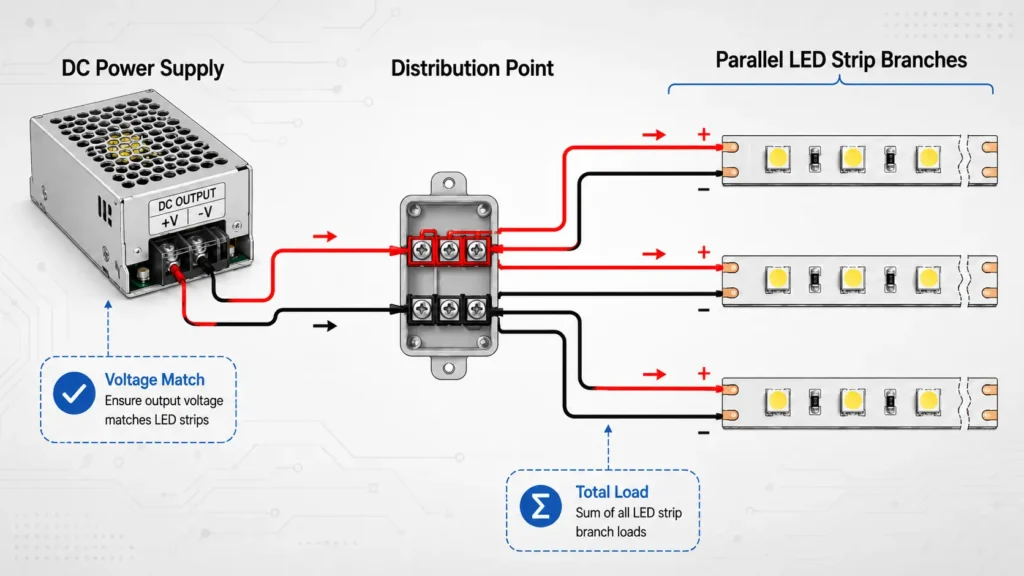
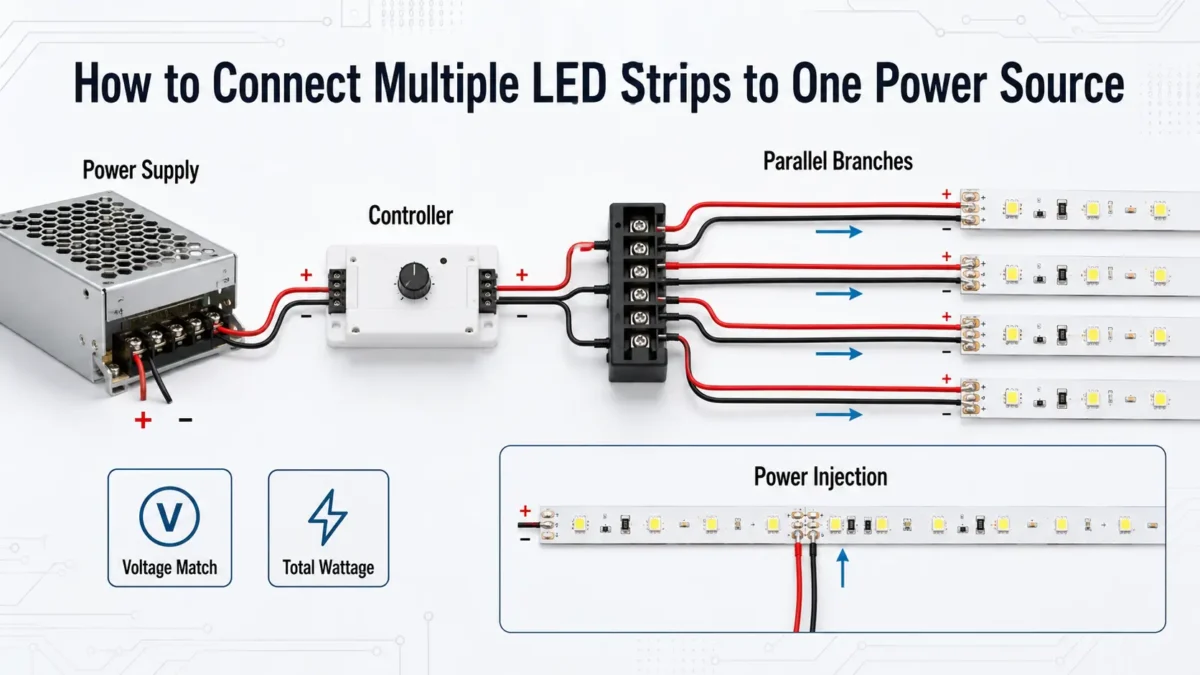
Yes, you can connect multiple LED strips to one power source if the strip voltage matches the power supply and the combined wattage stays within the power supply, controller, and wiring limits. For most multi-strip layouts, use parallel branches instead of one long daisy-chain, and check voltage drop on longer runs.
Do these checks before choosing connectors or cutting strip sections.
| Check | Why It Matters | What to Prepare |
|---|---|---|
| Strip voltage | The power supply output must match the strip voltage. | 12V, 24V, or the voltage marked on the strip/spec sheet |
| Watts per meter | This is needed to calculate total load. | W/m value from the strip label or datasheet |
| Total strip length | More length means more total wattage. | Length of each run, not only total roll length |
| Controller type | RGB, RGBW, dimming, and smart systems may be limited by controller/channel rating. | Controller model and rated output |
| Layout distance | Long runs and long feed wires may increase voltage drop. | Layout sketch with distances from power supply |
If any of these details are missing, treat the wiring plan as incomplete. A connector can physically join strips, but it does not confirm that the power supply or controller can handle the load.
Different layouts need different connection methods. The right choice depends on total load, strip distance, controller use, and how easy the installation needs to be serviced later.
| Method | Best For | Watch Out For | Needs Technical Review? |
|---|---|---|---|
| LED strip splitter | Short, simple branches from one power supply | Splitter and supply still need enough current capacity | Sometimes |
| Terminal block or distribution block | Multiple branches that return to one supply area | Wiring must be organized and rated for the load | Often |
| Soldered joints | Permanent custom layouts | Harder to revise later; workmanship matters | Sometimes |
| Clip-on connectors | Fast low-current or prototype layouts | May not suit all strip types or environments | Sometimes |
| Power injection | Longer runs with far-end dimming risk | Total load still counts toward the power supply | Yes for complex layouts |
| Separate power zones | High-load or distant sections | Control synchronization and grounding need careful planning | Yes |
For a small cabinet, shelf, or display, a splitter may be enough if the load is low and the run is short. For longer architectural, signage, retail, or OEM layouts, a distribution-style layout is usually easier to calculate and troubleshoot.
Start with the strip load. Use the strip’s wattage per meter and the length of each run.
Basic formula:
Strip watts = strip length × watts per meter
Total load = watts from run 1 + run 2 + run 3...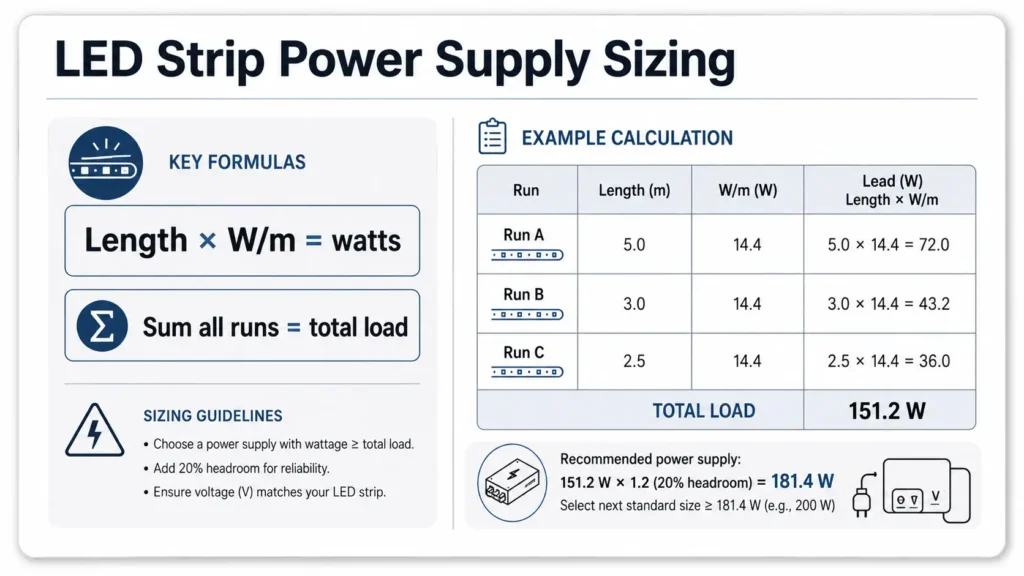
Then choose a matching-voltage power supply with enough usable capacity. Avoid planning a system that runs the power supply at its absolute maximum rating. A common planning approach is to leave margin, but the exact margin should follow the product specification and project requirements.
| Strip Run | Length | Strip Power | Run Load |
|---|---|---|---|
| Run A | 5 m | 10 W/m | 50 W |
| Run B | 3 m | 10 W/m | 30 W |
| Run C | 2 m | 10 W/m | 20 W |
| Total | 10 m | — | 100 W |
In this example, the connected LED strip load is 100 W. The power supply should match the strip voltage and provide more than the calculated strip load, with planning margin. Do not choose the power supply by strip count alone. Two short strips may draw less power than one long high-output strip.
For more detail on power supply sizing, see ElstarLED’s guide to how many LED strip lights can run on one power supply or review available LED power supply options.
Many users say “series” when they mean connecting strips end-to-end. For LED strip projects, the practical question is usually whether to run one long chain or create separate branches from the power source/distribution point.
For most multi-strip layouts, parallel branches are usually easier to size and help reduce uneven brightness risk.
| Layout | How It Works | Benefit | Risk |
|---|---|---|---|
| One long daisy-chain | Strip sections connect end-to-end | Simple physical connection | Far-end dimming and voltage drop can be more likely on longer runs |
| Parallel branches | Each strip run connects back to a power distribution point | Easier to calculate each branch and troubleshoot | Requires more wiring organization |
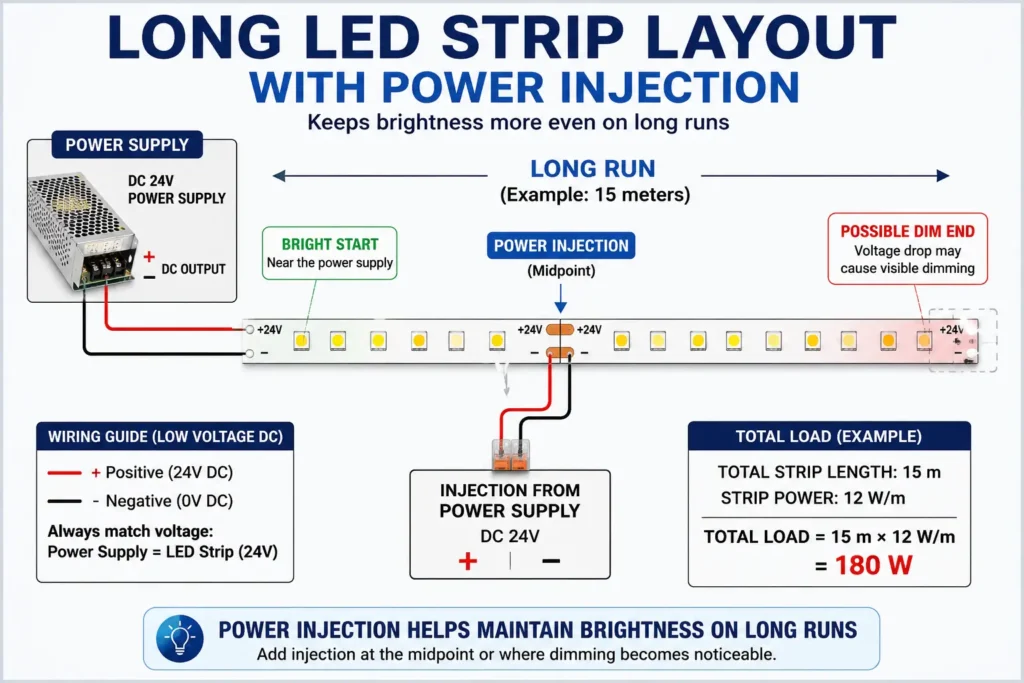
| Power injection | Extra low-voltage feed points are added along a run | May reduce dimming on long runs | Must still count total load and wire correctly |
| Separate zones | Different sections use separate power supplies or control zones | Useful for high-load or distant layouts | Needs careful control and wiring planning |
A simple rule for planning: do not judge the layout only by whether the connector fits. Check where the current flows, how long the path is, and whether the voltage at the far end will remain suitable for the strip.
Use this workflow for the low-voltage side of the project. If the work involves AC mains wiring, building wiring, or local electrical-code decisions, use qualified electrical support.
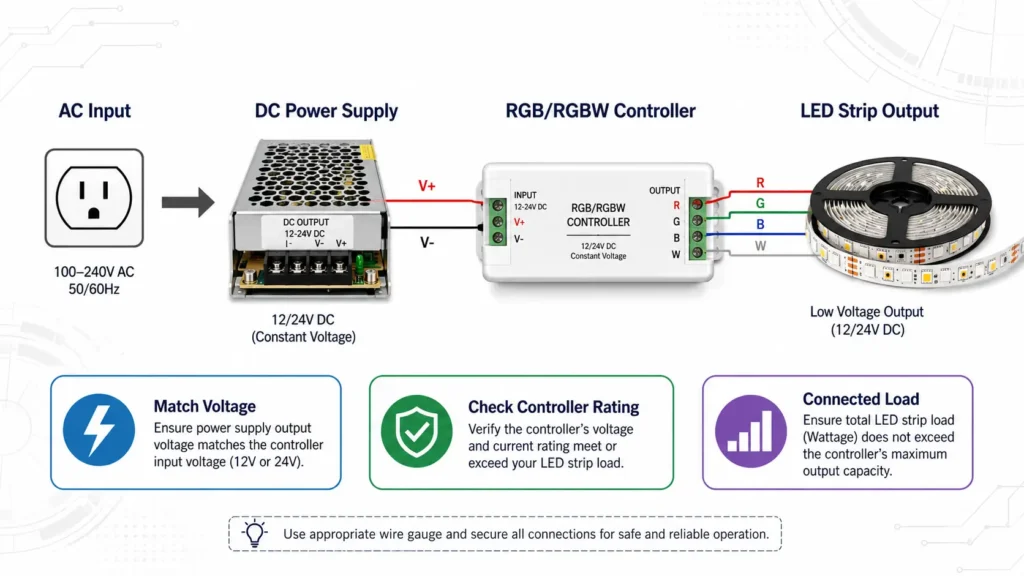
Check whether the strip is 12V, 24V, or another rated voltage. The power supply output voltage should match the strip rating.
Do not connect a low-voltage LED strip directly to a wall outlet. Use a matched power supply between the AC source and the low-voltage LED strip system.
Calculate each run separately, then add them together.
Run load = length × watts per meter
Total load = all run loads added together
For RGB, RGBW, or high-output strips, use the rated maximum load from the strip specification, not a visual estimate.
Choose a power supply with the correct voltage and enough capacity for the total load, with planning margin. If the total load is close to the supply rating, revise the layout, select a larger suitable supply, or split the project into zones.
If the strip is controlled by an RGB controller, RGBW controller, dimmer, smart receiver, or amplifier, check that device’s output rating. The power supply may be large enough while the controller is not.
For multiple strips, plan separate branches from a power distribution point where practical. Label positive and negative lines clearly. Keep polarity consistent.
Test each run or zone before loading the full system. If one section is dimmer, flickers, or heats abnormally, stop and review the wiring, load, and connection quality before continuing.
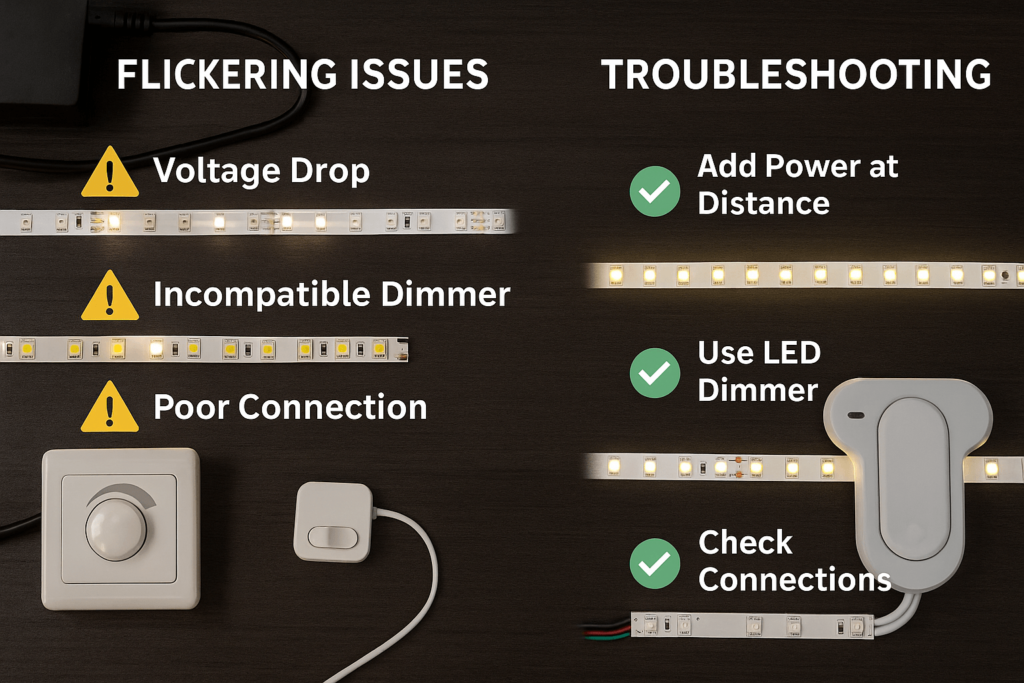
Voltage drop happens when the voltage reaching the LED strip is lower than intended. In LED strip projects, it can show up as dimmer LEDs farther from the power source, uneven color, or inconsistent brightness across a long run.
Voltage drop depends on several factors:
Power injection can help some long-run layouts by adding another low-voltage feed point. It does not reduce the total power required. Every powered section still counts toward the total load of the supply or supplies used.
| Symptom | Possible Cause | What to Check | Next Step |
|---|---|---|---|
| Strip is dim at the far end | Voltage drop | Run length and feed distance | Shorten branches or consider power injection |
| Color shifts on RGB/RGBW strip | Uneven voltage across channels | Controller output and wiring layout | Check controller rating and feed points |
| Power supply runs near limit | Undersized supply or too many strips | Total watts | Choose a supply with planning margin or split zones |
| Connector feels loose | Poor connection | Connector type and fit | Reconnect, solder, or use a suitable terminal method |
| One branch works, another fails | Polarity or branch wiring issue | Positive/negative wiring | Test one branch at a time |
Avoid guessing exact distance limits without the strip specification, wire information, and installation layout. For long commercial or custom projects, send a layout sketch for review before installation.
A power supply is not the only device that can limit the system. If the strips use a controller, dimmer, amplifier, or receiver, that device also has a maximum output rating.
Check these items before connecting multiple controlled strips:
| Item | What to Check | Why It Matters |
|---|---|---|
| Controller voltage | Must match strip voltage | A mismatched system may not operate correctly |
| Output current or wattage | Must support the connected load | The controller can be overloaded even if the power supply is large enough |
| Channel rating | Important for RGB/RGBW strips | Each color channel may have its own limit |
| Strip type | Single color, CCT, RGB, RGBW, addressable | Wiring and control method can differ |
| Amplifier need | Long or high-load controlled zones | May be needed depending on system design |
For controlled systems, think of the connection order like this:
Power source / AC input → DC power supply → controller or dimmer → LED strip branchesThat is a simplified planning view. The actual wiring should follow the product instructions for the specific power supply, controller, and strip model.
For controlled projects, review available LED strip controllers and amplifiers and match the controller rating to the strip load.
One power supply may not be the right choice for every project. High-load systems, distant zones, or complex controlled layouts may be easier to manage with separate power zones.
Consider splitting the system when:
Be careful with multiple power supplies. Do not assume two power supply outputs can simply be tied together. For complex layouts, keep zones clearly separated or follow a design reviewed for the specific products being used.
A connector may physically fit while the voltage does not match. Always check the strip voltage and power supply output.
The number of strips is not enough. Calculate the wattage of each run and add them together.
A long end-to-end chain may be simple, but it can increase voltage-drop risk. Parallel branches or power injection may be better for longer layouts.
A controller or dimmer can become the limiting part of the system. Check its output rating before adding more strips.
Indoor, outdoor, cabinet, signage, retail, and OEM applications can have different connector, enclosure, and maintenance needs. Do not use one layout as a universal answer.
For multi-run projects, even a simple sketch helps confirm strip length, feed points, controller placement, and supply location.
Yes, if the strip voltage matches the power supply and the combined load stays within the power supply, controller, and wiring limits. For most multi-strip layouts, plan parallel branches instead of one long chain.
It depends on the wattage of each strip run, not only the number of strips. Calculate length × watts per meter for every run, add the results, then choose a matching-voltage power supply with planning margin.
For most multi-strip layouts, parallel branches are usually preferred because each run can be calculated and fed more directly. Many “series” questions actually refer to daisy-chaining strips end-to-end, which can increase voltage-drop risk on longer runs.
Check the voltage and wattage of all four strips first. Then calculate total load, choose a matching power supply, and connect the strips through a suitable parallel distribution method, splitter, or terminal/distribution block depending on the layout.
Sometimes, but the controller rating matters. Check the controller’s voltage, total output rating, and channel limits. For RGB/RGBW strips, each channel rating may affect how many strips can be connected.
Far-end dimming often points to voltage drop, especially on longer runs or long feed wires. Check total load, branch length, connection quality, and whether power injection or a different layout is needed.
Separate power supplies may be useful for high-load or distant-zone layouts, but the design needs care. Do not assume power supply outputs can be tied together unless the system is specifically designed for that. Keep zones clear and request technical review for complex layouts.
Generally, no. 12V and 24V LED strips are designed to work with a matched low-voltage DC power supply between the wall power source and the strip. AC-side wiring and local electrical requirements should follow the installation rules in your area.
Send the strip voltage, watts per meter, total length, number of runs, layout sketch, controller type, indoor/outdoor environment, quantity, and destination. These details help the supplier check power, connection method, and accessory requirements.
Before asking for a recommendation or quote, prepare:
This helps avoid vague recommendations. It also makes it easier to identify whether the project needs a larger power supply, more than one power zone, a controller/amplifier, or a different wiring layout.
For a multi-strip LED project, prepare the strip voltage, watts per meter, total length, layout sketch, controller type, installation environment, quantity, and destination.
Send those details to ElstarLED for a project-specific power and connection review. The recommendation depends on the actual strip model, power supply, controller, wiring distance, and installation conditions.
Contact ElstarLED for project support.