

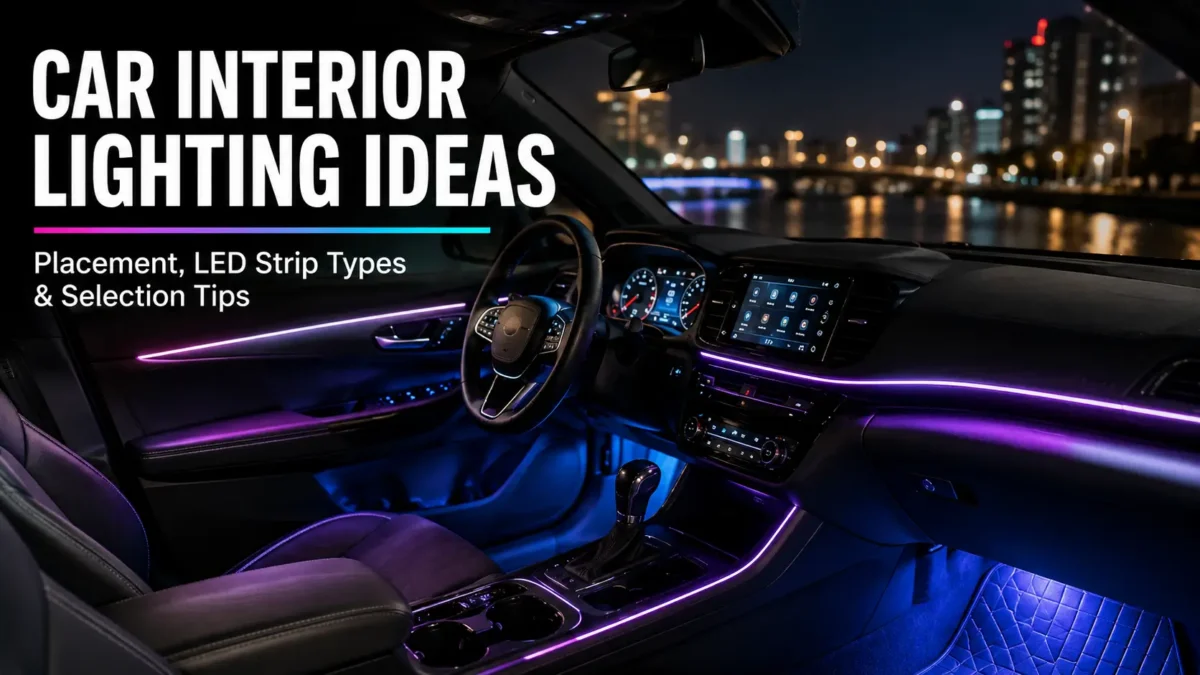
First, choose the cabin zone. Footwell lights give a soft glow, while dash and door-trim lines give a clean ambient look. Next, match the look with the right strip type, voltage, and control unit. Finally, check the mount surface, wire path, brightness, and local rules before you buy or install.
First, plan where the light will go. A strip that looks clean along the dash may not work as well near pedals, seat rails, door gaps, or cup holders.
Next, answer three simple questions:
For deeper product-choice background, use a related car LED strip guide as extra reading. However, keep this page focused on ideas, light effects, and planning checks rather than another broad car LED strip guide.
Use this table as a quick guide. Instead of choosing the brightest option first, match each cabin zone with the look, install effort, and control type you need.
| Cabin area | Light idea | Look | Install effort | Strip/control note | Caution |
|---|---|---|---|---|---|
| Footwell | Soft under-dash glow | Subtle cabin feel | Low to medium | Single-color, RGB, or app control may work, depending on layout | Avoid glare near pedals or the driver’s view |
| Dash edge | Thin ambient line | Factory-style accent | Medium | Diffused or COB-style strips may reduce visible LED dots | Check the mount surface and windshield reflection |
| Door trim | Side-line ambient light | Clean cabin outline | Medium | Flexible strip or fiber-style trim may fit narrow gaps | Door movement and wire path matter |
| Center console | Accent around storage or controls | Focused detail light | Low to medium | Short strip sections or small light modules may be enough | Do not cover controls or vents |
| Under-seat | Hidden rear cabin glow | Soft indirect light | Medium | Strip length and cable path matter | Keep wires away from seat tracks and moving parts |
| Cup holder / small trim | Small highlight zones | Small style detail | Low | Small modules or short strips may fit better than long strips | Avoid exposed LEDs that look harsh |
| Trunk / cargo area | Utility light | Better view when loading | Medium | Brightness and switch/control method matter | Avoid loose wires or weak mounting |
| Headliner / star style | Ceiling light effect | Show-style cabin | High | This is usually different from a basic strip-light job | Skill and planning matter |

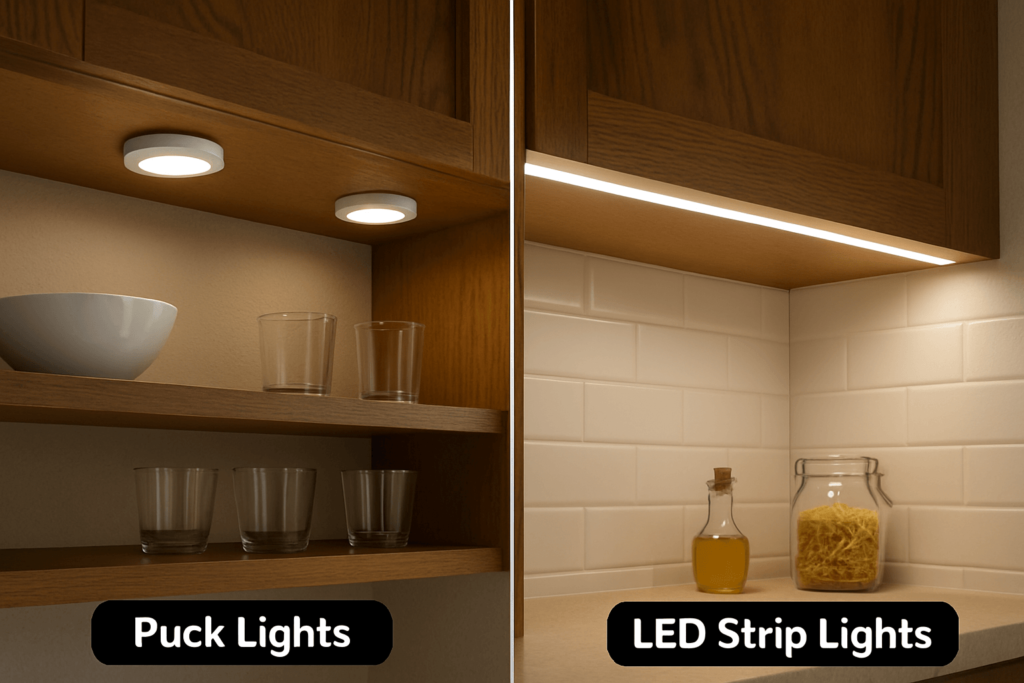
As a rule, a clean cabin look comes from hiding the light source and showing the glow. Therefore, footwells, door gaps, trim edges, and console recesses often look neater than exposed strips in open view.
Different ideas need different strip and control choices. For example, a basic LED strip may be enough for a simple glow. However, moving color effects may need RGB, RGBIC, or addressable parts that match the control unit.
| Option | Typical look | Control needs | Useful for | Choice question |
|---|---|---|---|---|
| Single-color LED strip | Simple, steady glow | Basic switch or dimmer | Footwell, trunk, utility light | Do you only need one color and simple control? |
| RGB LED strip | Color-changing glow | RGB controller | Footwell, console, door accent | Do you need color choice without complex zone effects? |
| RGBIC / addressable strip | Moving multi-color effects | Matching addressable control unit | Show-style cabins, multi-zone accents | Does the control unit match the strip type, voltage, and protocol? |
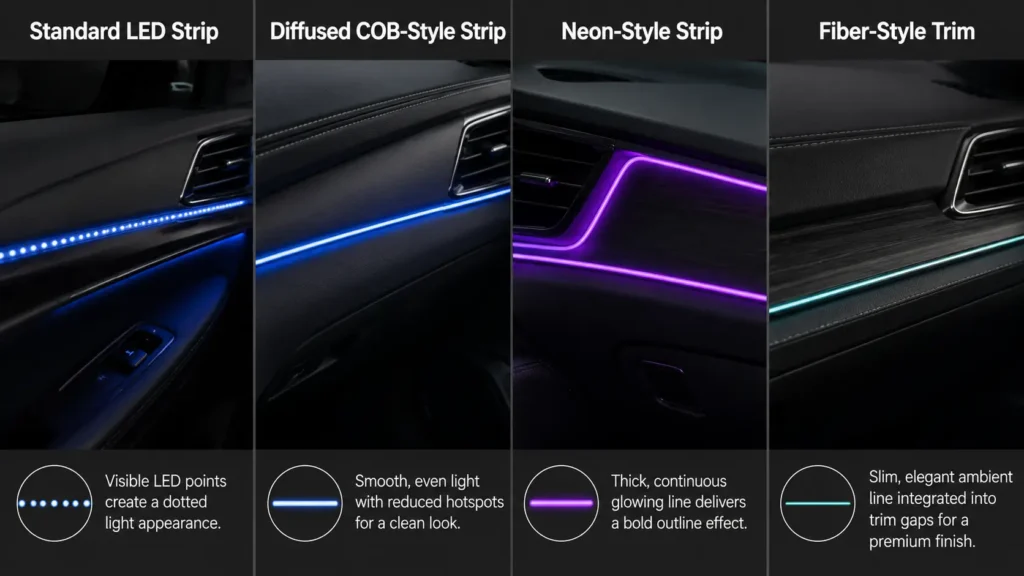
| COB / diffused-style strip | Smoother light line, fewer visible dots | Depends on product format | Dash lines, door trim, clean ambient look | Do you need a smoother line rather than visible LED points? |
| Neon-style flexible strip | Thicker continuous glow | Matching power/control setup | Trim outlines, strong visual accents | Does the bend radius and space fit the cabin? |
| Fiber-style ambient trim | Thin line effect | Dedicated control unit or light source | Door and dash ambient lines | Can the trim fit cleanly in the target gap? |
More features are not always better. For instance, more zones, moving colors, and app control can improve the look. However, they can also add more wires, setup steps, and test work.
Before choosing a strip type, confirm voltage, control fit, color mode, strip length, mount surface, brightness level, and whether the strip will be visible or hidden. Then, compare product pages such as COB LED strips, addressable LED strips, LED neon lighting, and LED strip controllers only after your layout is clear.
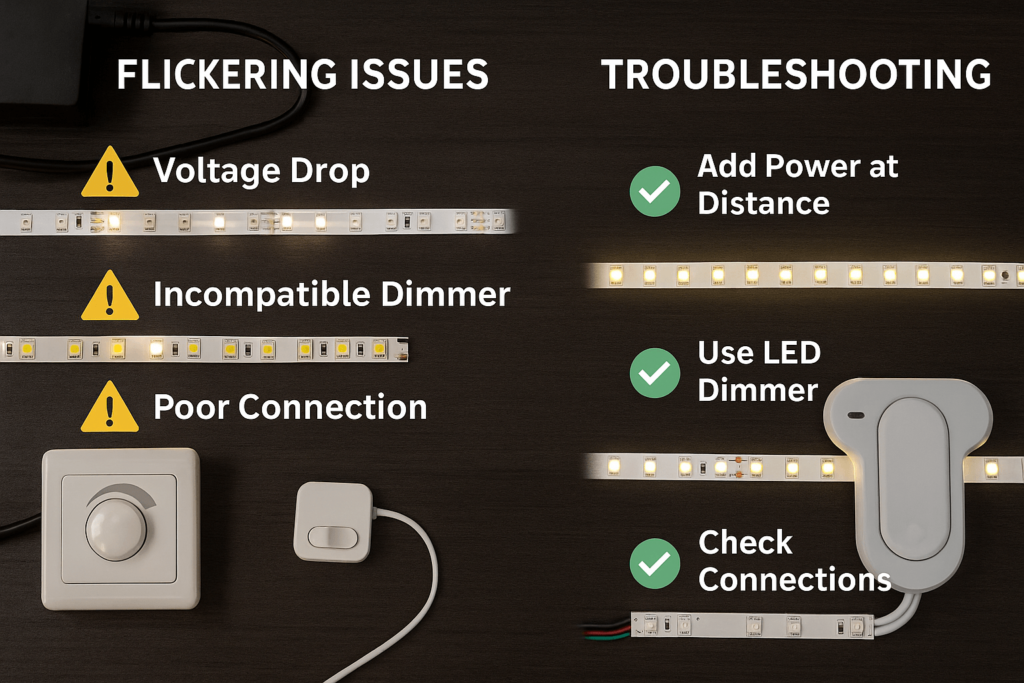
Interior lighting problems often come from parts that do not match or from rushed planning. Therefore, check the points below before buying or installing.
| Check item | Why it matters | Safe planning note |
|---|---|---|
| Voltage | Strip, control unit, and power source must match | Do not assume all LED strips use the same voltage |
| Control type | RGB, RGBIC, addressable, and single-color systems use different controls | Choose the control unit after you confirm strip type |
| Strip length | Long or short runs affect layout and power planning | Measure each cabin area before ordering |
| Wire route | Wires may pass around trim, doors, seats, or console areas | Keep wires away from moving parts |
| Mount surface | Adhesive may not hold well on dusty, rough, curved, or hot surfaces | Clean and test the surface first |
| Brightness | Too much brightness can distract inside a cabin | Use dimming where possible |
| Heat and cover | Tight spaces may affect mounting and look over time | Avoid enclosing strips without checking product guidance |
| Local rules | Color, flashing, outside view, and road use may be limited | Check local rules before road use |
| Access for repair | Hidden installs can be harder to fix | Leave a practical way to inspect or replace parts |

This page is not a detailed vehicle wiring guide. Instead, treat it as a planning aid. Wiring details depend on the vehicle, power source, and lighting product. If the install affects the vehicle electrical system, use product instructions and vehicle-specific guidance, or work with a qualified installer.
For general technical background, use DigiKey LED Basics for voltage ideas, DigiKey’s guide to addressable LEDs for control and protocol context, and Adafruit’s NeoPixel powering guide for power notes.
Interior lights should improve the cabin, not pull the driver’s eyes away from the road. Therefore, avoid lights that shine into the driver’s eyes, reflect on the windshield, flash while driving, copy emergency-style lights, block controls, or leave loose wires near moving parts.
Also, check local rules before using interior lights while driving, especially for visible, flashing, red, blue, or emergency-style effects. As a result, you should treat legal and safety points as items to verify, not as one-size-fits-all claims.
For background, the NHTSA distracted-driving resource supports the attention and distraction boundary. In addition, an official vehicle-lighting restriction example shows why color, flashing, and outside view may need review. However, it should not be used as a rule for every place.
For a simple personal upgrade, you may only need a kit that fits your cabin. However, for sourcing, resale, install work, or custom project review, prepare more details before asking for price, samples, or docs.
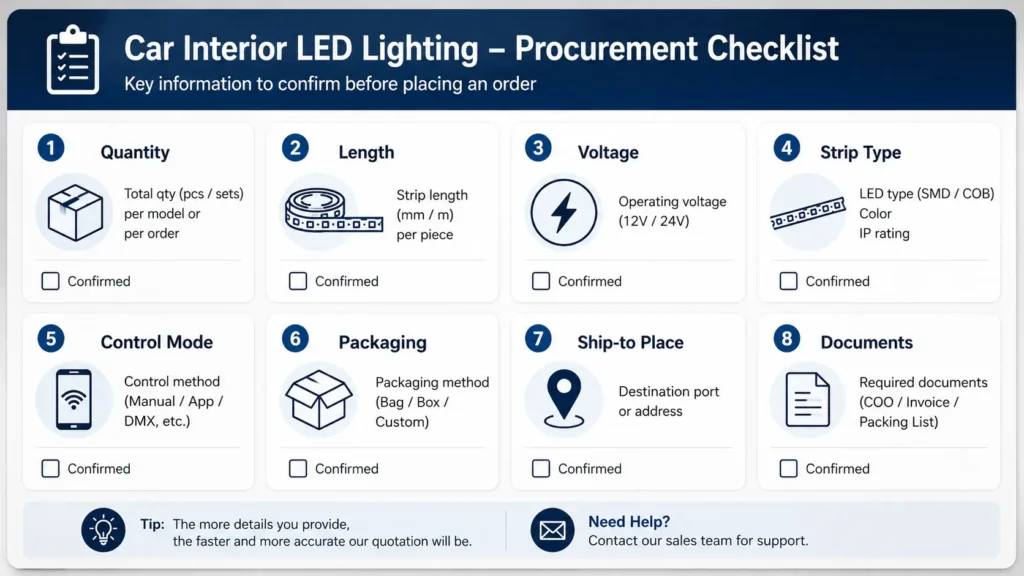
| RFQ item | What to prepare | Why it helps |
|---|---|---|
| Use area | Car cabin, footwell, door trim, dash, console, trunk, or other area | Helps define strip type and mount needs |
| Quantity | Estimated order or project quantity | Helps the supplier understand scale |
| Length | Needed length per zone or per vehicle | Helps avoid shortage or waste |
| Strip type | Single-color, RGB, RGBIC/addressable, COB/diffused, neon-style, or fiber-style | Helps match the target look |
| Voltage | Required voltage or system voltage if known | Helps prevent mismatched parts |
| Color/control mode | Single color, RGB, app control, remote, music sync, multi-zone | Helps define control needs |
| Control needs | Remote, app, switch, dimmer, addressable control unit, or other | Helps clarify control fit |
| Install area | Hidden trim, exposed strip, curved surface, under-seat, door area | Helps spot mount risks |
| Sample need | Whether samples are needed before a larger buy | Helps confirm look and fit |
| Packaging | Bulk, retail box, private-label pack, or installer pack | Helps sales planning |
| Ship-to place | Country, region, or delivery destination | Helps quote and shipping review |
| Docs | Datasheet, install guide, test docs, or compliance docs if needed | Helps clarify what must be checked before purchase |
Finally, keep this checklist generic unless the supplier confirms product scope, docs, MOQ, lead time, warranty, and compliance evidence. If a project needs custom review, use the LED strip customization page as a place to discuss needs, not as proof of any unverified claim.
Good ideas include footwell glow, dash ambient lines, door-trim accents, console light, under-seat glow, cup-holder accents, trunk light, and headliner-style effects. First, choose the look you want. Then, check strip type, voltage, control unit, brightness, and install effort.
Common planning areas include the footwell, dash edge, door trim, center console, under-seat area, trunk, cargo space, cup holders, and narrow trim gaps. However, the right place depends on cabin layout, mount surface, wire path, and whether you want a soft glow or a stronger style effect.
Warm white, soft white, ice blue, amber, and low-brightness single-color effects often look cleaner than harsh flashing or very strong colors. Also, for a cleaner style, hide the light source and show the glow. Still, the final color depends on the cabin color and personal taste.
LED strip lights can work well for car cabins when the strip type, voltage, control unit, brightness, and mount method fit the use. For example, they can help with footwell glow, trim accents, console light, and cargo light. However, they may be a poor fit if they are too bright, poorly mounted, or placed where they distract the driver.
At a high level, plan the zones, measure strip length, confirm voltage and control fit, clean the mount surface, route wires away from moving parts, test the lights, and then adjust brightness. Also, follow product instructions and vehicle guidance for any electrical work.
Rules vary by location. Color, flashing pattern, outside view, and driver distraction can all matter. Therefore, avoid emergency-style colors or flashing effects, and check local rules before using interior lights while driving. This is general guidance, not legal advice.
The controller depends on the strip type and effect you want. For example, single-color strips may only need simple switching or dimming. RGB strips need a matching RGB control unit. Meanwhile, RGBIC or addressable strips need a control unit that matches the strip type, voltage, and protocol.
Include the use area, quantity, strip length, voltage, strip type, color/control mode, control needs, sample needs, packaging, ship-to place, and document needs. Also, do not assume MOQ, lead time, warranty, certificates, or vehicle fit unless the supplier confirms them.
Planning a car interior LED lighting project? First, prepare your target place, desired light effect, strip type, length, voltage, color/control mode, quantity, packaging needs, destination, and document needs. Then, contact a supplier with these details so the team can review the request with less back-and-forth.