

Do not rely on a product label alone. Although specification matters, the final appearance also depends on the actual box depth, diffuser, artwork, and viewing distance. For larger displays, a small test section can prevent a full-size mistake.
Cut, Connect, and Test Before Final Mounting
Finally, some LED strips are designed to be cut, but only at marked cut points. However, cutting at the wrong place can break the circuit or leave a section unusable. Before trimming a strip, check whether that strip is cuttable and where the cut marks are located.
Before final mounting, use this short check:
- Confirm the strip can be cut.
- Cut only at marked cut points.
- Check connector compatibility with strip width and pin layout.
- Test each strip section before installing it inside the frame.
- Test the power supply and controller before sealing the box.
- Leave access to parts that may need inspection or replacement.
- Avoid tight bends unless the strip design allows them.
- Keep wiring neat so it does not cast shadows or block the diffuser.
For mounting, adhesive may be acceptable for some temporary or lightweight projects, but the surface, strip weight, heat, and service time should be checked. However, for a larger display or repeated use, consider whether mechanical support, LED aluminum profiles, or service access are needed.
RFQ Checklist: What to Tell a Supplier
At this point, if you are asking a supplier for LED strip or lightbox display parts, give enough information for a practical recommendation. In most cases, “I need LED strip for a lightbox” is usually not enough.
Next, prepare these details:
| Detail | What to Provide |
|---|---|
| Display size | Outer size and illuminated area |
| Frame depth | Distance available between LEDs and diffuser |
| Lighting layout | Back-lit, edge-lit, perimeter strip, grid layout, or unsure |
| Strip length | Estimated total strip length needed |
| Color requirement | White CCT, RGB, RGBW, or fixed color |
| Brightness/control need | Fixed output, dimming, remote control, or controller requirement |
| Power preference | Voltage preference if already known |
| Diffuser material | Acrylic, fabric, film, panel, or not selected yet |
| Environment | Indoor, outdoor, humid, dusty, enclosed, or ventilated |
| Quantity | Prototype, small batch, or larger project |
| Installation method | Adhesive, profile, clips, frame channel, or custom mounting |
| Documents needed | Ask what documents are available for the project if needed |
Overall, this checklist also helps you decide whether the project is still a simple DIY build or needs a more reviewed component plan. For example, a small tabletop photo box and a large backlit retail panel have very different risk points.
FAQ
How do you make a lightbox display?
A basic lightbox display is made by placing a light source inside or behind a frame with a translucent front panel. For a simple DIY version, the frame can be a box or rigid structure, and the front can be a diffuser or acrylic sheet. However, for a cleaner result, plan the LED strip, diffuser distance, power supply, and wiring path before assembly.
How do you make a homemade light box?
A homemade light box can be made with a box or frame, a translucent surface, and a light source. For photography, people often use a simple diffused box. However, for a display-style lightbox, LED strips are common, but you should check voltage, strip length, diffuser setup, and power supply compatibility before installing the lights.
What can I use instead of a light box?
Alternatives depend on the purpose. For photography, you may use natural window light, a softbox, LED panel, photo tent, or diffused lamp setup. Meanwhile, for display use, you may use a backlit frame, LED panel, or ready-made display lightbox. Therefore, the right option depends on size, portability, brightness control, and the visual result you need.
How do you make a box frame with lights?
Start with a rigid frame, plan where the diffuser or front panel will sit, then decide where the LED strip will be mounted. Next, leave space for the power supply connection and wiring exit. Before final mounting, test the strip, power supply, controller, and diffuser together so you can adjust the layout if dots or shadows appear.
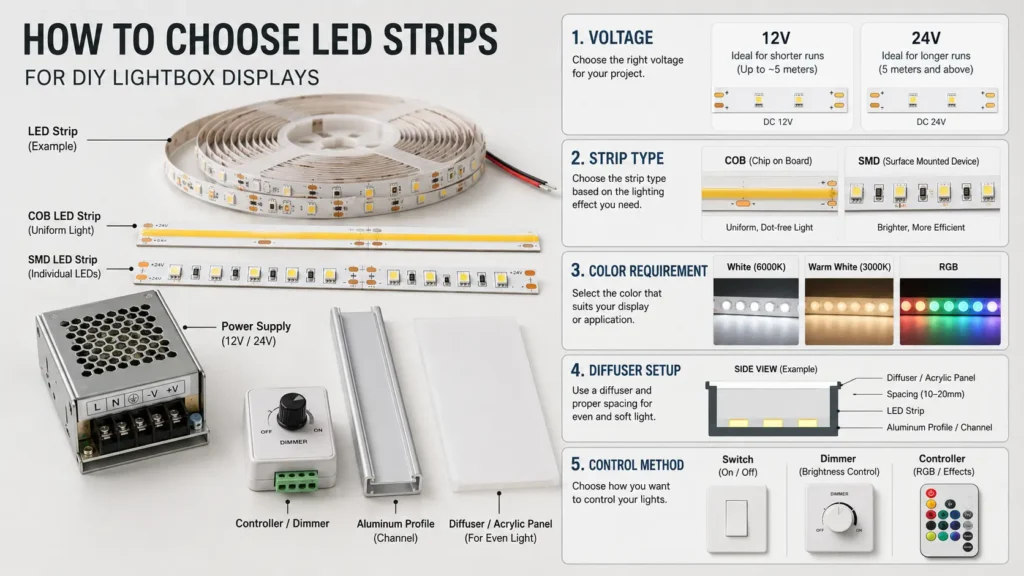
What power supply do I need for LED strip lights?
First, check the LED strip voltage and total power requirement. Then, the power supply should match the strip voltage and be rated for the total planned load. In addition, total load depends on the strip specification and installed length. If the setup involves mains wiring or permanent installation, ask a qualified person to review it.
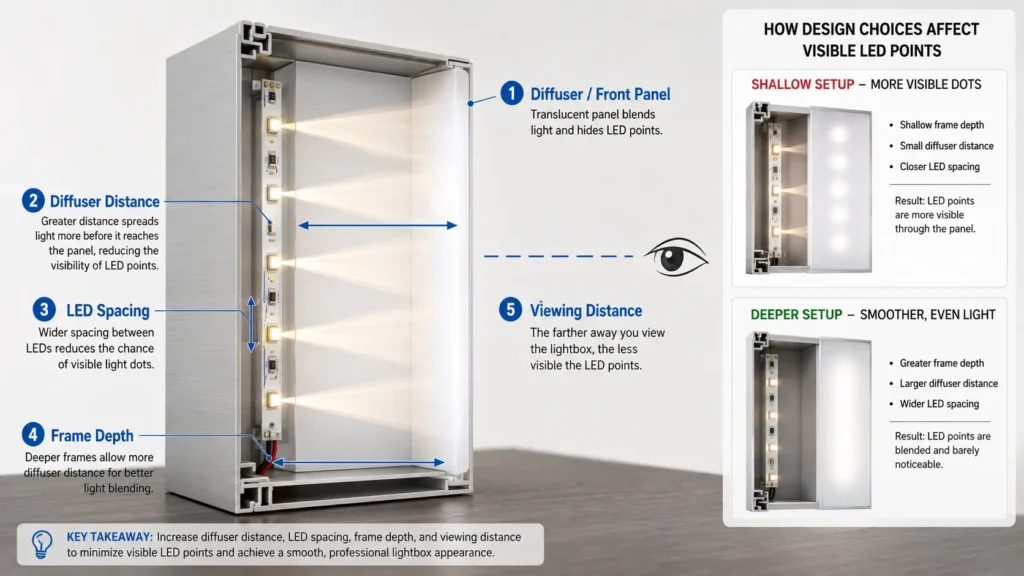
How do I reduce LED dots in a lightbox?
Visible LED dots can often be reduced by increasing the distance between LEDs and diffuser, using a suitable diffuser material, choosing a denser strip layout, or testing a strip type that appears smoother through the front panel. Still, the result depends on the actual frame depth, diffuser, strip spacing, and viewing distance.
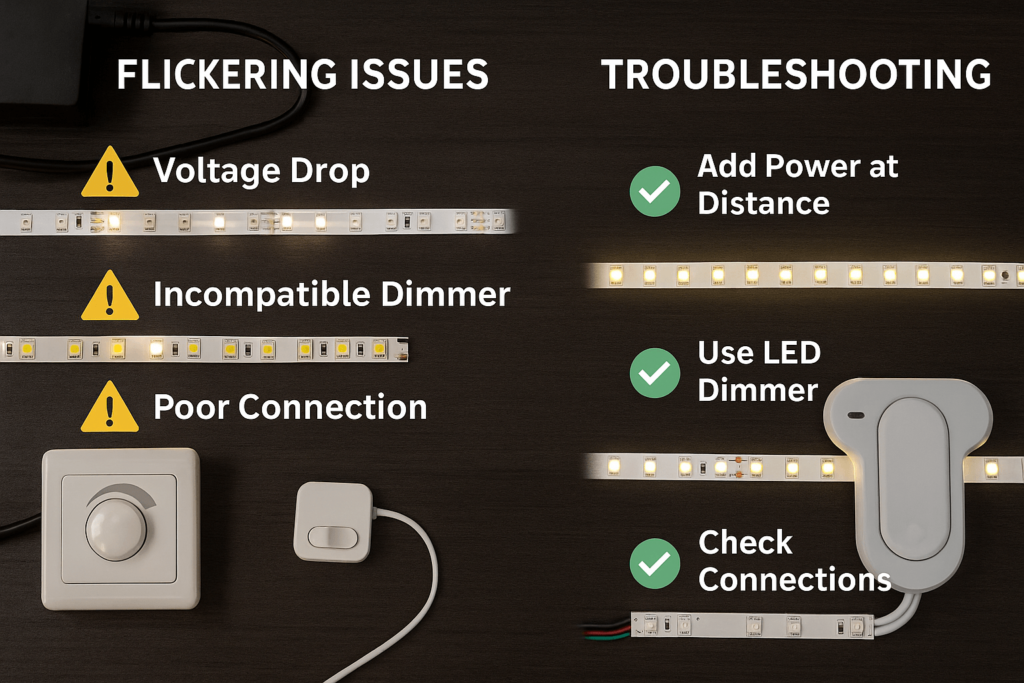
Can I dim LED strips in a DIY lightbox?
Yes, dimming may be possible, but it depends on the LED strip, power supply, controller, and wiring setup. However, do not assume every strip can use every dimmer. Instead, confirm that the dimmer or controller is compatible with the strip type and power arrangement.
What should I tell a supplier before buying LED strips for a lightbox?
Provide the display size, frame depth, estimated strip length, color requirement, diffuser material, installation environment, control method, quantity, and any document needs. Also, if you are unsure about the layout, share drawings, photos, or a sketch so the supplier can review the component requirements more accurately.
Need Help Reviewing Your DIY Lightbox Display Parts?
Before buying LED strips or requesting a quote, prepare your lightbox size, strip length, color requirement, diffuser setup, installation environment, control method, and quantity.
Share those details for review so the lighting parts can be checked as a complete setup: LED strip, power supply, connectors, controller, diffuser, and mounting path.