Most DIY neon sign tutorials show “what to do.” This one focuses on how to do it repeatably—so the sign looks clean, powers reliably, and can be serviced if a segment fails. The workflow is written for makers, studios, and small teams building neon-style signs with LED neon flex (not glass neon).
DIY Neon Sign (LED Neon Flex) Quick Start
A good DIY neon sign is mostly workflow discipline: design around bend/cut constraints, mount for serviceability, wire with polarity control, then test before you commit.
Quick workflow (high-level):
Choose LED neon flex and confirm bend direction + cut-point rules (datasheet).
Design the layout: plan corners, joints, and wire exits.
Prep the backer: drill pass-throughs and mounting holes.
Dry-fit, then mount (adhesive, clips, channels/holders, or standoffs).
Wire and add strain relief; keep polarity consistent.
Run the commissioning checklist, then do a final test after mounting.
Success checklist (prevents most rework):
Cut points and bend direction are verified for the exact model/series.
Joints are planned where they’re least visible and easiest to service.
Cables don’t pull on connectors/solder joints (strain relief is in place).
A test-before-final-mount check was completed.
Boundary note: bend limits, cut units, and termination guidance are model-dependent—confirm on the specific datasheet and installation guidance.
DIY Neon Sign Basics: What It Is Today and Which Method Fits
A “DIY neon sign” today typically means a neon-style outline made with low-voltage lighting and mounted to a backer—most commonly LED neon flex on acrylic.
Key points (method fit):
LED neon flex: continuous “neon line” look; well-suited to lettering and logos.
LED strip + diffuser channel: strong for straight runs and modular builds; different aesthetic.
EL wire: flexible and simple, but usually a different brightness/finish class than LED neon signage.
Glass neon: specialized fabrication and safety scope.
Boundary note: This guide is for LED neon flex builds. Treat glass neon as a specialist process.
DIY vs Kit vs Custom: Quick Decision Checklist for Teams
Choose the option that minimizes rework for your finish requirements and timeline.
Key points (decision logic):
DIY from parts: best for prototyping and customization; requires process discipline.
Kit: best for speed and predictable components; design flexibility may be limited.
Custom: best when finish consistency, service, or installed-sign requirements matter.
Option
Best when…
Watch-outs
DIY from parts
You can iterate and you want flexibility
Rework traps if corners/joints/termination aren’t planned
Kit
You want a quick build within a defined system
Limited customization; service/spares vary
Custom
You need consistent finish and support
Requires clear specs; scope varies by supplier
Cost drivers (no hard numbers):
Labor time (design validation, mounting, testing)
Backer fabrication and finishing
Rework and returns (connector stress, bad cuts, weak sealing)
Boundary note: For installed signage, verify local/project requirements for power supplies and installation responsibility.
Materials & Tools Checklist (Minimum vs Cleaner/Pro Finish)
You can get a working sign with a small kit of parts, but a clean, serviceable finish usually needs better mounting control and cable management.
Minimum viable checklist:
LED neon flex that matches your layout (bend direction, cut points, color type)
Backer (acrylic is common; wood/PVC also used)
Mounting method (adhesive, clips, or a simple holder/channel approach)
Compatible low-voltage power supply
Termination approach (connectors or solder tools + insulation)
Template for placement + basic measuring/marking tools
Cleaner/pro finish add-ons:
Channels/holders or well-spaced clips for consistent curves
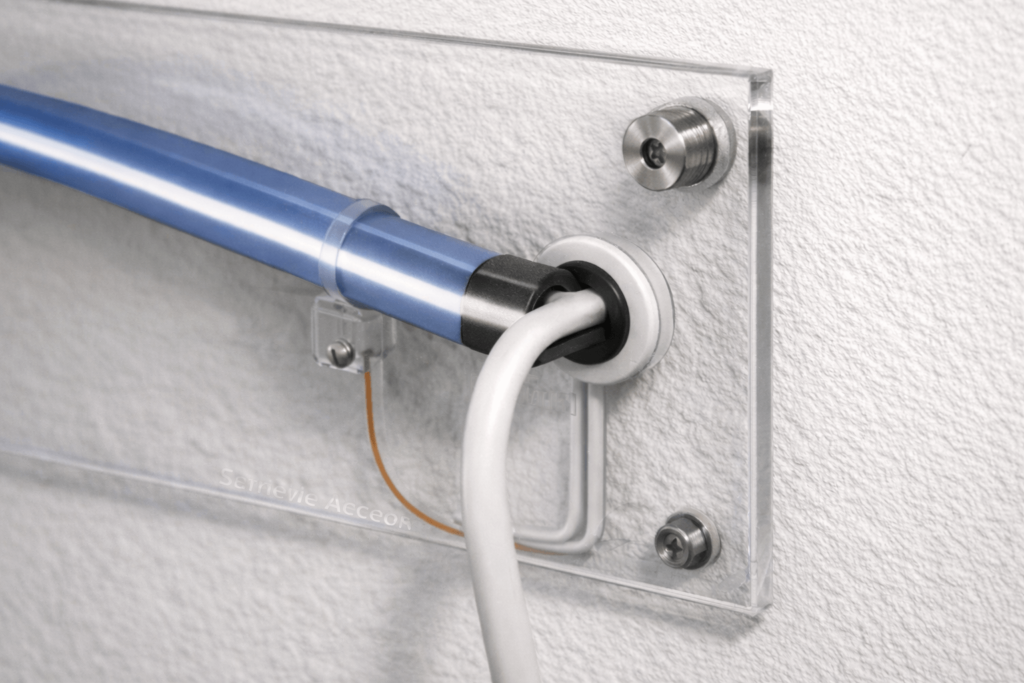
Standoffs for wall mounting and hidden wire routing space
Grommets/edge protection, strain relief, and wire labels
A simple bench-test setup to isolate segments before final mounting
Boundary note: Required tools vary by mounting method and how you fabricate/finish the backer.
Design Rules That Make or Break the Look (Bends, Corners, Cut Points)
Most “ugly” DIY neon signs come from a layout that ignores bend direction, cut points, or joint visibility. Fix those before assembly.
Key points:
Choose top-bend vs side-bend behavior based on your lettering and curve geometry.
Plan cut points and joints so they land in low-visibility areas.
Solve sharp corners with geometry (small radius, segmentation, hidden joint), not force.
Do / don’t rules:
Do reduce tiny details if they require many short segments.
Do plan wire exits and joints before making the backer template.
Don’t cut except at marked cut points; don’t assume “anywhere is fine.”
Don’t place joints at the most visible curve apex if you can avoid it.
Validation workflow (fast):
Overlay your layout with likely cut-point positions (per datasheet).
Adjust lettering/corners so cut points and joints land in quieter areas.
Confirm a service path: how a failed segment could be replaced later.
Boundary note: Bend direction and cut rules are series/model dependent—verify for the exact product.
A clean look comes from consistent curves, hidden wires, and a mounting method that doesn’t trap you if you need to repair the sign.
Key points:
Adhesive-only is fastest but often the hardest to service cleanly.
Clips and channels/holders improve repeatability and make replacement realistic.
Standoffs create space for wire routing and future access.
Mounting method
Serviceability
Best for
Watch-outs
Adhesive-only
Low to medium
One-offs, quick prototypes
Surface prep and stress can cause lift; removal can damage backer
Clips
Medium to high
Serviceable signs, moderate curves
Clip spacing must support the curve and prevent stress at joints
Channels/holders
High
Repeatable shapes and clean curves
Requires more planning and backer work
Standoffs (with any method)
High
Wall-mounted signs and clean cable exits
Hardware must match wall/backer; plan access
Steps (backer + mount):
Prep the backer (holes for wire pass-throughs; keep acrylic film until late).
Transfer the template and dry-fit the neon flex.
Mount using the chosen method; keep joints supported and accessible.
Route cables behind the backer; add grommets and strain relief.
Boundary note: Adhesion and long-term durability depend on surface prep, stress, and environment—treat adhesive-only builds as more sensitive to process variation.
Build Workflow Part 2: Wiring, Power Planning, and Commissioning Tests
Reliable signs come from polarity discipline, solid terminations, and strain relief—plus staged testing before final cable management.
Key points:
Termination quality and mechanical stress cause most failures.
If the layout is large/complex, power distribution may require more than one feed point (design-dependent).
A repeatable test-before-final-mount checklist prevents most rework.
Steps:
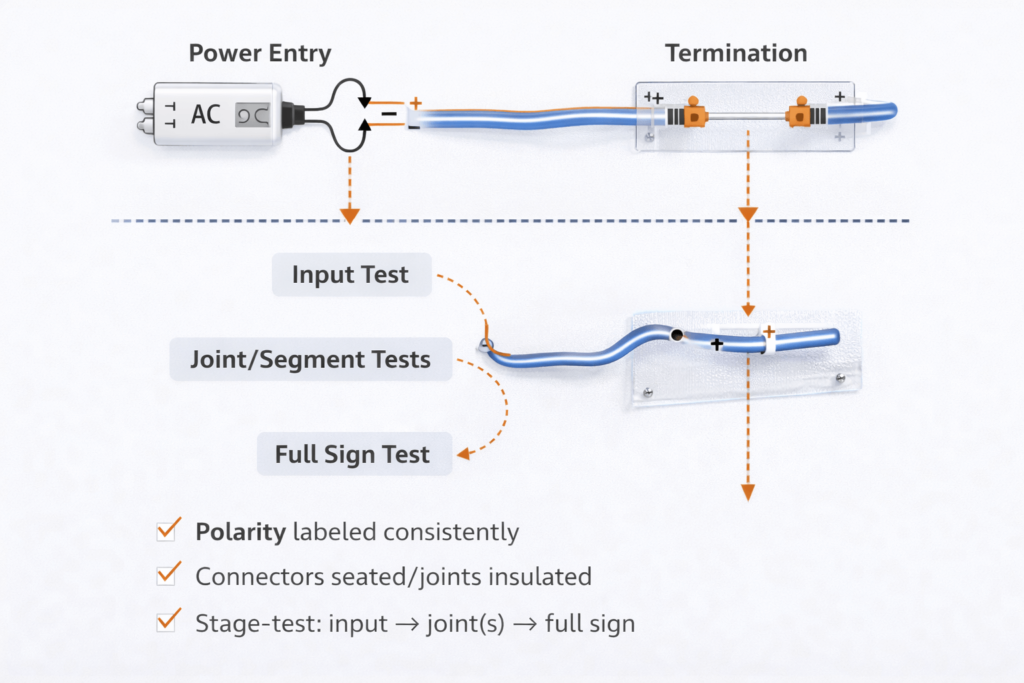
Plan power entry and cable routes; label polarity.
Terminate (connectors or solder) and add strain relief.
Stage test: input test → joint/segment tests → full sign test.
Final test after mounting and cable management.
Commissioning checklist:
Polarity verified at input and at each reconnected segment
Connectors seated / joints insulated and supported
Cables secured so joints carry no mechanical load
Segment isolation test plan ready (so you can localize faults quickly)
Safety note: De-energize before reworking wiring or terminations. OSHA’s workplace electrical safety work practices emphasize de-energizing live parts before working on or near them, with limited exceptions: OSHA 1910.333 – Selection and use of work practices.
Boundary note: Power supply and controller compatibility is configuration-dependent—verify documentation for the exact components used.
Boundary note: For installed signage, verify site and code requirements.
Summary & Next Steps (Prototype → Small Run → Project Install)
A dependable DIY neon sign comes from validated design rules, serviceable mounting, wiring discipline, and commissioning tests—not from luck.
Next steps by scenario:
Prototype: validate bends/cuts early; stage-test before final mounting.
Small run: standardize templates; favor clips/channels; label wiring; keep the troubleshooting table with build notes.
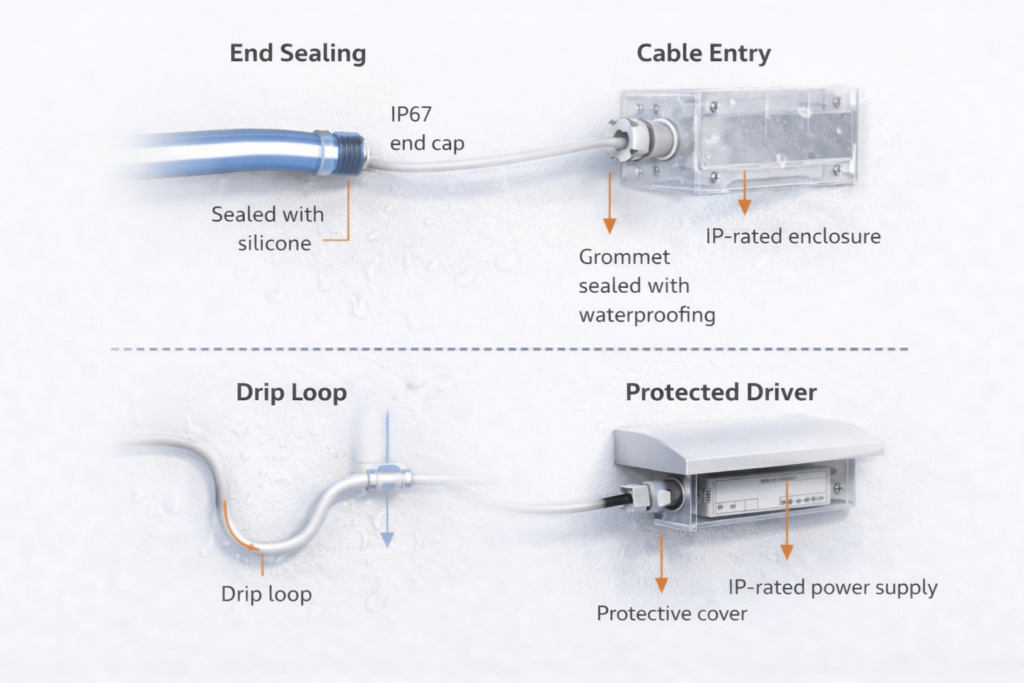
Project install: treat outdoor/IP and compliance-sensitive requirements as verification tasks; confirm scope and follow installation guidance.
Note (optional): If you’re sourcing components for a sign project, request the exact datasheet plus a wiring diagram (and controller guide if used). This is especially important for outdoor-rated builds, RGB/dimming control, and serviceable mounting designs.
Boundary note: Bend/cut rules, IP scope, and certification statements are model/series dependent—verify against documentation for the exact product used.


