

Table of Contents
DIY LED strip wall art works best when you treat it like a small lighting fixture, not only a craft project. First, choose the format. Next, plan diffusion and cable routing before you peel any adhesive. Then, bench-test everything before final mounting.
As a result, the wall art can glow cleanly, sit flat on the wall, avoid visible dots, and still be serviceable later. Also, the same workflow works for canvas art, acrylic art, wood panels, and small display pieces.
For related setup basics, you can also review Elstar’s internal LED strip installation guide and browse LED strip lights for format ideas.
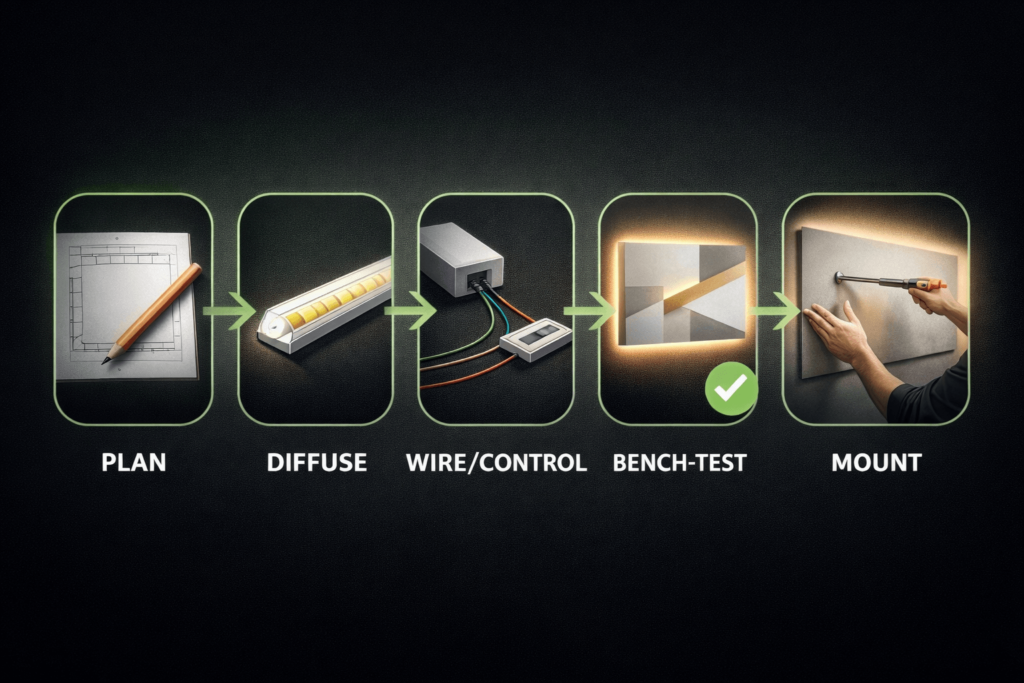
A clean LED wall art build is mostly planning. Therefore, choose the format, pick a strip type, design diffusion, plan cable exits, and test the piece before you close it up.
In short, DIY LED strip wall art works best when the lighting, frame, wiring, and service plan are designed together.
Many wall art problems come from hidden wires, weak diffusion, trapped heat, or parts that cannot be reached later. Therefore, treat access and testing as part of the design, not a last step.
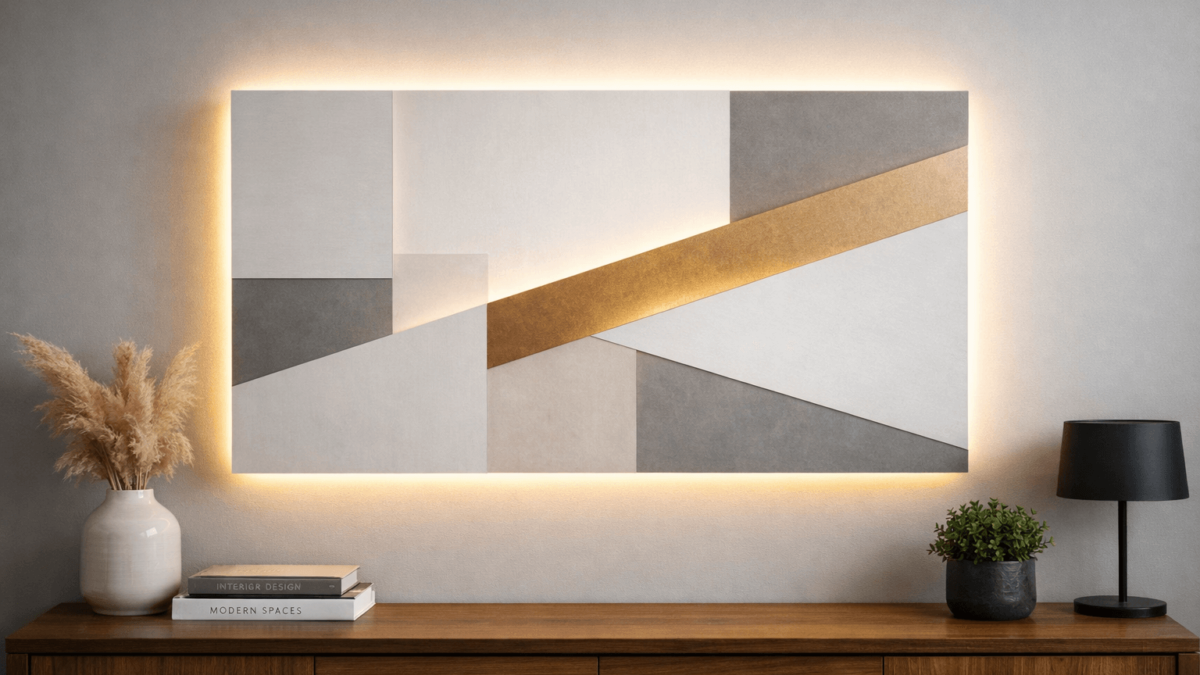
Backlit wall art shines light from behind the artwork, like a shallow lightbox. Meanwhile, edge-lit wall art pushes light into the edge of a clear panel, often acrylic, so the graphic glows from within.
For DIY LED strip wall art, format choice decides the frame depth, diffuser plan, and wire path.
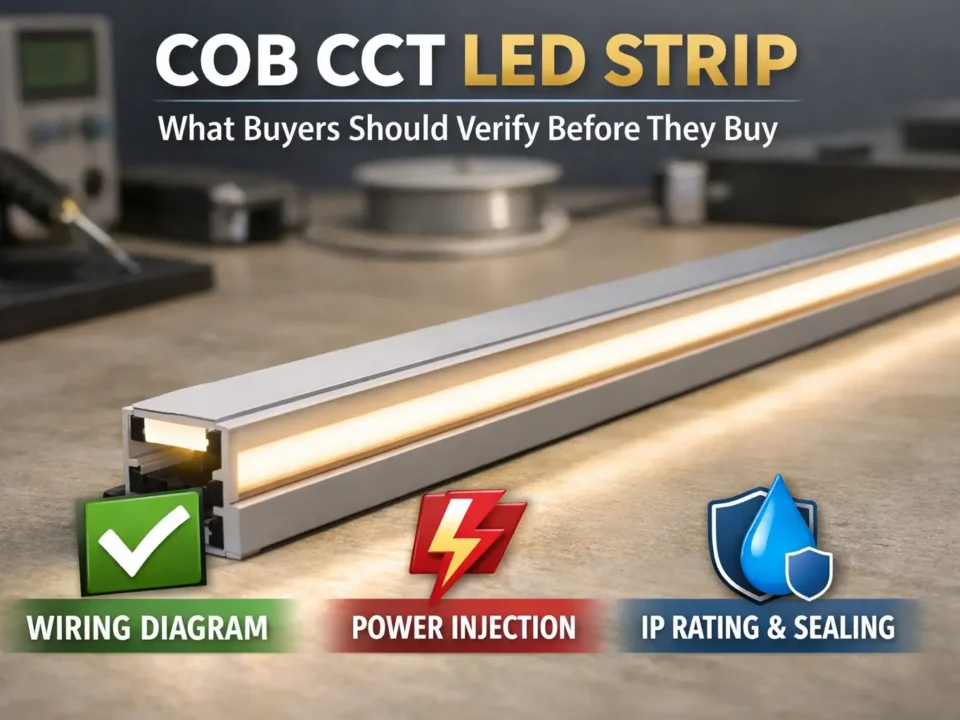
Boundary conditions: Materials, depth, and viewing distance change results. Also, COB does not guarantee a dotless finish by itself.
You can build LED strip wall art with a small, repeatable parts set. Then, you can change the style by switching the substrate, such as canvas, wood, acrylic, or a display panel.
The parts list for DIY LED strip wall art should match the format, not just the strip color.
Boundary conditions: Power sizing depends on strip rating and total length. Therefore, check the datasheet instead of guessing.
The best strip depends on the main goal. For example, the goal may be a smooth glow, a simple build, or animated effects.
If the design needs smoother light in shallow spaces, Elstar’s COB LED strips category can help you compare options. If the piece needs a cleaner finished edge, the LED aluminum profiles category is also useful.
When choosing strips for DIY LED strip wall art, decide whether the main goal is smooth glow, simple wiring, or animated effects.
| Strip type | Best for wall art | Trade-offs | Control notes |
|---|---|---|---|
| COB LED strip | Smoother glow in shallow builds | Still needs diffusion and careful corners | Use a matching dimmer or RGB/RGBW controller if needed |
| SMD LED strip | Flexible layouts and common accessories | Dots can show if the frame is shallow | Match controller to white, RGB, or RGBW type |
| Addressable LED strip | Patterns, gradients, and moving effects | More wiring and setup work | Needs an addressable controller matched to the chipset and voltage |
Boundary conditions: Dot visibility depends on depth, diffuser material, and interior reflections. Therefore, test a short strip before sealing the build.

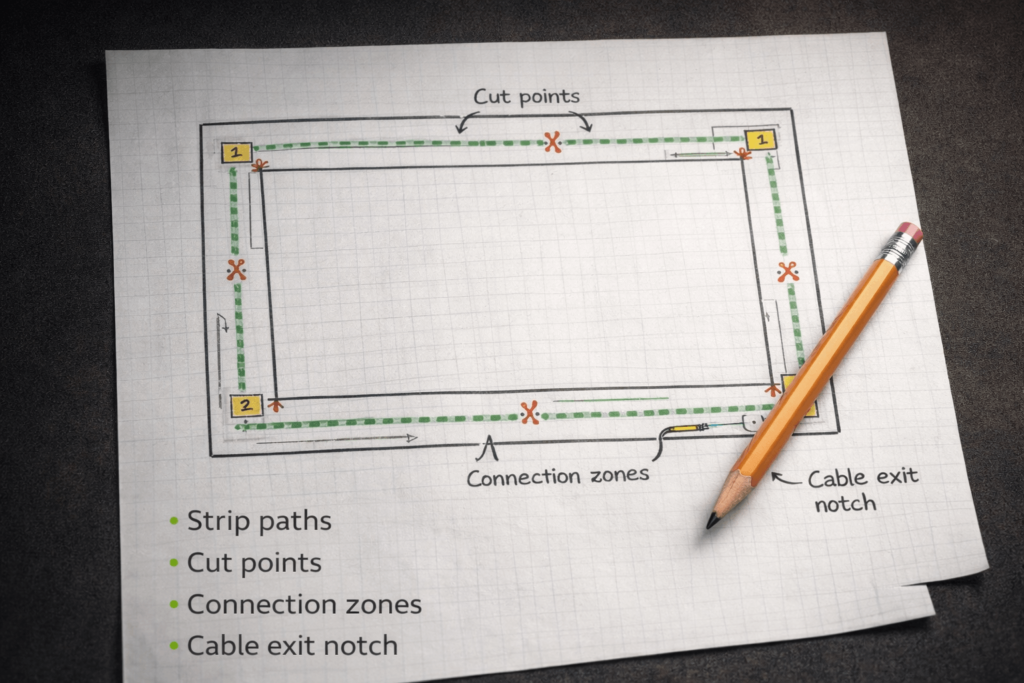
Planning is what separates a clean install from a messy one. A simple sketch can prevent hotspots, poor wire exits, shadows, and a frame that cannot sit flat.
A layout sketch helps keep DIY LED strip wall art clean because it shows where wires, shadows, and service points will land.
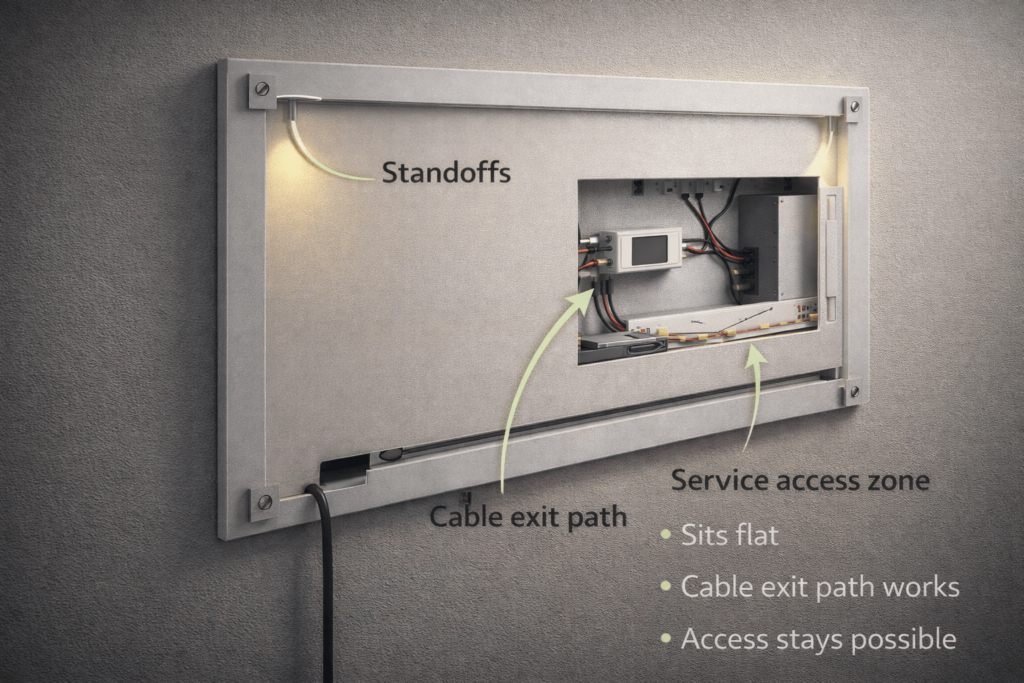
Even a small wall art piece may need repair later. Therefore, avoid sealing the controller or a key joint where it cannot be reached.
Boundary conditions: Outlet location, wall type, and cable hiding rules can change the exit strategy. Also, strip cut-point rules vary by product.
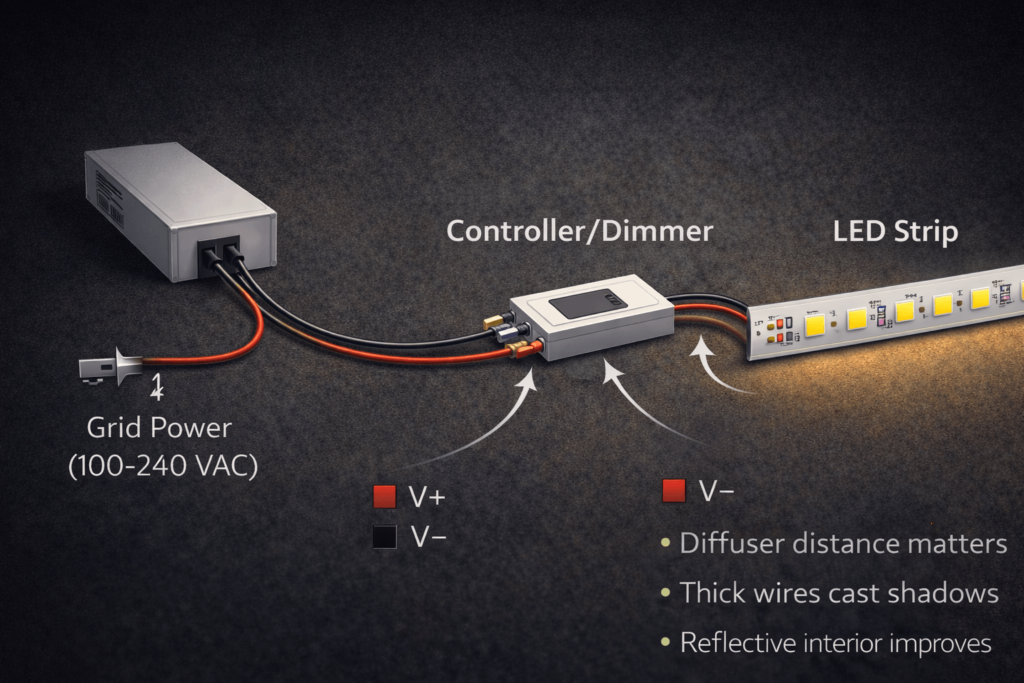
To stop hotspots, think in terms of light mixing. The LED points need distance, diffusion, or reflection before the viewer sees the final surface.
For DIY LED strip wall art, smooth light usually comes from spacing and diffusion, not from strip choice alone.
Boundary conditions: Diffusion results depend on depth, material, and strip type. Therefore, test before final close-up.

A test-gated build sequence helps catch issues while everything is still easy to reach. As a result, you can fix a bad joint, shadow, or wire route before the piece goes on the wall.
During the build, treat DIY LED strip wall art like a small fixture that needs test points and service access.
Boundary conditions: Enclosed builds can warm up. Therefore, avoid sealing power parts in a way that blocks airflow or access.
The safest approach is compatibility-first. In other words, match the strip type to the right controller, verify voltage and load, and keep the power supply where it can breathe and be serviced.
| Strip type | Typical controller | Notes |
|---|---|---|
| Single-color white | Inline dimmer or compatible controller | Simpler wiring and good for first builds |
| RGB | RGB controller | Match voltage and strip type |
| RGBW | RGBW controller | Use the right controller for the white channel |
| Addressable | Addressable controller | Match chipset, protocol, and voltage |
Power planning for DIY LED strip wall art matters because dimming, flicker, and heat often come from the full system.
For background on LED flicker and why drivers and dimmers matter, see DOE: Flicker basics and DOE: Understanding the IEEE recommended practice for flicker.
Battery builds work best for small pieces and simple controls. However, runtime and brightness depend on battery type and total load, so test early.
Boundary conditions: Always verify voltage and wiring needs by datasheet. Also, follow local standards if wiring is hidden inside a building element.
A clean mount is mostly cable planning. Therefore, plan the exit path and clearance so the artwork does not rock on the cord and the wiring remains reachable.
For renters, use mounting methods chosen by wall type and artwork weight. Also, avoid permanent in-wall routing and use cable control that can be removed cleanly.
Boundary conditions: Mounting depends on wall type, artwork weight, and site rules. Therefore, test the location before final mounting.
If one end of the wall art looks dimmer, the cause is often voltage drop. This happens more often as builds get larger, runs get longer, or wire paths become more complex.
Larger DIY LED strip wall art pieces may need a better feed plan so one end does not look dimmer.
Boundary conditions: Extra feed points depend on voltage, current draw, total length, and wire method. Therefore, check the datasheet and test the real layout.
Most problems are easier to solve if you isolate variables. Therefore, test a shorter segment, test the power supply and controller, and avoid reworking everything at once.
| Symptom | Likely causes | First checks | First fixes |
|---|---|---|---|
| Flicker while dimming | Controller mismatch or loose connection | Check controller type and connector fit | Use matched control parts and redo weak joints |
| Dim at one end | Voltage drop or one feed point | Check feed point and run length | Use a more balanced feed plan |
| Dead section | Wrong cut, wrong polarity, or bad connector | Check cut point and polarity | Re-cut, reconnect, or remake the joint |
| Wrong colors or unstable effects | Controller mismatch or data issue | Check data direction and controller setup | Rewire based on the controller guide |
| Strip will not stay stuck | Dirty surface, heat, or mechanical strain | Check surface prep and stress points | Add support and reduce strain |
Boundary conditions: Symptoms can overlap. Therefore, bench-test before making major changes.
LED wall art can be safe and reliable when you plan airflow, protect wiring, and avoid trapping parts in sealed cavities. Also, power supplies need access and ventilation.
For general workplace electrical safety context, see the OSHA electrical overview. OSHA also notes that electrical equipment should avoid blocked ventilation openings and should maintain needed air flow: OSHA 1910.303.
Follow the power supply maker’s install guide for airflow and mounting. For example, Mean Well’s LED power supply guide covers install and handling basics: Mean Well LED power supply installation guide.
Boundary conditions: Local codes and product instructions govern details. If the build connects to building wiring or concealed routing, use a qualified professional.
Backlit wall art shines from behind the artwork, while edge-lit art sends light into the edge of a clear panel. Backlit is often easier for a first build. However, edge-lit can look sharper if the acrylic and graphic are planned well.
COB often helps when you want a smoother glow. SMD can work well when you have enough diffusion depth. Addressable strips are best when motion or effects matter.
Add light mixing. For example, increase distance, add a diffuser layer, use reflective interior surfaces, and keep wires out of the light field.
Dim ends often come from voltage drop or a single feed point. First, check layout, feed point, and connection quality. Then, test a shorter segment to isolate the issue.
Flicker often comes from a mismatch between the strip, controller, and power supply. Also, weak connectors or poor strain relief can cause flicker. For background, see DOE: Flicker basics.
Plan the cable exit path first. Then, use a notch, rear channel, or standoff gap so the cord does not push the frame off the wall.
It can be safe if you allow airflow, keep power parts accessible, and avoid trapping heat. However, follow the power supply instructions and local rules.
Not always. Solderless connectors can work, but soldered joints are often stronger when paired with heat-shrink and strain relief.
The cleanest DIY LED strip wall art comes from a plan-first workflow. Therefore, pick the format, choose the strip, plan diffusion, plan cable exits, bench-test, and then mount.
Use these next steps to match the DIY LED strip wall art workflow to the project size and risk level.
For custom layouts or project support, you can also review Elstar’s custom LED light strip page before preparing a drawing or RFQ.
If the design has unusual shapes, custom lengths, long runs, or document needs, work with a supplier that can confirm the exact strip, wiring plan, and control guide by datasheet for the model used.
Boundary reminder: Verify compatibility and ratings by datasheet and project conditions. Also, follow local standards where they apply.

