
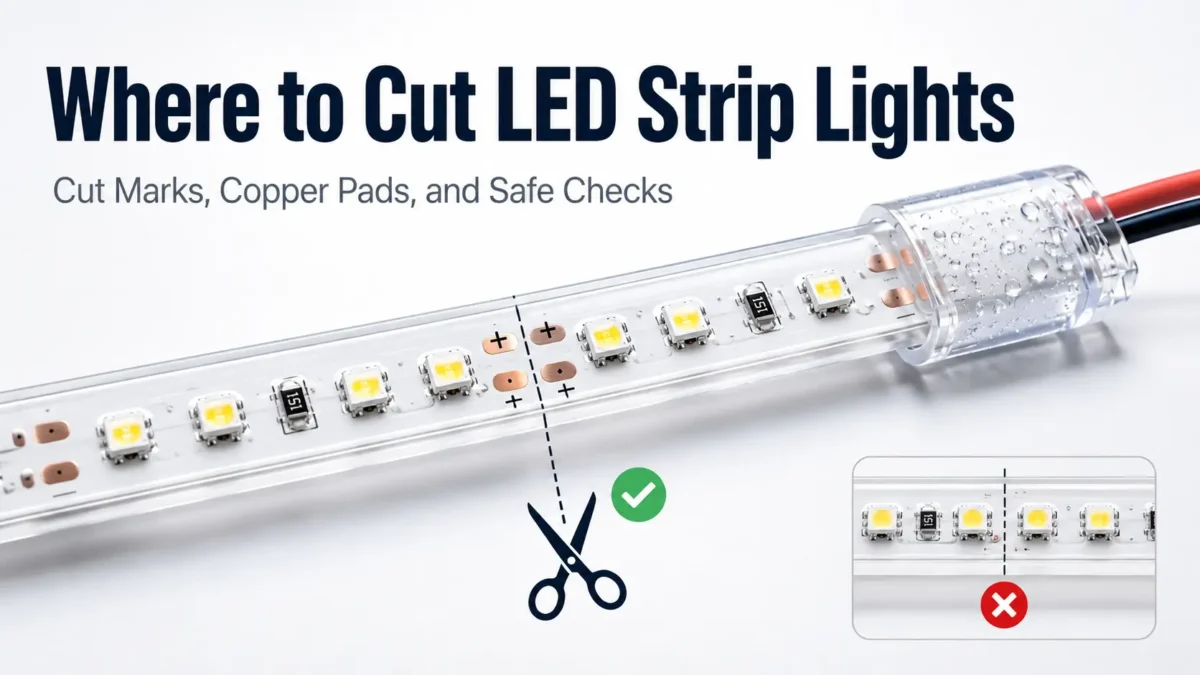
LED strip lights are made to be cut only at set points. In most cases, the safe place is not just a gap between two LED chips. Instead, it is the marked cut point on the strip, often shown by a scissor icon, a printed line, or bare copper pads.
This guide shows you how to find the right cut point, what to check first, and why strip type, plus and minus marks, water seal, and connector fit all matter. Also, it is written for installers, buyers, project teams, and anyone who needs LED strips for a room, display, cabinet, sign, building detail, or custom light plan.
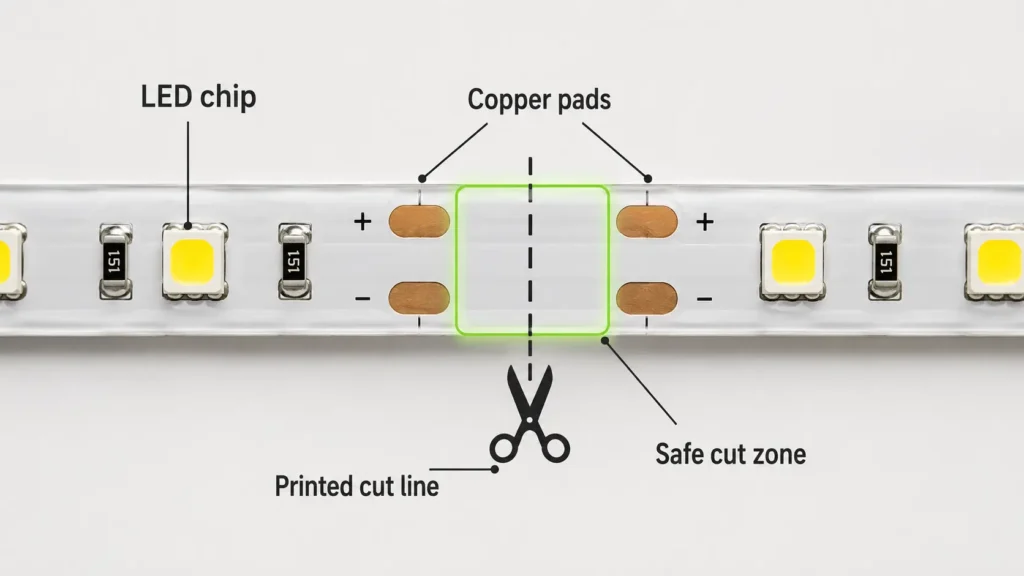
A safe LED strip cut point is the place where the strip maker has planned one circuit part to end. Usually, you can see it when you look closely at the printed board.
| Cut-point sign | What it means | What to check before cutting |
|---|---|---|
| Scissor icon | The strip can be cut here | Cut on the line, not through LED chips or parts |
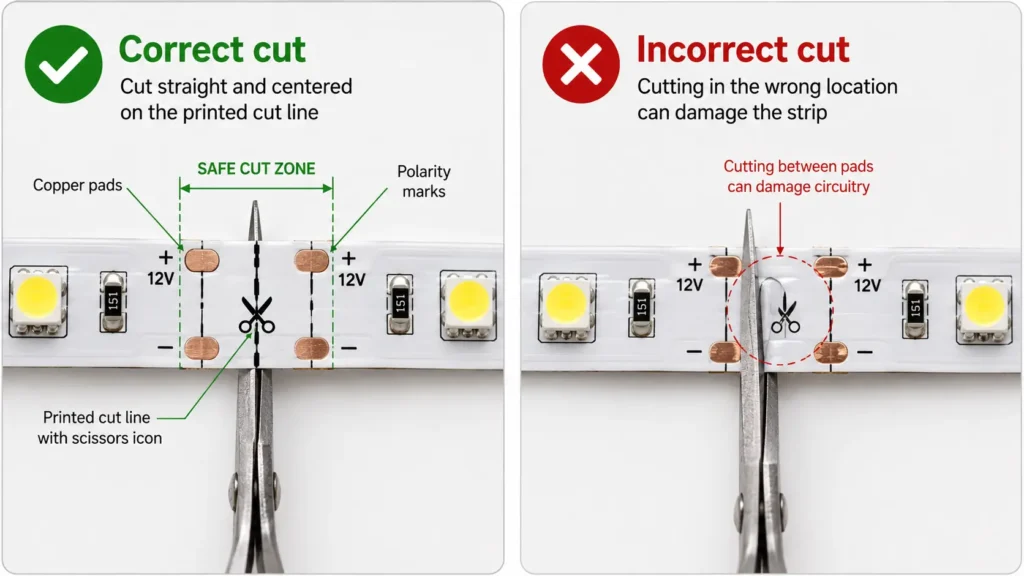
| Printed line | The line shows the cut spot | Keep the cut straight and centered |
| Copper pads | Pads may help you join the strip again | Keep enough pad space on both sides |
| Repeated circuit part | The strip repeats in small sections | Do not cut in the middle of an unmarked part |
| No clear mark | The safe cut point is not clear | Stop and check the guide or ask the seller |
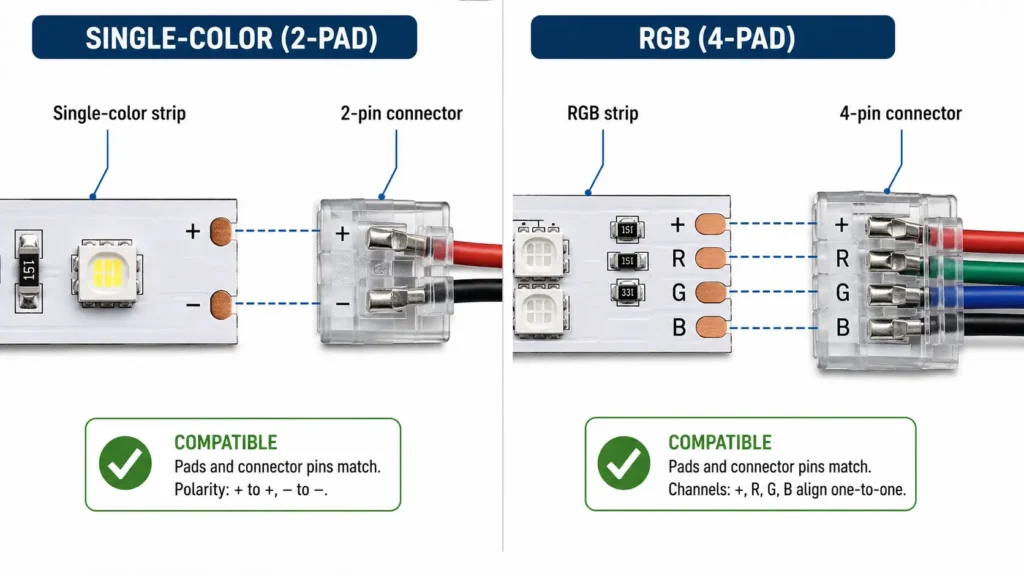
Copper pads matter because they are often the contact points used to join a cut strip again. For example, a single-color strip may have two pads, such as plus and minus. However, RGB or RGBW strips often have more pads because they use more color channels. Smart strips may also have a data line, so they need extra care.
Cut spacing can change from one strip to another. Therefore, do not assume the spacing from one product will match the next one.
Before you make any cut, use this checklist.
| Check | Why it matters | Go ahead? |
|---|---|---|
| Power is off and unplugged | Cutting a powered strip is unsafe and can harm parts | Yes, only after power is off |
| Cut mark is clear | The strip should be cut at the planned point | Yes, if the mark is easy to see |
| Copper pads are not damaged | Pads may be needed to join the strip again | Yes, if the cut keeps pads usable |
| Strip type is known | RGB, RGBW, COB, water-safe, and smart strips may need different steps | Yes, after checking the strip type |
| Right tool is ready | A clean, straight cut helps keep the pads and circuit part usable | Yes, with sharp scissors or a good cutter |
| Connection plan is clear | Connector type, width, pad count, and plus/minus marks must match | Yes, if all are checked |
| Water seal plan is ready | Water-safe strips need the cut end or joint sealed | Yes, only if the seal method fits the strip |
| Product guide is on hand | Unmarked or odd strips should not be guessed | Stop and check first |
For most users, the key rule is simple: if you cannot clearly see the cut mark, do not cut yet.
No. Standard LED strip lights should not be cut anywhere. Instead, cut them only at the marked cut points.
LED strips are built in small circuit parts. The LED chips may look evenly spaced, but the circuit under them has set points where one part ends and the next one starts. As a result, the printed cut point is the safest place to split the strip.
| Mistake | What may happen | Safer next step |
|---|---|---|
| Cutting between copper pads | The circuit part may stop working | Do not keep trimming at random; inspect the strip and check the guide |
| Cutting through an LED chip or resistor | The strip piece may be damaged | Stop and replace the damaged piece if needed |
| Cutting at an angle across pads | The connector may not make good contact | Trim only if a clear marked cut point remains |
| Cutting a water-safe strip without sealing it | Moisture may get into the strip | Seal the end or joint with a suitable method |
| Cutting a smart strip without checking data lines | The controls may not work as expected | Check the guide and controller wiring first |
Still, cutting in the wrong place does not always ruin the whole roll. The result depends on where the cut was made, how the circuit is built, and whether enough pad space remains.
Once you find the right cut point, the cut itself is simple.
This is general guidance. However, the product guide should always come first.
A cut LED strip piece may still work if it was cut at the right point and linked to a suitable power feed, connector, or soldered wire. However, both sides do not work on their own just because the cut was made in the right place.
| Check | Why it matters |
|---|---|
| Plus and minus marks | Plus and minus must match. If they are reversed, the strip may not light. |
| Pad count | A 2-pad, 3-pad, 4-pad RGB, or 5-pad RGBW strip needs the right connector or wire layout. |
| Strip width | Solder-free connectors must match the strip width. |
| Channel type | RGB, RGBW, CCT, and smart strips use different channels or data lines. |
| Voltage | The cut piece must match the right power supply voltage. |
| Controller fit | RGB, RGBW, CCT, or smart strips may need the right controller. |
| Water seal | Outdoor or damp-area joints need proper seal work. |
| Method | Best use | Checks before use | Limit |
|---|---|---|---|
| Solder-free connector | Fast indoor joint or extension | Strip width, pad count, plus/minus marks, and connector type | Not universal; it must match the strip |
| Soldered wires | Stronger joint when done well | Pad shape, plus/minus marks, solder skill, and insulation | Needs care and the right tools |
| Ready-made connector part | Repeat jobs or planned projects | Confirm that it fits the strip model | Do not assume one part fits all strips |
| New power feed | Using a cut piece on its own | Voltage, plus/minus marks, power supply size, and controller needs | Must be planned safely |
| Seller support | Large layouts or unusual strips | Layout, strip type, controller, water seal, and order size | Best when project risk is high |
For B2B projects, the connection plan should not be an afterthought. Connector choice affects install time, field fixes, water seal work, and long-term use.
Different LED strip types can have different cut and connection needs. Even so, the main rule is the same: cut only at the marked point.
| Strip type | Main cutting concern | Main connection concern | What to check |
|---|---|---|---|
| Single-color LED strip | Cut points are often easier to see | Plus and minus must match | Voltage, strip width, cut mark, and connector type |
| Tunable white / CCT strip | More than one white channel may be used | Channel match matters | Pad labels, controller type, and plus/minus marks |
| RGB strip | Several color channels are used | R, G, B, and the common line must line up | Pad count, connector type, and controller |
| RGBW strip | One more white channel is used | More pads must match | Connector fit and pad labels |
| COB LED strip | Cut marks may be less clear | Product design can vary | Product sheet, cut gap, and connector method |
| Water-safe LED strip | Cut end needs a seal | The joint must be kept safe from moisture | IP rating plan, end cap, sealant, and location |
| Smart LED strip | Data line or control circuit may be used | Direction and controller setup may matter | Guide, data line, controller, and product notes |
Therefore, do not assume the method for one strip type will work for another. This is especially true for smart, COB, and water-safe strips, where the visible layout may not show the full circuit.
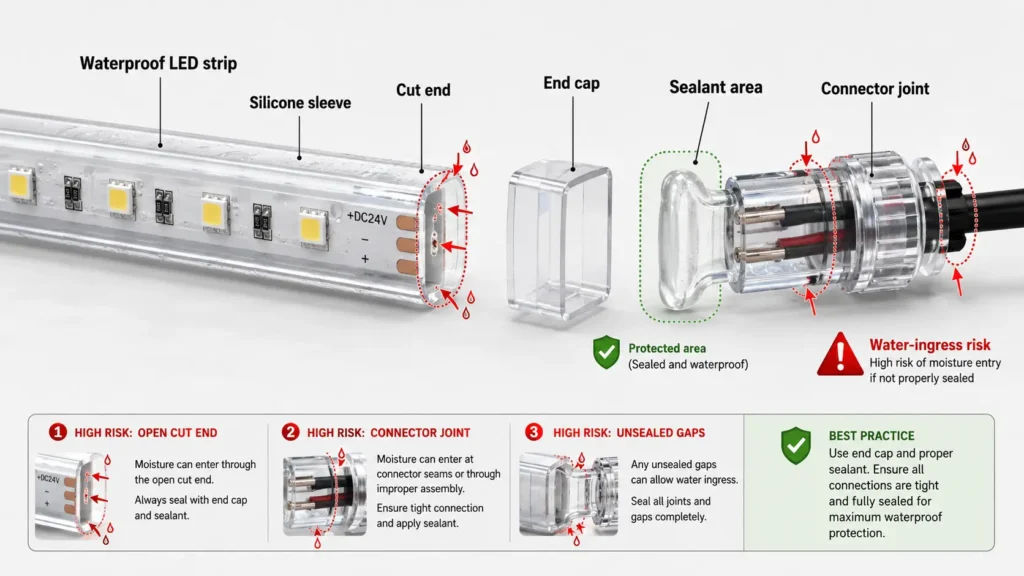
Many waterproof LED strips can be cut at approved cut points. However, the cut creates one more job: the open end or joint must be sealed.
The coating, sleeve, or cover helps keep moisture away from the strip. Once you cut it, the open end may let water or damp air get in. For dry indoor use, the seal need may be lower. Even so, follow the product guide. For kitchens, baths, signs, outdoor installs, display cases, or damp rooms, sealing and connector cover become much more important.
| Water-safe cutting check | Why it matters |
|---|---|
| Approved cut point is clear | Cutting outside the mark may harm the circuit |
| Seal method is ready | The cut end needs moisture protection |
| Connector fits the location | Indoor connectors may not suit damp areas |
| End cap or sealant fits the strip | The seal method should match the strip build |
| Rating plan is checked | The original IP rating may not stay the same after cutting |
| Test is done before install | Problems are easier to fix before mounting |
Do not claim that sealing the end always restores the first IP rating. The result depends on the strip design, seal material, connector method, and install site. For this reason, project teams should confirm the rating plan before cutting and installing the strip.
If there are no clear cut marks, do not guess.
For example, one of these issues may apply:
Next, check the manual, product sheet, pack, or seller notes. If the strip is already installed or part of a larger job, write down the strip type, voltage, width, pad layout, controller, and install site before asking for help.
For buying teams, this is also a useful question before an order is placed. If a project needs exact lengths, ask for the cut gap and layout limits before buying standard rolls.
Cutting mistakes often happen because the strip looks simple, while the circuit is less clear.
| Mistake | What may happen | What to do next |
|---|---|---|
| Cut between marked points | A section may not light | Stop trimming and check whether a usable cut point remains |
| Cut through copper pads unevenly | Connector contact may be weak | Check whether enough pad area remains |
| Joined with plus and minus reversed | The strip may not light | Disconnect power and check plus/minus alignment |
| Used the wrong connector width | The connector may not grip or touch pads well | Match the connector to strip width and pad layout |
| Mixed RGB/RGBW channels | Colors may show wrong | Match channel labels before joining |
| Cut a water-safe strip without sealing | Moisture risk goes up | Seal it before damp or outdoor use |
| Assumed the leftover piece works on its own | The piece may need its own power feed | Plan power, controller, and plus/minus marks before reuse |
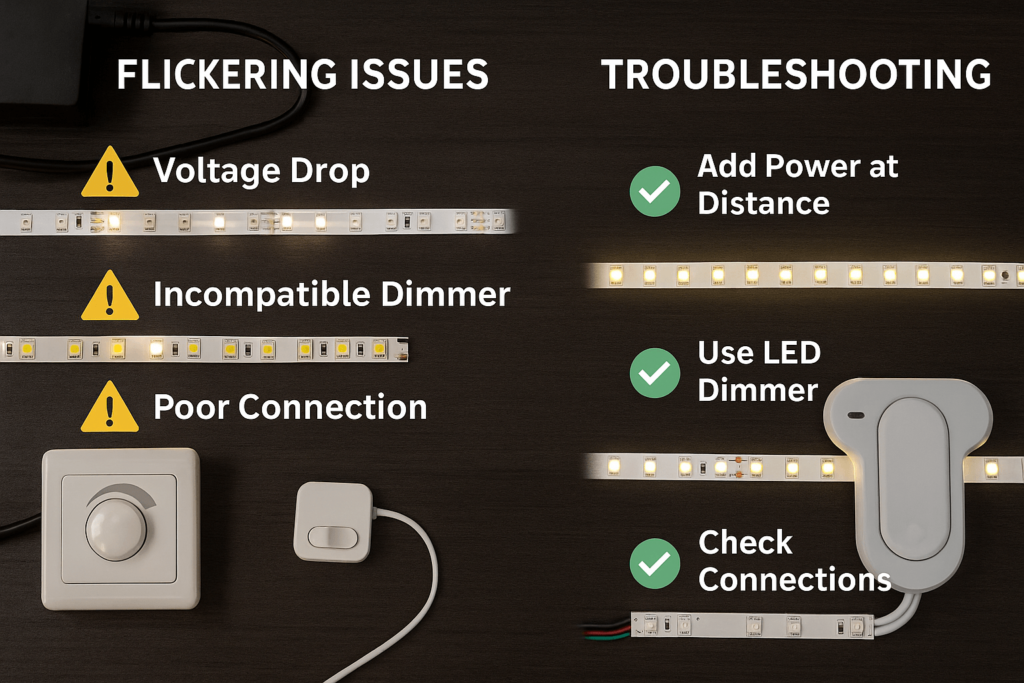
If a strip does not light after cutting, do not keep cutting it into shorter pieces without a clear reason. Instead, check power, plus/minus marks, cut spot, connector contact, controller fit, and pad damage. For deeper troubleshooting, see ElstarLED’s LED strip connection problems guide.
For one small home job, cutting at the nearest mark may be enough. However, for commercial, OEM, sign, display, hotel, retail, cabinet, or building-light projects, cutting choices should be part of the project spec.
Before you order LED strip lights, confirm these points.
| Project detail | Why it matters |
|---|---|
| Total run length | Helps estimate strip amount and power needs |
| Needed finished lengths | Shows whether standard cut gaps fit the layout |
| Cut gap | Shows how close the strip can get to the target length |
| Strip type | Single-color, CCT, RGB, RGBW, COB, water-safe, or smart strips have different needs |
| Voltage | Must match the power supply and project plan |
| Power plan | Long runs and many sections need the right power setup |
| Controller type | RGB, RGBW, CCT, and smart systems need matching controls |
| Connector method | Affects install speed, service, and long-term use |
| IP rating and site | Water seal work depends on where the strip will be used |
| Mounting method | Channels, clips, tape, or profiles can affect install order |
| Order size and repeat work | Repeat jobs need steady layout and cut rules |
| Drawings or layout files | Help the seller understand length and connection points |
For tighter layouts, it may be better to discuss length or layout guidance before ordering. In addition, share the layout, total lengths, strip type, voltage, IP need, controller plan, and connector choice.
Ask for seller support before cutting if:
Before you ask for guidance, prepare the strip type, voltage, total length, target cut lengths, IP rating need, controller needs, connector method, install site, and order size. This helps ElstarLED review whether standard rolls, suitable parts, or project-specific setup should be discussed.
You can review custom options or contact ElstarLED with your project details.
The safest approach is to solve cut and connection questions before the strips are installed, not after the first section fails.
For project planning, these ElstarLED pages may also help:
The links below are outbound references for extra technical context.
For more context before cutting or joining LED strips, review these outside guides:
Cut LED strip lights at the marked cut point. Usually, this point is shown by a scissor icon, printed line, or bare copper pads. Since spacing can change by product, check the guide if you are unsure.
No. Standard LED strip lights should not be cut anywhere. Instead, cut only at the marked cut points unless the product guide gives other steps.
Cutting in the wrong place can break the circuit or leave part of the strip non-working. Also, repair is not guaranteed. It depends on the cut spot, pad shape, and strip design.
Do not guess if there are no clear cut marks. First, check the manual, product sheet, pack, or seller guidance.
Not always. A cut piece may work if it was cut correctly and linked to a suitable power feed, connector, or soldered wire. However, plus/minus marks, pad layout, voltage, controller type, and strip design all matter.
Many cut LED strips can be joined again. However, the connector or soldering method must match the strip width, pad count, plus/minus marks, and channel type. RGB, RGBW, CCT, COB, and smart strips may need extra checks.
Waterproof LED strips may be cut only at approved cut points. After that, the cut end or joint needs a suitable seal. Still, do not assume the original waterproof or IP rating stays the same after cutting and sealing.
No. Different strip types may have different pad layouts, data lines, and control needs. Therefore, check the product sheet or seller guidance before cutting.
Confirm the strip type, voltage, cut gap, needed lengths, IP rating, controller type, connector method, power plan, install site, and order size. For complex layouts, share drawings or length details before ordering.
Choose project-specific guidance when the layout has tight length needs, repeat sections, water-safe needs, hard-to-reach areas, or unclear connector needs. Also, ask the seller what details they need before ordering or cutting.