

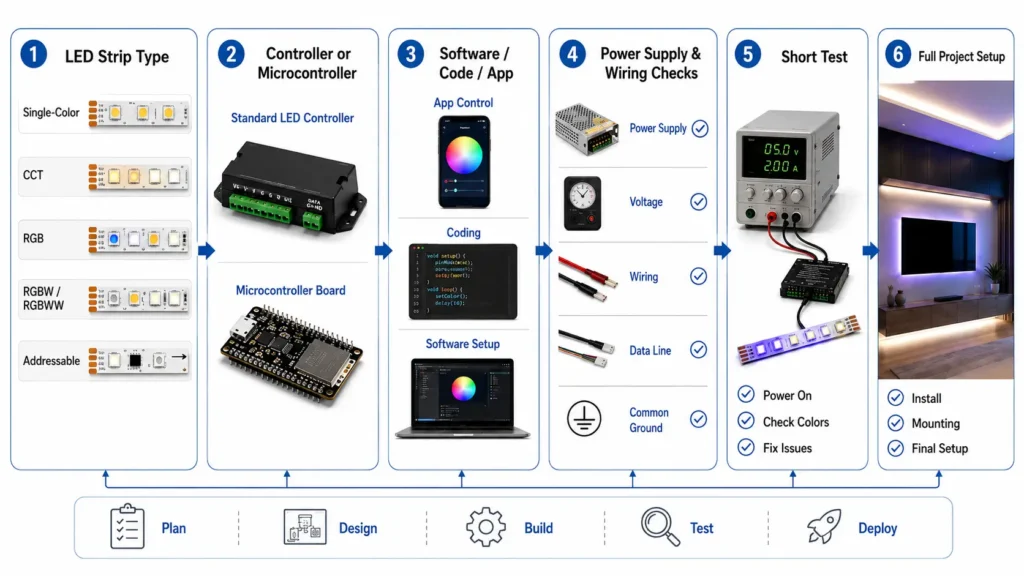
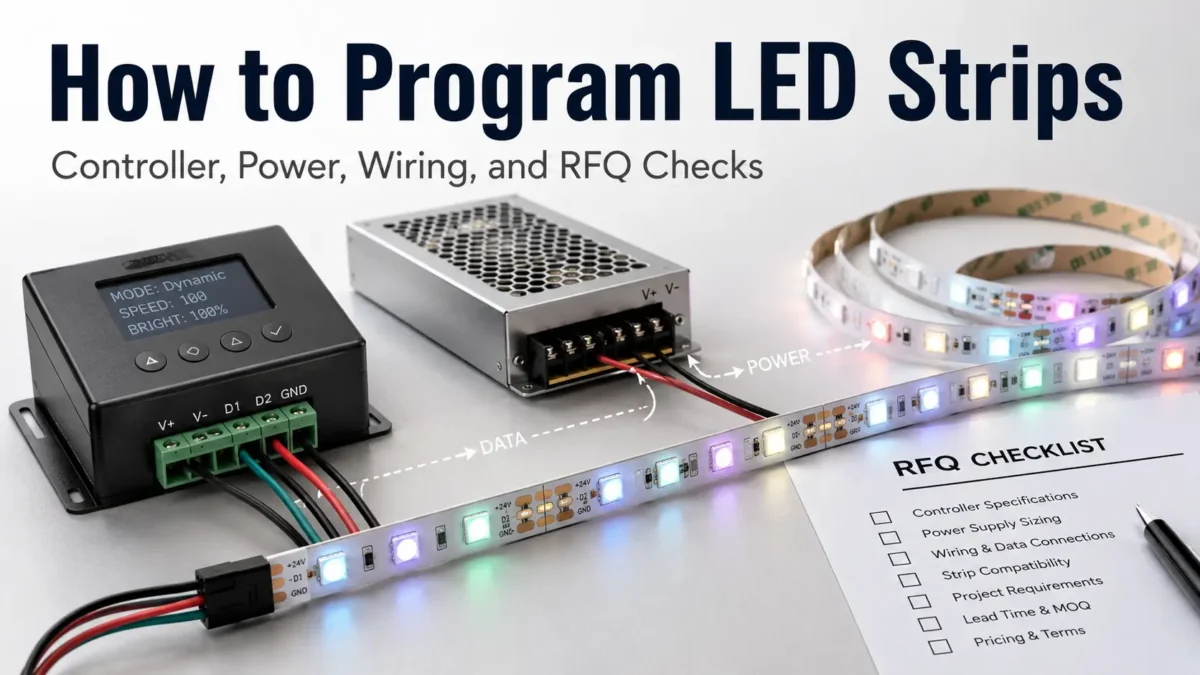
Programming LED strips is not only a coding task. First, check the strip type, controller, IC or chip, voltage, power supply, data wiring, and site conditions.
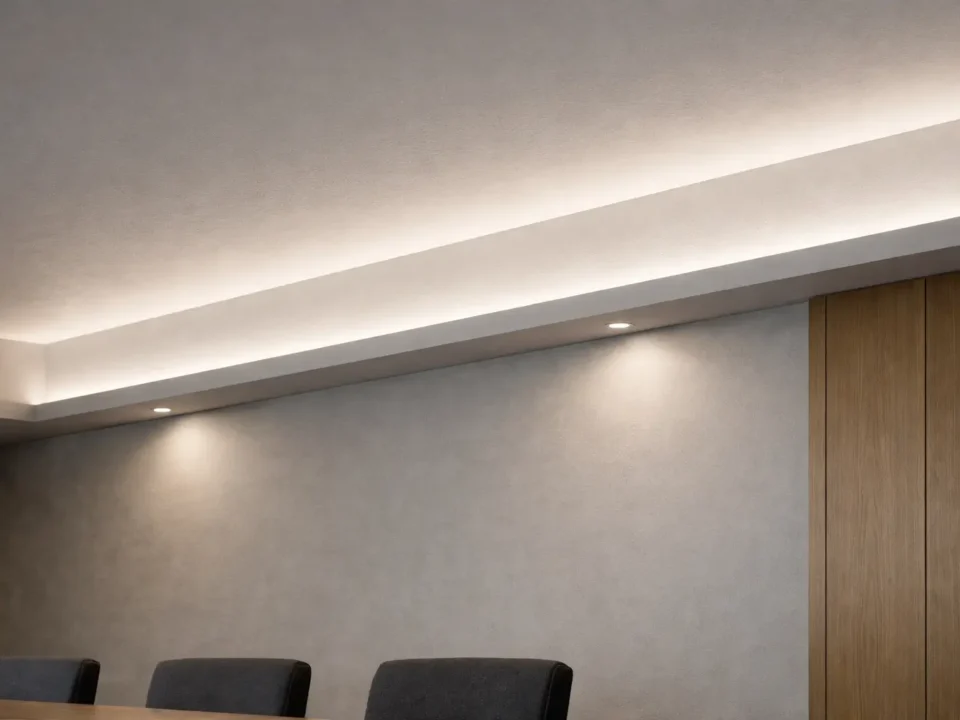
Even a small test setup can fail when it is moved into a long run. For example, a strip that works on a desk may flicker on site if the power plan, controller, or wiring route is wrong.
Therefore, this guide focuses on the full setup path. You will learn how LED strips are controlled, what to check before code, and what details to send before asking for a quote.
To program LED strips, first confirm whether the strip is non-addressable or addressable. Then match the strip with the right controller or microcontroller, IC/chip setting, voltage, power supply, data direction, and control software. For B2B projects, also prepare strip type, length, voltage, control method, site use, and quantity before asking for advice or a quote.
Not every LED strip is controlled in the same way. Before you look for code, ask a simpler question: what kind of strip am I using?
A non-addressable LED strip usually controls the whole strip or channel together. For example, an RGB strip may turn the full strip red, green, blue, or a mixed color. A CCT strip may adjust warm white and cool white channels.
By contrast, an addressable LED strip can support more detailed effects. Depending on the chip and controller, it can create chasing, flowing, pixel, scene, or custom effects.
| LED Strip Type | Typical Control Method | Program Flexibility | What to Check First |
|---|---|---|---|
| Single-color strip | Dimmer or single-channel controller | Low | Voltage, power supply, dimming method |
| CCT strip | CCT controller | Low to medium | Warm/cool channel control, voltage, controller output |
| RGB strip | RGB controller | Medium | Wiring type, voltage, channel order |
| RGBW / RGBWW strip | Multi-channel controller | Medium | Channel order, controller fit, power |
| Addressable LED strip | Addressable controller or microcontroller | High | IC/chip, voltage, data direction, control method, power plan |
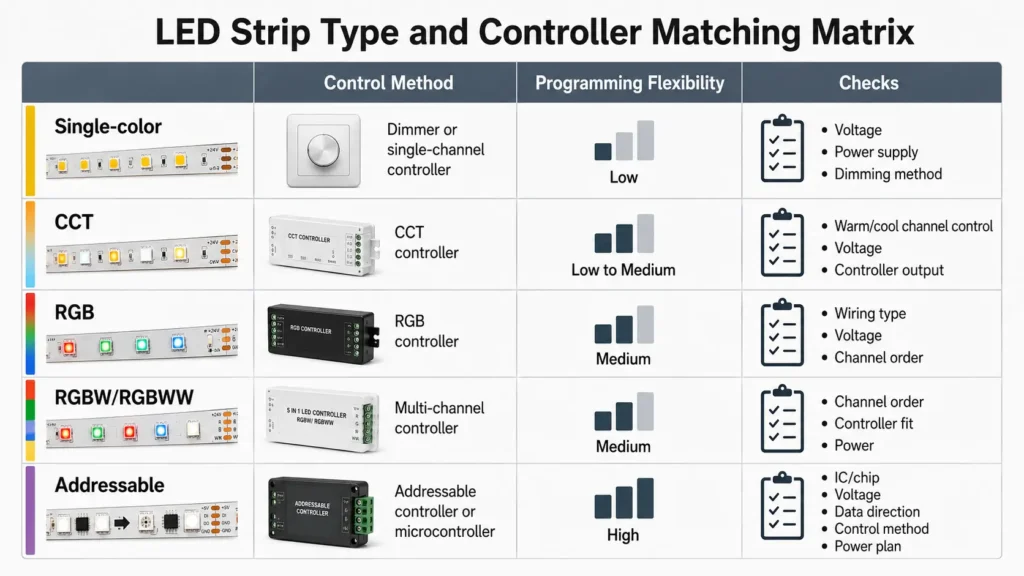
As a result, strip type affects much more than the light effect. It also affects the controller, wiring, site work, fault checks, and RFQ details.
After the strip type is clear, choose the control path. This path links user input or software to the LED strip.
For simple jobs, a standard LED strip controller may be enough. However, projects with more effects may need an app controller, DMX/SPI or project-level controller where supported, Arduino, or another microcontroller.
For testing and custom effects, Arduino with a library such as FastLED can be one route for supported addressable LED strips. However, it is not a method for every strip. The chip, voltage, output signal, library support, data timing, and wiring still need to match.
| Control Path | Useful When | Main Checks | B2B Notes |
|---|---|---|---|
| Basic LED controller | Standard color changes or preset effects are enough | Strip type, voltage, channel output | Good for simple jobs where custom effects are not needed |
| App or remote controller | The user needs easy scene control | App system, load, strip fit | Useful for small and medium decor jobs |
| Arduino / microcontroller | Custom effects or tests are needed | IC/chip support, library, pin, power, signal level | Useful for tests and custom logic, but it needs a technical setup |
| DMX/SPI or project-level controller | The project needs central control or a wider light system | Protocol, controller limit, wiring plan | Often used when lighting must work with a larger control plan |
| Custom control setup | OEM or special effects are needed | Specs, test scope, site use, production plan | Requires clear needs before quote or build |
Instead of starting with random code, first define the job. Then the control path becomes easier to choose.
Addressable LED strips rely on control data. Therefore, the strip IC or chip is one of the first details to confirm.
For example, one addressable strip may use a WS2812B-type protocol, while another strip may use a different chip. If the IC, color order, or data setting is wrong, the strip may not respond as expected.
Before you program the strip, confirm these items:
| Item | Why It Matters | What to Confirm |
|---|---|---|
| IC / chip type | Sets the controller or library choice | IC model from product label, spec sheet, or supplier |
| Voltage | Affects power supply and wiring | 5V, 12V, 24V, or another required voltage |
| Data direction | Signal must enter the right end of the strip | Arrow mark or DIN/DO label on the strip |
| Color order | Wrong settings can show wrong colors | RGB, GRB, BGR, or another order used by the strip |
| Controller output | The output must fit the strip type and load | Protocol, voltage, load limit, and wiring method |
| Pixel count / length | Longer runs affect power, timing, and signal behavior | LED count, strip length, density, and layout |
For B2B projects, include these details before supplier talks. “Programmable LED strip” alone is too broad for a sound part choice.
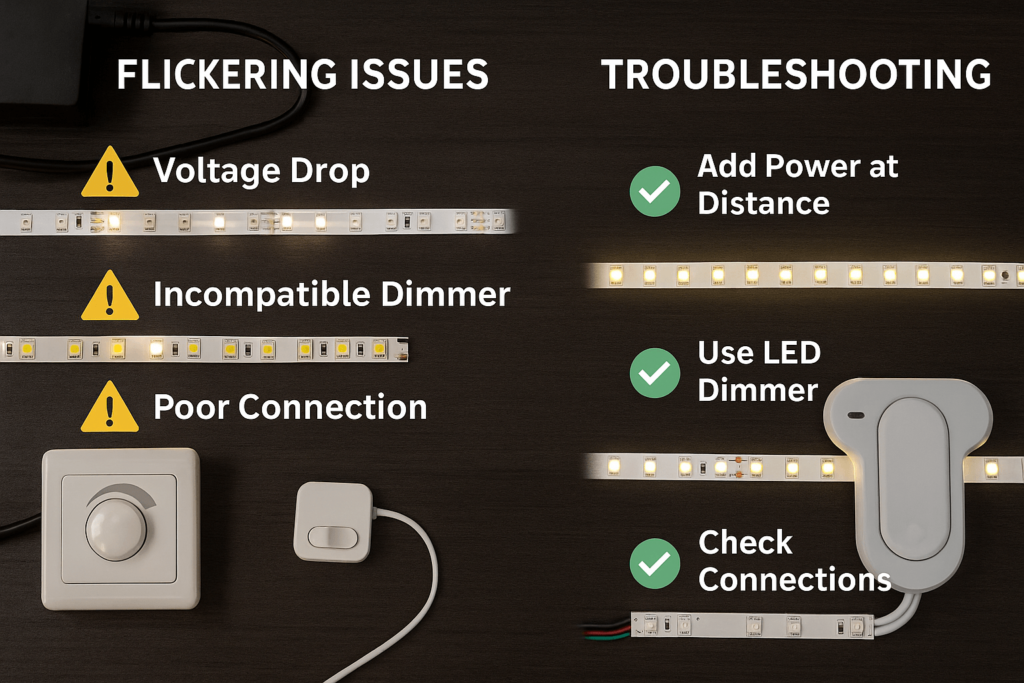
Many LED strip faults look like code faults at first. However, the root cause is often power, wiring, or signal setup.
Before you change code, check the main electrical and connection points. A strip may flicker, show weak color, or stop after a certain length if the power supply, voltage drop, connection, or data signal is not right for the run.
| Check | Why It Matters | First Action |
|---|---|---|
| Correct voltage | Wrong voltage can stop normal use or damage parts | Match the strip voltage to the power supply and controller needs |
| Power capacity | Long or dense strips need enough power | Estimate load from the strip specs and project length |
| Voltage drop | Long wire or strip runs may lose voltage along the run | Check whether power injection or shorter wiring is needed |
| Common ground | Controller and strip may need the same reference point | Follow the controller and strip wiring guide |
| Data direction | Signal must enter the correct end of an addressable strip | Check arrows, DIN/DO marks, and wire order |
| Signal level | Some setups need matched signal levels | Check controller output and strip input needs |
| Test length | A full run can hide simple setup issues | Test a short section before scaling up |
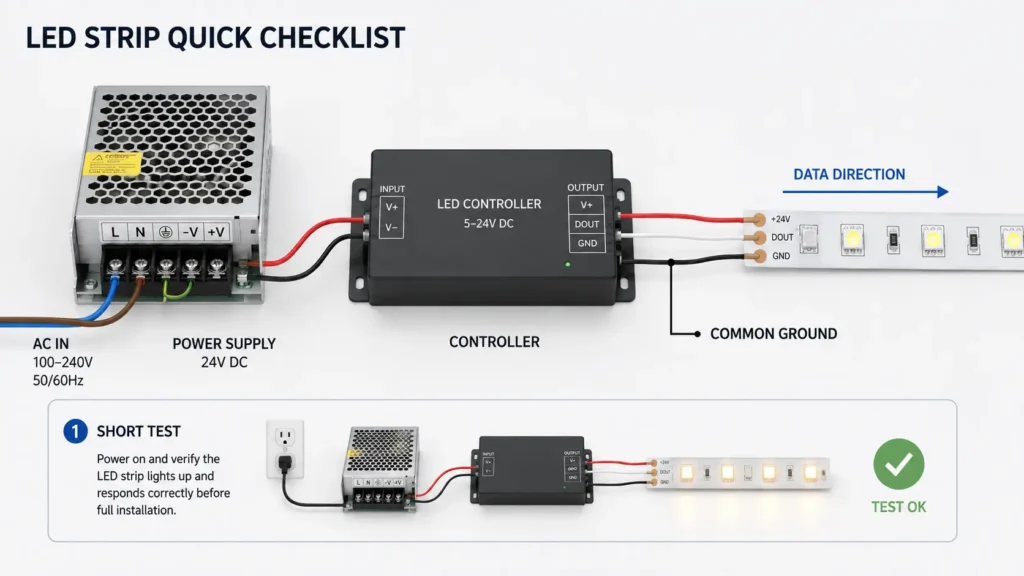
For site work, do not rely on a desk test alone. Also check the real run length, cable distance, controller place, power supply place, site conditions, and access for future service.
A clear workflow is safer than jumping straight into effects. Use this general path before you scale a project.
As a result, engineers, installers, and buyers can link the code plan with real site needs.
If an LED strip does not work as expected, do not assume the code is wrong. Instead, start with the visible symptom and the basic checks.
| Symptom | Possible Causes | First Checks | When to Ask a Supplier or Engineer |
|---|---|---|---|
| Strip does not light | No power, wrong voltage, wrong wiring, controller mismatch | Check power supply, polarity, controller output, and first LED connection | If voltage and wiring seem correct but the strip still does not respond |
| Wrong colors | Color order mismatch, channel order issue, controller setting issue | Test red, green, and blue one by one; check RGB/GRB/BGR setting | If color stays wrong after controller settings are checked |
| Flickering | Power instability, voltage drop, loose connection, signal issue | Check power capacity, wire length, connection quality, and common ground | If flicker appears only in longer runs or bright scenes |
| Only part of the strip works | Data break, damaged LED/pixel, voltage drop, wrong LED count setting | Check data direction, pixel count, and the point where the fault starts | If the fault repeats at the same place after rewiring |
| Effects act strangely | Wrong IC/chip setting, timing issue, library mismatch, controller mismatch | Confirm IC/chip model and controller or software support | If the setup uses custom code or mixed hardware |
| Strip works on the bench but not on site | Longer wiring, voltage drop, different power layout, site conditions | Compare the bench setup with the final layout | If the final job has long runs or complex wiring |
Because one symptom can have several causes, keep fault checks step by step. Clear setup notes can also cut the time needed to find the issue.
A buyer who only asks for “programmable LED strips” may get the wrong advice. Therefore, send enough detail to match the strip, controller, and power plan.
This checklist does not replace engineering review. However, it helps the supplier or technical team understand the job before they suggest a setup.
When you prepare an RFQ, include the project details below. This makes the first supplier review clearer.
| RFQ Item | What to Provide | Why It Helps |
|---|---|---|
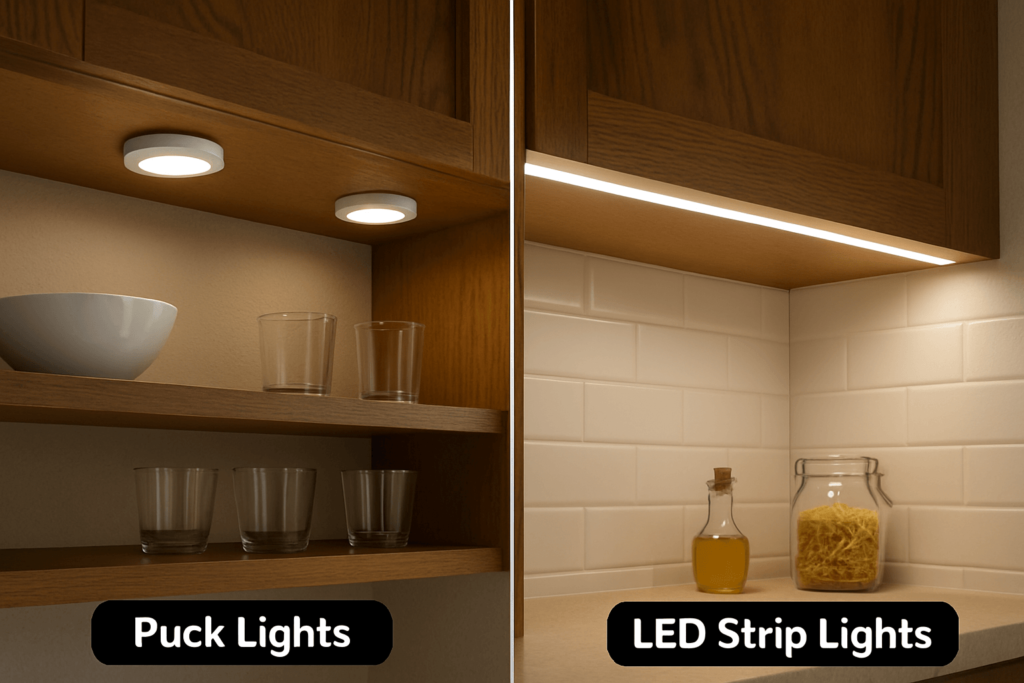
| Application | Retail display, sign, building light, OEM product, cabinet light, stage/display project, or other use | Helps match effect, brightness, and site needs |
| Strip type | RGB, RGBW, CCT, addressable, or unknown | Helps identify the control route |
| Voltage | 5V, 12V, 24V, or to be confirmed | Affects power supply and wiring |
| IC/chip | Known IC model, if addressable | Helps check controller or software fit |
| Length and layout | Total length, segment lengths, bends, site drawing | Helps review wiring and power plan |
| LED density | LEDs per meter or pixel density | Affects brightness, effect smoothness, power, and cost |
| Controller method | Standard controller, app, DMX/SPI, Arduino, microcontroller, or custom | Helps choose the control path |
| Site conditions | Indoor, outdoor, damp, warm, display case, or other condition | Helps check protection and setup risks |
| Quantity | Sample, trial order, or project quantity | Helps the supplier suggest a suitable next step |
| Required documents | Spec sheet, test report, compliance document, drawing, packaging details, or other needs | Helps avoid late document gaps |

Finally, avoid asking only for price. A strip selected only by price may not fit the controller, effect, run length, or site conditions.
Yes, but the method depends on the strip type. Non-addressable strips usually control the whole strip or color channels together. In contrast, addressable LED strips can support more detailed effects when they match the controller, IC/chip setting, power supply, and wiring.
Programmable LED strips use a controller or microcontroller to send control signals to the strip. For addressable strips, the controller sends data that tells LEDs or LED groups how to behave. Therefore, the exact method depends on the IC/chip, voltage, controller, software, and wiring.
You usually need the LED strip, a compatible controller or microcontroller, a suitable power supply, correct wiring, and the right control software or settings. Also confirm the IC/chip type, data direction, color order, LED count, and voltage before testing effects.
Arduino with FastLED can be one common option for supported addressable LED strips. However, it is not a universal method for every strip. Before using this route, confirm the IC/chip, voltage, signal needs, LED count, color order, and library support.
Wrong colors may come from color order settings, channel order, controller settings, wiring, or strip mismatch. First, check whether the software or controller is set to the right color order, such as RGB, GRB, or another format used by the strip.
Flicker may be linked to power supply capacity, voltage drop, loose connections, long wiring, signal issues, or controller mismatch. Start by checking voltage, power, common ground, data direction, connection quality, and whether the issue appears only in long runs or bright scenes.
Prepare the application, strip type, voltage, IC/chip if known, total length, LED density, controller method, site conditions, quantity, drawings, and required documents. These details help the supplier or technical team review fit and suggest a more suitable setup.
Prepare your strip type, voltage, IC/chip if known, total length, LED density, controller method, site conditions, quantity, drawings, and required documents before requesting selection help or a quotation.
Before the final setup is chosen, the strip, controller, power, wiring, and project conditions should be checked together.