
Table of contents
If you search for a “waterproof COB LED strip,” you likely need to solve two things at once. First, you need the right IP rating for the site. Also, you need a plan that stops water from entering through ends, cuts, plugs, cables, drivers, or controls.
Therefore, this guide treats “waterproof” as a full system need. It is not only a label on the strip.
Yes, COB LED strips can be waterproof. However, the strip must use a wet-rated build, and the whole setup must stay sealed as one system. That system includes the strip body, ends, cuts, plugs, cable entries, drivers, and controls.
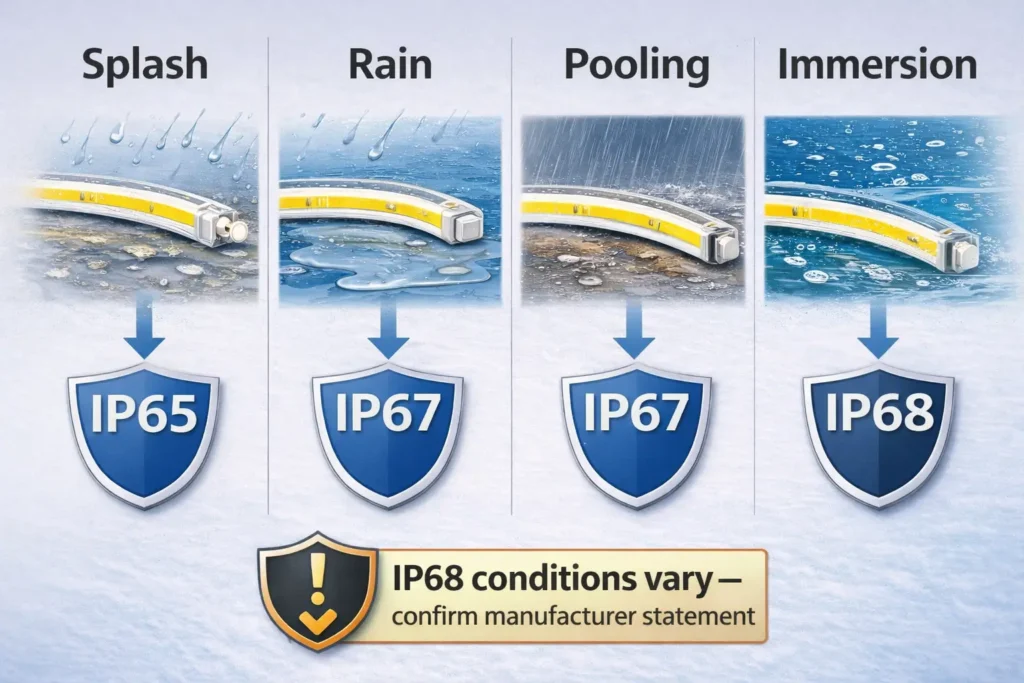
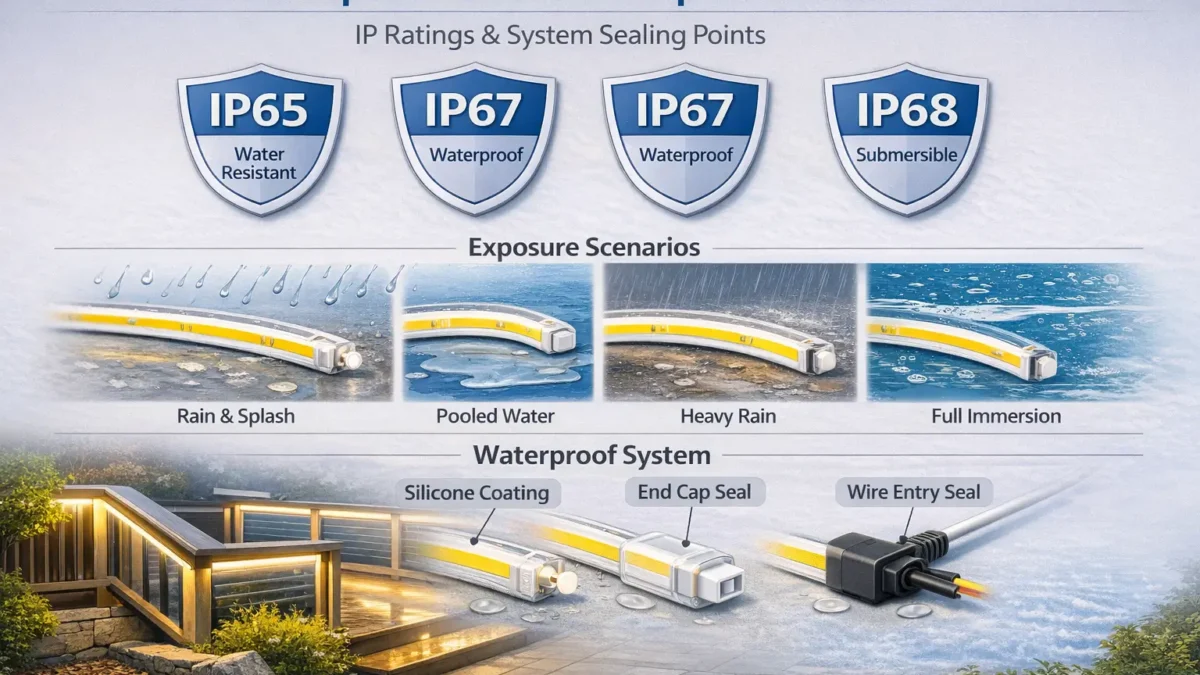
IP65, IP67, and IP68 are common labels. Still, your choice should start with the real site: splashes, rain, pooled water, or use in water. After that, ask how the supplier seals each weak point.
In short, do not buy by the word “waterproof” alone. Instead, match the strip to the site, then check the seal plan. As a result, you can reduce leaks before you order a full batch.
Key Points
Use the table below as a first check. However, always confirm the final choice with the model data sheet.
| Wet area | Common IP label | What it often means | Main risk to plan for |
|---|---|---|---|
| Indoor splashes or light wiping | IP65 | Basic splash or spray cover, based on the model | Ends, cuts, and plugs still need sealing |
| Outdoor rain or wind-driven wetting | IP67 | Stronger wet-area cover; some models may allow short water contact | Water often enters through ends and cable entries |
| Pooled water or possible use in water | IP68 | Water-use cover under stated limits | Depth and time limits must come from the supplier |
For COB LED strips, “waterproof” should mean two things. First, the strip has a clear water rating. Second, the full setup keeps water out of each entry point.
For example, the top of the strip may look sealed. However, water can still enter through a cut end, a cable joint, or a loose plug. Therefore, the full layout matters as much as the strip body.
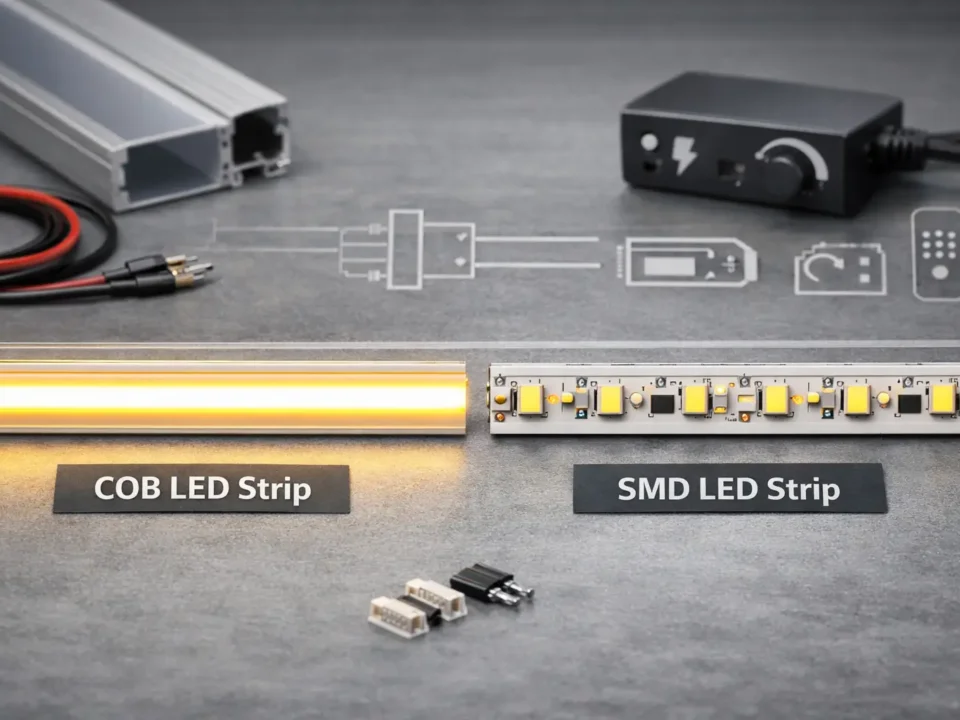
COB means “chip on board.” In LED strips, this style helps make a smooth and dot-free light line. However, COB does not define water safety.
A COB strip can be non-waterproof, splash-safe, weather-safe, or built for stronger wet use. Because of this, buyers should check the wet-rated model, not only the COB label.
Key Points
People often use these words in loose ways. Still, they do not always mean the same thing.
Water-resistant often means the strip can handle limited splashes or spray. By contrast, waterproof is often used for stronger wet use. If the strip may sit in water, ask for the exact test depth and time.
Key Points
A reliable wet-area setup protects more than the strip surface. It also protects strip ends, cut points, plugs, cable entries, drivers, controls, and boxes.
As a result, many field faults come from the parts around the strip, not from the light line itself.
Check these parts:
Choose IP65, IP67, or IP68 based on real wet risk. Do not choose by guesswork. Also, avoid using “outdoor” as the only spec, because outdoor use can mean many things.
For instance, a strip under a roof edge faces a different risk than a strip near a pool, fountain, or open sign box. Therefore, map the site before you compare models.
IP codes show how well a product keeps out dust and water. The first digit relates to dust or solids. The second digit relates to water.
In LED strip buying, suppliers often use IP65 for splash areas, IP67 for stronger wet areas, and IP68 for water-use projects. However, IP68 needs extra proof because the depth and time limits depend on the exact model.
Use this table as a guide. Then, ask the supplier for the model scope before you order.
| IP label | Best starting use | What to confirm | Install tip |
|---|---|---|---|
| IP65 | Indoor splashes, damp areas, and light spray | Water scope and seal method | Seal ends and keep power parts away from wet zones |
| IP67 | Outdoor rain or stronger wet use | Whether short water contact is allowed | Protect cable entries and avoid pooled water |
| IP68 | Pooled water or use in water | Depth and time limits for this model | Plan sealed entries, safe power parts, and service access |
If the strip only faces light splashes, IP65 may be enough. However, you still need sealed ends and safe power placement.
If the strip faces direct rain, IP67 is often a better start. In addition, the layout should stop water from sitting near plugs or cut ends.
If water can pool around the strip, do not rely on a basic waterproof claim. Instead, ask whether the model covers short water contact.
Finally, if the strip will be used in water, ask for IP68 details. Most importantly, get the depth, time, and install limits in writing.
Before you order samples, write a simple wet-area spec. This step helps the supplier choose the right model and reduces rework later.
Start with the site. Then, list the ends, cuts, and plugs. After that, note where the driver and controls will sit.
First, describe the site in plain terms. For example, say whether the strip will face indoor splashes, open rain, pooled water, or use in water.
Also, note cleaning spray, heat swings, and possible moisture build-up. These details help the supplier avoid a poor match.
Next, describe the route. Include the run length, corners, cut points, plugs, and service access.
In addition, say whether the strip will sit flat, inside a channel, under a cover, or in a tight space. This helps the supplier see where water may gather.
Also, state where the driver and controls will sit. In many wet projects, these parts should stay in a dry or safer zone.
If you use a box, describe how cables enter it. Cable entries often become weak points, so they need sealing and strain relief.
When samples arrive, do not check light output only. Instead, review the end caps, plugs, cable entries, seal method, channel fit, and data sheet.
As a result, your team can spot install issues before the full order.
Sample checklist:
A waterproof COB LED strip works best when the whole setup blocks water paths. Therefore, plan the install before you cut, join, or close any channel.
First, find where water may come from. Look for rain, spray, cleaning water, moisture build-up, and low spots where water may sit.
Also, check whether water can run along a cable and drip into a plug or box.
Next, count every weak point. Each end, cut, and plug needs a seal plan.
For harsh outdoor use, custom lengths can reduce field cuts. Therefore, they can also reduce leak risk.
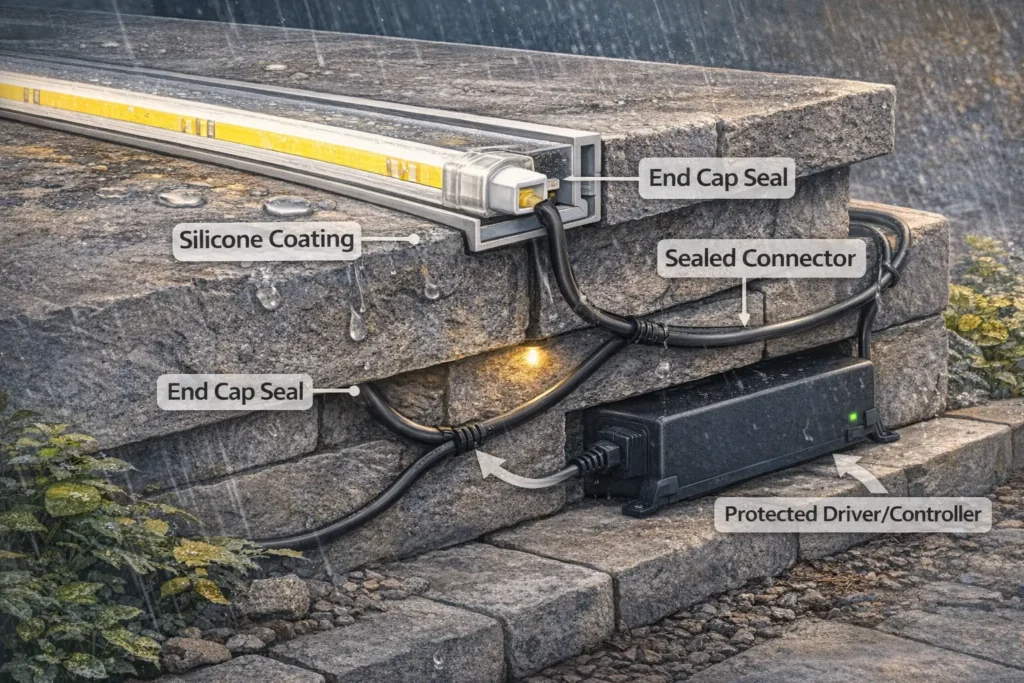
After layout planning, seal the ends and cable entries based on the supplier’s method. Then, add strain relief where cables may move.
This step matters because movement can open seals over time.
Place drivers and controls in dry or safer areas when possible. If they must stay near wet zones, use a suitable box and seal the cable entries.
In addition, keep enough access for later checks.
Before you close profiles, covers, or wall spaces, check all seals. Look for gaps, loose caps, bare copper, or stressed cables.
Finally, test the strip before the area becomes hard to reach.
Sometimes, LED neon is a better choice than a waterproof COB strip. For example, it may help when the project needs a strong outer body and a very smooth light line.
However, the choice still depends on site shape, wet risk, and service access.
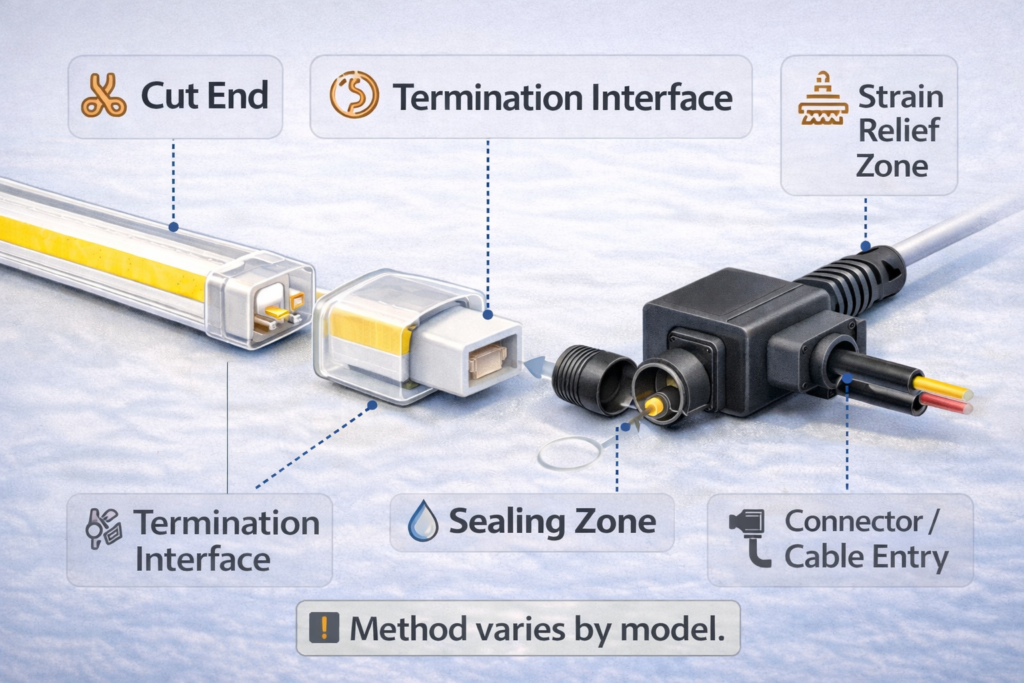
You can often cut waterproof COB LED strips. However, every cut creates a new weak point. Therefore, the cut end must be sealed again with the method approved for that model.
Do not assume a field cut keeps the original IP rating. Instead, ask the supplier how to keep water out after cutting.

Yes, many waterproof COB strips can be cut at marked points. Still, the cut end must be sealed again.
Before cutting, ask where the approved cut points are, what cap or seal method to use, and whether the supplier supports field sealing.
For outdoor or hard-to-reach areas, custom lengths may be safer. They reduce the number of site cuts and joins.
However, custom lengths do not remove all risk. The install team still needs to protect cable entries, drivers, and controls.
Choose custom lengths when the project has many wet-zone cuts, poor service access, rain exposure, pooled water risk, or a need for repeat work.
As a result, the team makes fewer field seals and has fewer points to check later.
Most outdoor failures do not start in the middle of the strip. Instead, water enters through the easiest path.
Common paths include ends, cuts, plugs, cable entries, and driver or control boxes. In addition, moisture and rust can build up over time.
| Weak point | What often goes wrong | How to reduce risk |
|---|---|---|
| Strip end | End cap is loose or poorly sealed | Use the approved seal method and check it |
| Cut end | Field cut is not sealed well | Limit cuts or order custom lengths |
| Plug or joint | Water reaches the plug | Seal and support the plug |
| Cable entry | Water follows the cable into a box | Use safe routing and sealed entries |
| Driver or control | Power parts sit in wet zones | Move them to safer areas or use a suitable box |
Watch for flicker, dim parts, dead sections, moisture near ends, rust near plugs, loose caps, or water inside channels.
If these signs appear, inspect the setup soon. Otherwise, a small leak may spread to more parts.
A sealed setup still needs access for checks. If the strip is locked inside a space with no access, small faults can grow.
For this reason, plan access points in wet, outdoor, or high-risk layouts.
Waterproof COB strips use different cover methods. Each method has trade-offs. Therefore, choose based on wet risk, install work, and service needs.
Coated strips often fit splash or damp areas. They may also be easier to handle than thicker sealed styles.
However, the coating does not remove the need to seal ends and cuts. Poor handling can also damage the surface.
Sleeve or jacketed strips add an outer cover around the light strip. This can help in stronger wet areas.
Still, end sealing becomes very important. If water enters the sleeve, it may travel along the strip.
Encased strips often suit stronger wet use. Some may fit water-use projects, but only under stated limits.
Therefore, buyers must still ask about depth, time, end sealing, and cable entry limits.
| Method | Best use | Main caution | Supplier question |
|---|---|---|---|
| Coated | Splash and damp areas | Ends and cuts still need sealing | How are cut ends sealed? |
| Sleeve or jacketed | Outdoor rain and stronger wet areas | Water can enter through poor end seals | What is the approved end seal method? |
| Encased | Pooled water or water-use projects | Depth and time limits must be clear | What IP68 limits apply to this model? |
More sealed builds can give better wet cover, but they can also make field cuts harder. As a result, the best method depends on how many cuts and joins the layout needs.
If field cuts are likely, choose a model with a clear and repeatable end-seal method.
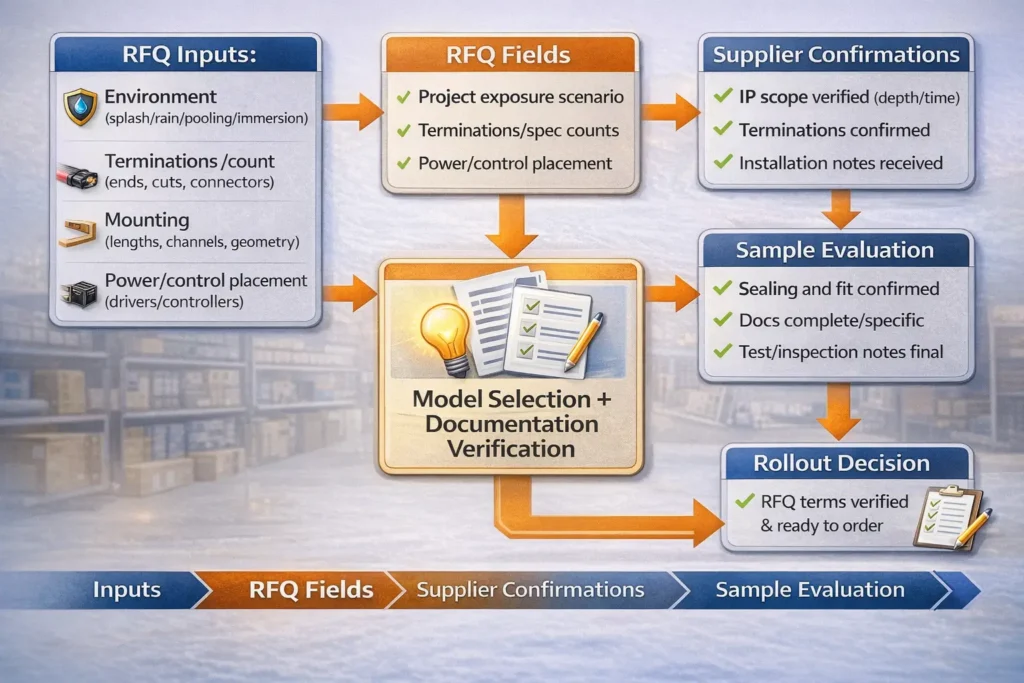
A strong RFQ makes the word “waterproof” clear. Do not write only “need waterproof COB strip.” Instead, describe the site, wet risk, cuts, plugs, and power setup.
Then, ask the supplier to confirm the model scope. This makes the quote easier to compare.
| RFQ field | What to write | Why it matters |
|---|---|---|
| Wet risk | splash, rain, pooling, or water use | Helps choose the IP scope |
| Target IP rating | IP65, IP67, or IP68 | Sets the water-cover goal |
| Ends and cuts | number of ends, cuts, and plugs | Shows leak risk and site work |
| Cut plan | factory length or field cut | Affects seal method |
| Mounting method | tape, clips, channel, or profile | Affects support and water paths |
| Driver location | dry zone, box, or wet-area limit | Helps protect power parts |
| Needed docs | data sheet, IP notes, install notes | Reduces guesswork |
Ask for the model data sheet, IP rating notes, cut and seal guide, plug notes, install notes, and model or series scope.
Also, if you need IP68, ask for the stated depth and time. This point is important because IP68 limits can vary by model.
If you want a second set of eyes on a wet or outdoor COB strip spec, share your site risk, layout notes, and driver plan through the Elstar contact page: Contact Elstar.
These FAQs answer common questions about waterproof COB LED strips. Also, they use the same rule as the guide: match the product to the site, then seal the full setup.
It means the strip has a defined water rating, often shown as an IP rating. However, the full setup must also seal ends, cuts, plugs, cables, drivers, and controls.
IP65 often fits splash or spray areas. IP67 often fits stronger outdoor wet use. IP68 is for water-use projects, but the supplier must state the depth and time limits.
Sometimes, yes. IP65 may work for covered outdoor areas with light splash risk. However, if the strip faces direct rain, pooled water, or flood risk, review IP67 or IP68 options.
Protect the ends, cut points, plugs, cable entries, driver, and controls. These parts often fail before the strip body does.
Often, yes. However, the cut end must be sealed again. Also, the seal method must match the model’s design.
Coated strips often fit splash or damp areas. Sleeve or jacketed strips often fit stronger wet areas. Encased strips may fit water-use jobs, but only if the supplier gives clear IP68 limits.
Water usually enters through weak points, not through the center of the strip. Common causes include loose end caps, poor cut sealing, exposed plugs, poor cable routing, and unsafe driver placement.
Choose LED neon when you need a stronger outer body and a smooth neon-style light line. However, the final choice still depends on shape, wet risk, and service access.
A waterproof COB LED strip project works best when you match the IP rating to the real wet risk and seal the full setup. The strip body matters, but the ends, cuts, plugs, cables, drivers, and controls matter just as much.
Finally, share your wet-risk type, layout, end and cut count, and driver placement plan. As a result, the supplier can suggest a better waterproof COB LED strip and a safer seal method.
For sourcing help, share: (1) wet-risk type, (2) layout with end and cut count, and (3) driver or control placement. You can start here: Elstar contact and mention “waterproof COB strip IP selection and seal plan.”
