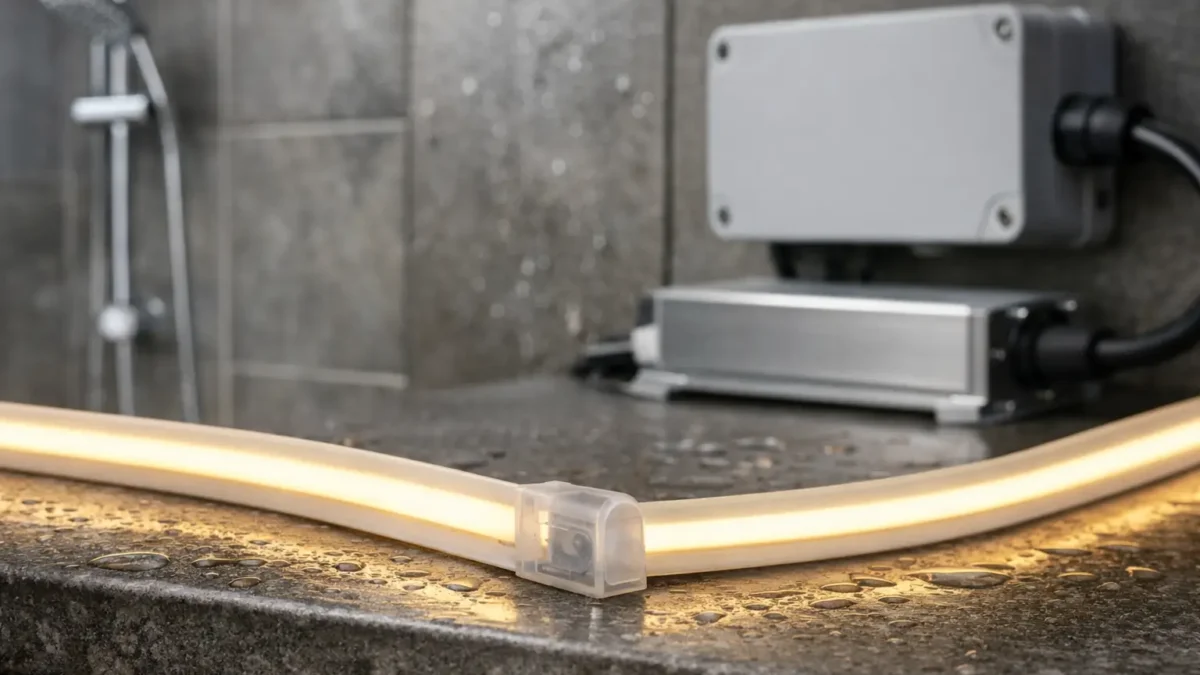
A waterproof COB LED strip is an IP-rated COB strip made to resist moisture. However, a reliable wet-area install depends on the full system, not only the strip body. Therefore, buyers must also protect cut ends, connectors, cable entries, drivers, controllers, and enclosures.
Fast buying rules
First, choose the IP level by real exposure, such as splash, rain, pooling, or immersion.
Next, protect the full chain: strip body, cut ends, connectors, cable exits, and power gear.
Also, plan how the strip will be cut, joined, and resealed before it goes on site.
Finally, confirm the exact model datasheet and install notes before bulk order.
Quick IP direction table
Environment
Common IP direction
What else must be wet-ready
Indoor damp or occasional splash
IP65 often
Resealed ends, protected connectors, and drip-safe routing
Outdoor rain exposure
IP67 often
Cable entry sealing and protected driver or controller box
Standing water or accidental dunking
IP67 or IP68, project-dependent
Full-system sealing and site-based checks
Continuous immersion
IP68 only with stated limits
System design, test limits, and service plan
Important IP limits
However, IP ratings describe test-based protection, not an unlimited waterproof promise.
Also, strip IP does not automatically cover the power supply or controller.
What “Waterproof” Means for COB LED Strips: Strip vs System
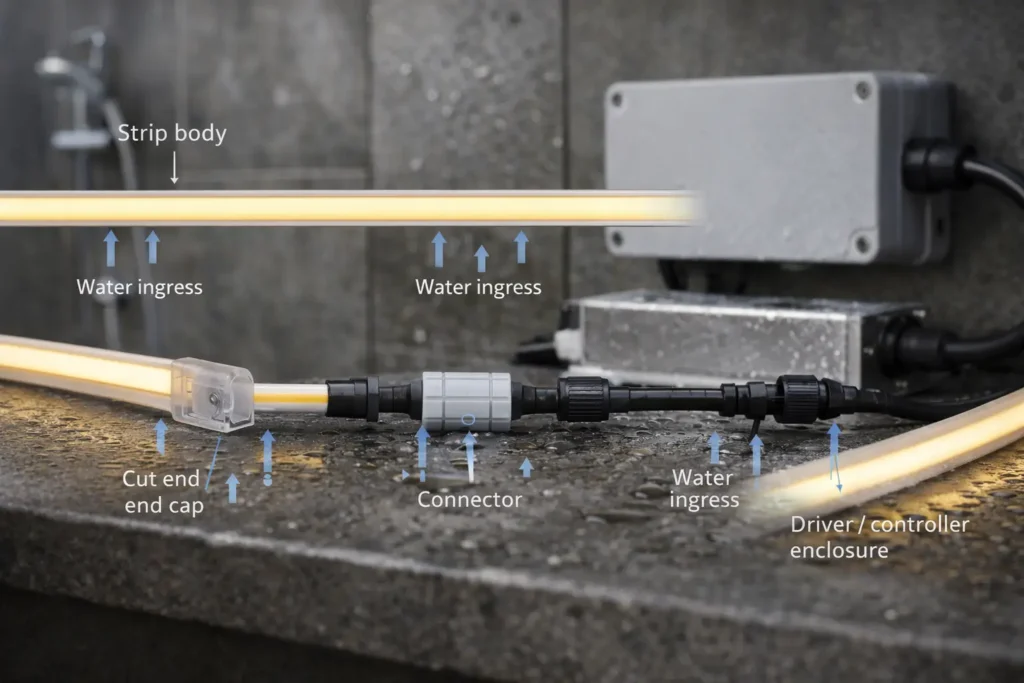
Waterproof performance is a system result. In other words, an IP-rated strip body can still fail if water enters through ends, joins, cable exits, or the power enclosure.
Parts that can break waterproofing
Cut ends after field trimming
Connectors and splices that lack sealing or strain relief
Cable exits and wire entry points
Driver, dimmer, or controller boxes without a matching enclosure plan
Why wet-area failures happen
Usually, moisture enters at a weak end or joint. Then, corrosion or short risk increases. As a result, the strip may flicker, dim unevenly, or fail.
Ingress-point checklist
First, reseal every cut end with the method made for that strip series.
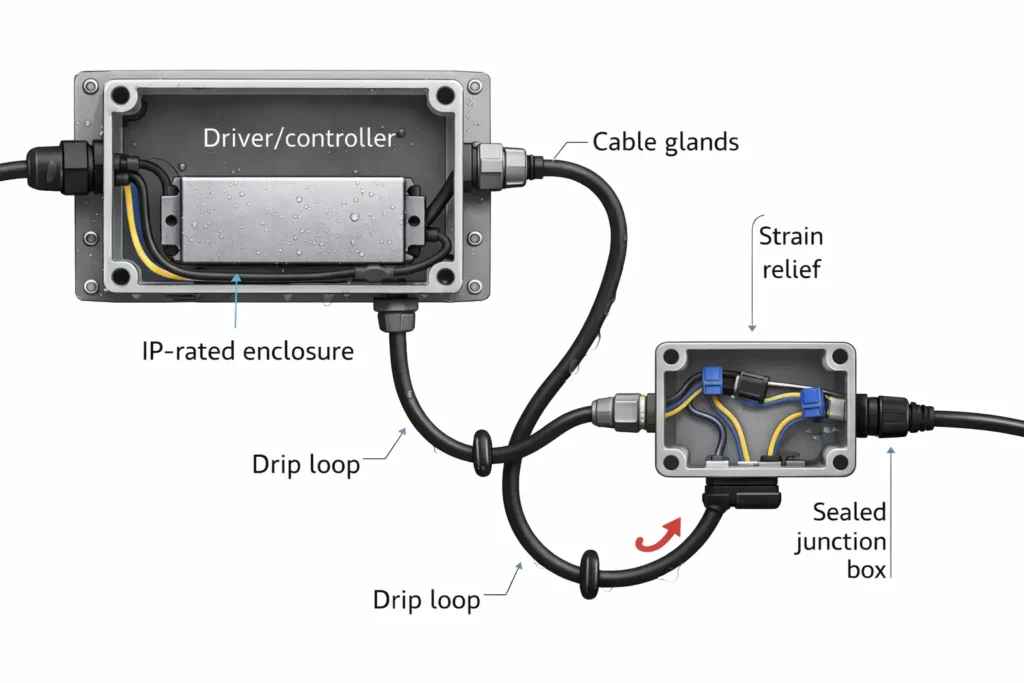
Next, protect connectors and add strain relief so movement does not open gaps.
Also, route cables with drip loops where water may follow the cable.
Finally, place the driver and controller in a suitable enclosure or protected zone.
System boundary notes
However, “waterproof connector” does not mean the whole assembly is watertight.
Also, the driver and controller usually need their own wet-area protection.
Therefore, treat the strip as one part of a larger waterproof system.
IP65 vs IP67 vs IP68: Choose the Right Waterproof Level by Environment
Choose IP level by how water contacts the install. For example, splash, rain, pooling, and immersion are different risks. Therefore, the right answer is not always the highest IP number.
IP selection table
Scenario
Typical exposure
Practical IP direction
Notes that reduce failures
Indoor damp or occasional splash
Humidity and light splashes
IP65 often
Focus on ends, connectors, and power enclosure.
Covered outdoor under eaves
Wind-driven rain risk
IP67 often
Seal cable entries and protect driver/controller.
Fully exposed outdoor
Rain and pooling risk
IP67 or IP68, project-dependent
Plan drainage, sealing, and maintenance access.
Accidental dunk or standing water
Temporary immersion risk
IP67 or IP68, project-dependent
Define test limits and verify the full system.
Continuous immersion
Always submerged
IP68 only with stated conditions
Use a full system design, not only a strip choice.
Why highest IP is not always best
Higher IP can add cost and install work.
Also, stronger sealing can make field repair harder.
In addition, more waterproof layers may affect heat and flexibility.
Therefore, choose the lowest IP level that fits the real exposure and service plan.
IP boundary notes
IP ratings follow defined test scopes, so marketing terms are not enough.
Also, submersion claims need clear model-level conditions.
Finally, the full assembly must match the site, including cable exits and enclosures.
Waterproof Construction Options: Coating vs Silicone Sleeve/Tube
Waterproof COB strips often use a coating, a sleeve, or a tube-style cover. Each method changes handling, heat flow, bend limits, and field service. Therefore, confirm the build before choosing accessories.
Common construction types
Waterproof approach
Pour
Trade-offs
Typical fit
Surface coating
Slim profile and easier fit in tight spaces
Cut ends still need careful resealing
Damp or splash areas where low bulk helps
Silicone sleeve or tube
Stronger outer barrier for rain exposure
More complex terminations and lower service ease
Outdoor areas where added protection matters
Trade-offs to check
First, check how the strip can be cut and sealed.
Next, check whether compatible end caps and connectors exist.
Also, check whether the added layer changes flexibility.
Then, check whether the build needs more heat planning.
Finally, check whether the site needs future service access.
Model-specific warning
Different series can use different waterproof methods. As a result, two strips with the same IP label may need different end caps, seal steps, and service methods.
Boundary conditions: Always verify the exact datasheet and accessory kit before purchase.
Cutting, Connecting, and Resealing Waterproof COB LED Strips
Any cut or splice creates a new water entry point. Therefore, resealing is not optional in wet-area work. It is part of the install process.
Why terminations fail
Water often enters through an open copper end.
Also, cable movement can pull seals open over time.
In addition, dust, oil, or moisture can weaken seal contact.
As a result, the strip may pass a first test but fail later.
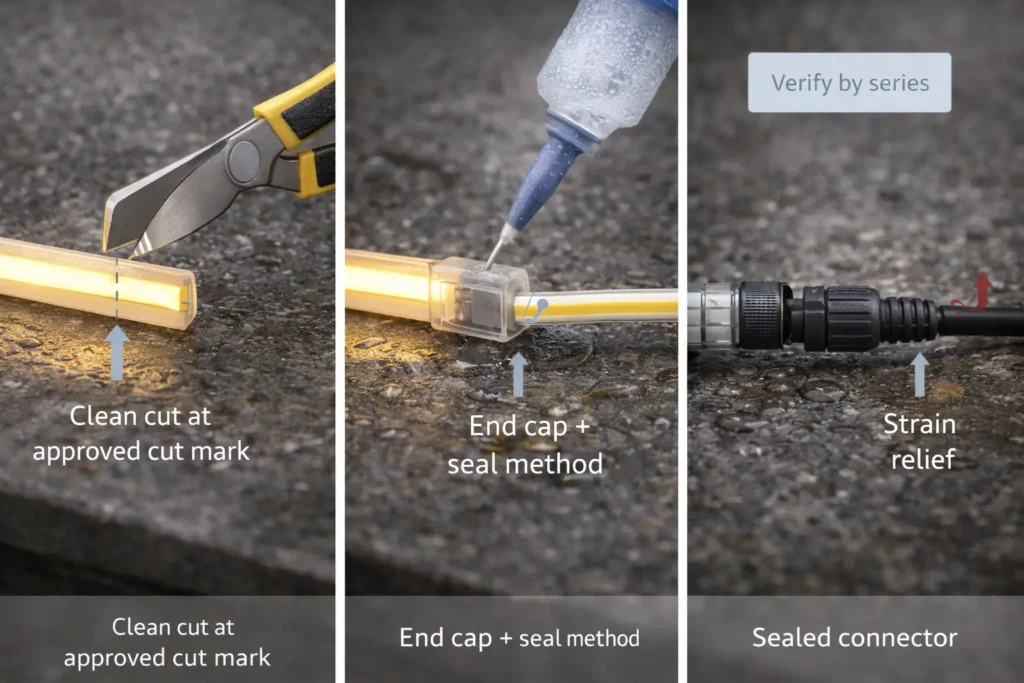
Reseal process
First, confirm the approved cut point from the series notes.
Next, cut cleanly without tearing the waterproof layer.
Then, keep the end clean and dry before sealing.
After that, apply the correct end cap or end-seal method.
Also, seal connector and cable exit points.
Next, add strain relief so movement does not open small gaps.
Finally, inspect the seal and test the strip before final close-up.
What not to do
Do not leave exposed copper at a cut end.
Also, do not seal over wet, dusty, or oily surfaces.
In addition, do not skip strain relief at connectors.
Finally, do not assume a waterproof connector protects the whole joint by itself.
Fast commissioning checklist
Ends sealed?
Connectors sealed?
Cable entries sealed?
Water routed away from boxes and joints?
Seals rechecked after the first operation cycle?
Boundary conditions: Do not assume IP protection is restored after cutting unless the approved reseal method is used and checked.
Power, Wiring, and Enclosures for Wet/Outdoor Waterproof COB Strip Systems
Even with an IP-rated strip, wet and outdoor reliability depends on the power and control system. Therefore, choose proper enclosures, seal cable entries, support wires, and plan power feeds.
Enclosure checklist
First, use an enclosure suited to rain, dust, or washdown risk.
Next, avoid open knockouts or rough cable entry holes.
Also, plan drainage where a sealed box could trap water.
Finally, keep access for inspection and service.
Cable entry and routing checklist
Use proper glands, boots, or sealed entries.
Also, add drip loops so water does not run into the enclosure.
Then, secure cables so vibration does not loosen seals.
Finally, avoid hidden wet joints that cannot be checked later.
Run planning concepts
Voltage drop can make long runs dim or unstable at the far end.
Power injection can help long or high-load layouts.
However, injection spacing depends on the exact strip, wire, and site layout.
Dimming and control checks
First, confirm the driver and controller use the same dimming method.
Next, keep control wiring away from moisture paths.
Also, use connectors and seals that fit the strip series.
Finally, test dimming before the system is closed.
Boundary conditions: Wet-location work can depend on local code and site rules. For official context, see this NFPA overview of NEC Article 300.
Heat and Mounting Reliability in Wet Areas
Waterproof layers can make heat and mounting more important. As a result, projects should treat the mounting method as part of the reliability plan.
Heat risks to watch
High ambient temperatures
Closed channels with poor airflow
Long operation with little heat path
Fully enclosed spaces that trap heat and moisture
Waterproof layers that slow heat release
When to use profiles or clips
Use profiles or clips when the surface is uneven or porous.
Also, use them when the run is long and movement may stress ends.
In addition, use them when a defined heat path and clean alignment matter.
When adhesive-only mounting may work
Adhesive may work when the surface is clean, dry, and compatible.
Also, it may work when the environment is mild and stress is low.
However, add extra support at terminations to reduce movement.
Boundary conditions: Thermal results depend on wattage, substrate, airflow, and profile choice. Therefore, verify in project conditions.
Safety, Compliance, and Documentation
IP ratings describe water and dust protection. However, they do not prove every safety or compliance requirement. Therefore, request documents for the exact model and project use.
Documents to request
Product datasheet for the exact model or series
Install note for waterproof ends, connectors, and cable exits
Wiring diagram and driver/controller notes
Certificate scope by model or series, if required
Project-required inspection or test records, if listed in the contract
System checks for submittals
Enclosure plan for driver and controller
Termination plan for cuts, connectors, and seals
Accessory kit needed for end caps and cable exits
Maintenance and access plan for sealed areas
Boundary conditions: Compliance needs vary by project and local authority. Therefore, confirm requirements locally and avoid blanket certificate claims.
B2B Sourcing Checklist for Waterproof COB LED Strips
To source waterproof COB strips well, write the environment, IP direction, termination plan, power plan, and document needs in one RFQ. As a result, the supplier can quote the correct strip and accessories.
RFQ-ready checklist
First, define the environment: damp, splash, outdoor rain, dunk risk, or continuous immersion.
Next, state the target IP level and where it must apply.
Also, ask whether coating or sleeve/tube construction fits the project better.
Then, state whether the strip will be cut on site.
In addition, request the approved reseal method and end-cap kit.
Finally, describe driver/controller location and enclosure needs.
Document pack to request
Datasheet for the exact model
Install note for waterproof sealing
Wiring and control notes
Certificate scope by model or series, if needed
Accessory list for end caps, connectors, and cable exits
Validation plan
Request samples for fit and termination testing.
Also, review ingress risk under the real mounting and routing plan.
Finally, test the strip, enclosure, and cable entries as one system.
Boundary conditions: Numeric performance specs must come from the exact datasheet. Also, lead times, warranty terms, and certificates must be confirmed per order.
FAQ: Waterproof COB LED Strip Lights
What does waterproof COB LED strip mean?
It means the strip body has moisture protection based on an IP-rated build. However, the full install must also protect cut ends, connectors, cable entries, and the power enclosure.
What is the difference between IP65, IP67, and IP68?
IP65 often fits splash areas. IP67 often fits stronger wet exposure and some temporary immersion risk. IP68 applies to immersion conditions defined by the maker. Therefore, check the exact model and full system.
Is IP65 enough for a bathroom or kitchen?
Often, yes, for damp or splash zones. However, ends and connectors still need proper sealing, and power gear still needs protection.
Can IP67 or IP68 COB strips be submerged?
Sometimes, but only when the maker defines the conditions and the full system supports them. Therefore, avoid blanket submersion claims without clear limits and tests.
How do you seal ends after cutting?
Cut only at the approved mark. Then, use the series-approved end cap and seal method. Also, add strain relief and inspect the seal before commissioning.
Are waterproof LED strip connectors actually waterproof?
Some are designed for wet use. However, correct assembly, cable sealing, and strain relief still decide whether the joint lasts.
What power supply setup should be used outdoors?
Use a driver or controller setup protected for the environment. In addition, use a suitable enclosure, cable glands, drip loops, and safe routing.
What should buyers ask suppliers before ordering?
Ask for the IP recommendation, waterproof construction method, reseal method, accessory kit, datasheet, wiring notes, and certificate scope if needed.
Summary and Next Steps
A waterproof COB LED strip project works best when you treat waterproofing as a full system. The strip IP rating matters, but ends, connectors, cable entries, enclosures, and workmanship often decide real reliability.
Key takeaways
First, choose IP by real exposure, not by marketing terms.
Next, protect the full waterproof chain: strip, ends, connectors, cable entries, and enclosure.
Also, treat cutting and resealing as a controlled process.
Then, match power, wiring, and enclosures to wet-area risk.
Finally, request documents and samples before bulk orders.
Scenario-based next steps
For damp or splash installs, lock the termination method and routing plan first.
For outdoor exposure, define the enclosure and cable entry method before ordering.
For any immersion language, write the conditions clearly and require system-level validation.
If you need a waterproof COB strip solution for a project, prepare these inputs before asking for a quote: environment description, target IP level, whether on-site cutting is required, driver/controller location, and any certificate constraints.



 English
  Spanish
  French
  Arabic