

LED strip lights can change the look of a bedroom, retail display, event booth, showroom, or rental space quickly. However, wall damage can happen later if adhesive pulls paint, leaves sticky marks, or harms weak wall surfaces during removal. Therefore, do not assume every LED strip backing is safe for every wall. Instead, choose the mounting method based on the surface, how long the lights will stay up, how clean removal needs to be, and whether the install is temporary or long term.
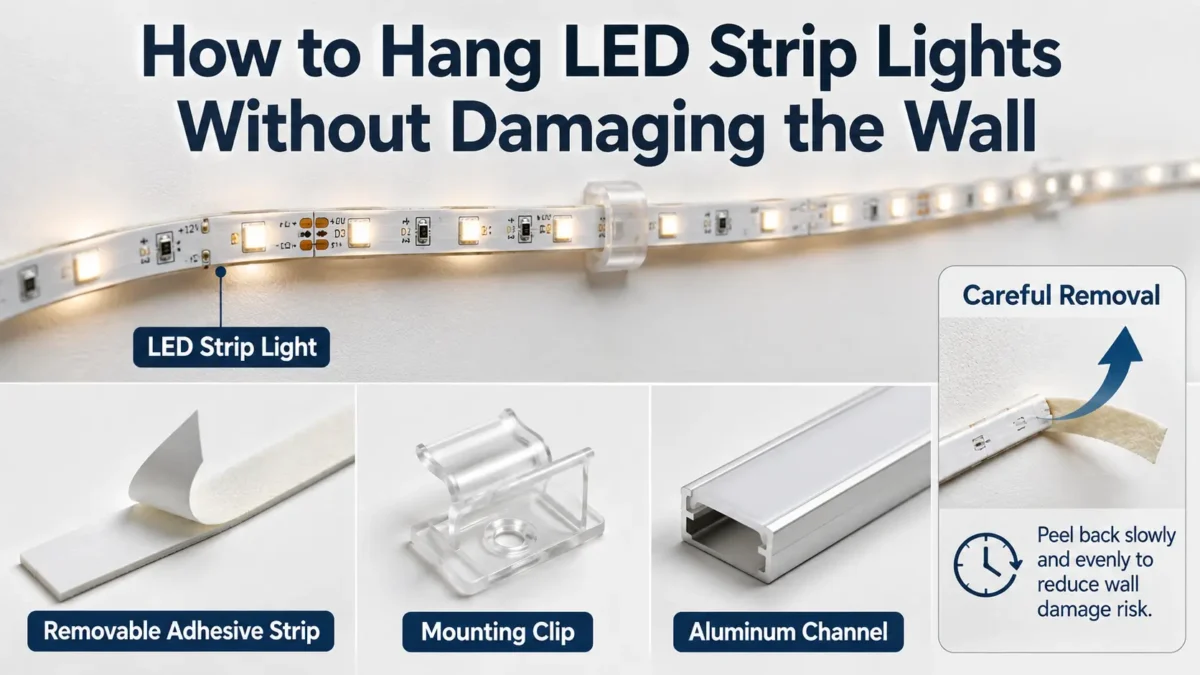
To hang LED strip lights with less wall damage risk, avoid sticking strong adhesive directly to weak paint, wallpaper, or textured walls. Instead, use removable adhesive strips, mounting clips, aluminum channels, Velcro-style fasteners, magnetic mounting, or a temporary backing method based on the surface. Also, test a hidden area first. Then, remove the strip slowly and follow the adhesive maker’s instructions. No method can promise zero wall damage.
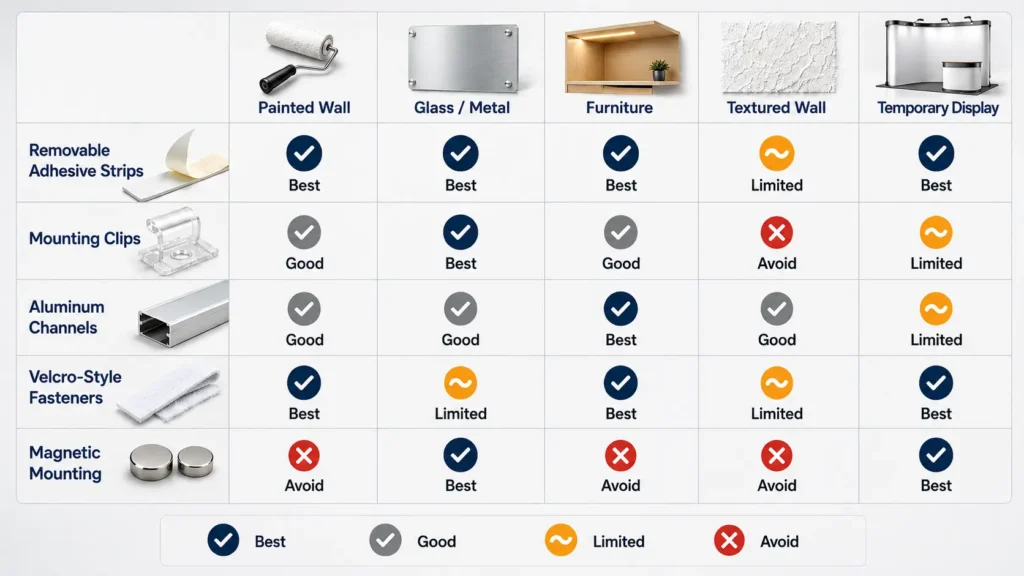
The right mounting method depends on the wall, not only the LED strip. For example, a smooth painted wall, glass panel, metal shelf, wooden cabinet, brick wall, and temporary display panel all behave differently.
Before choosing a method, ask four quick questions. As a result, you can avoid using too much adhesive on a surface that cannot handle it.
| Mounting Method | Often Used For | Wall Damage Risk Note | Trade-Off | When to Avoid |
|---|---|---|---|---|
| Built-in LED strip adhesive backing | Smooth, stable surfaces where long-term mounting is acceptable | Can pull paint if the adhesive bonds strongly or is removed too quickly | Simple and clean look | Weak paint, wallpaper, textured walls, rental walls where clean removal matters |
| Removable adhesive strips | Temporary setups on approved smooth surfaces | Lower-risk only when used within the adhesive maker’s surface and removal instructions | Easier removal than strong long-term tape | Fresh paint, textured surfaces, wallpaper, rough surfaces, or unsupported weight |
| Painter’s tape or tape buffer method | Short tests, layout planning, and very temporary use | Can reduce direct contact between LED adhesive and wall, but may not hold well long term | Useful for testing placement | Warm areas, long runs, heavy strips, or long-term installs |
| Clips de montaje | Runs where support matters | May reduce adhesive contact, but clips may need small screws or holes | Better support for longer runs | Rental spaces where holes are not allowed |
| Aluminum channels or profiles | Clean finish, better alignment, display lighting, and project installs | Wall risk depends on how the channel is attached | Cleaner look and easier strip replacement | When the surface cannot accept screws, tape, or brackets |
| Velcro-style fasteners | Temporary access, removable panels, and displays | Can reduce direct strip-to-wall contact, but fastener adhesive still touches the surface | Easy to remove strip from the mounted fastener | Weak paint or surfaces not approved for the fastener |
| Magnetic mounting | Metal surfaces, display frames, cabinets, and temporary fixtures | Low wall-contact risk when mounted to metal, but only works on compatible surfaces | Easy to move and adjust | Non-metal surfaces unless you add another mounting base |
For most renters or short-term installs, the lower-risk path is usually not stronger adhesive. Instead, use a method that limits direct wall contact, spreads the load, and can be removed slowly. For project installs where a clean finish matters, Perfiles de aluminio LED may be worth reviewing as a mounting format. However, wall risk still depends on how the profile is attached.
A low-damage install starts before you peel off any backing. Many wall problems happen because the surface was not suitable for adhesive in the first place.
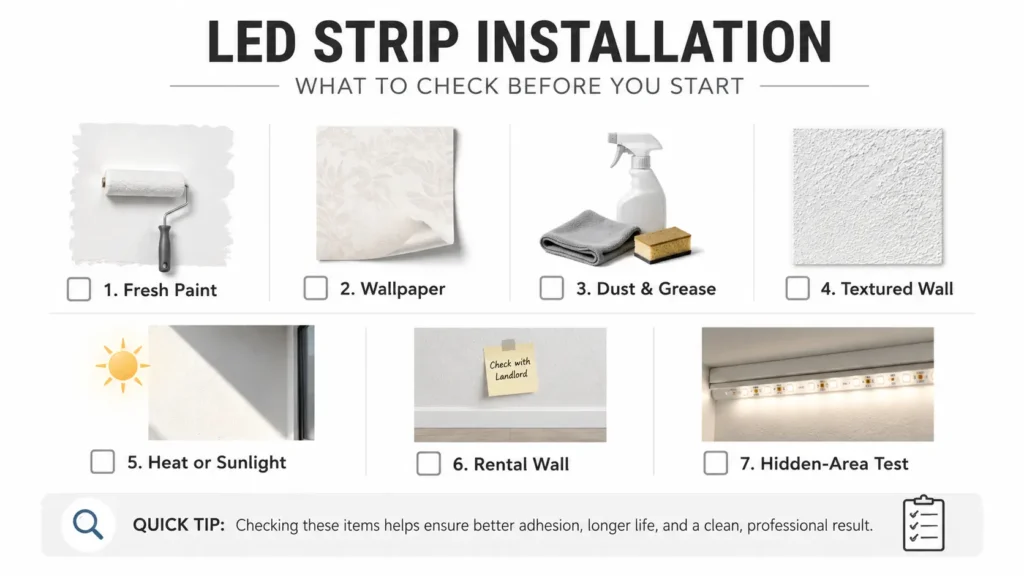
For removable adhesive products, check the maker’s approved surfaces before use. For example, some removable strip products are made for mostly smooth surfaces and may require extra waiting time before use on fresh paint. Use those instructions as a product boundary, not as proof that every adhesive behaves the same way.
A hidden-area test is not a guarantee. However, it is a useful warning step. Apply a small piece of the planned adhesive or mounting method in a less visible area. Then, wait and remove it carefully. If paint lifts, softens, or leaves sticky marks, choose a different mounting method.
First, hold the LED strip in place without sticking it. Then, mark the start point, end point, corners, power supply location, and support areas. Also, avoid tight bends unless the product instructions allow them. If the strip is cuttable, cut only at marked cut points and follow the strip maker’s instructions.
Next, use the comparison table above to choose between direct adhesive, removable strips, clips, channels, Velcro-style fasteners, or magnetic mounting. For weak painted walls, direct adhesive backing may not be the right choice. Instead, a removable method, channel, or temporary backing layer may reduce risk, depending on the surface.
Before installing the full strip, test the mounting method in a low-visibility area. This step matters most for rental walls, older paint, matte paint, wallpaper, and repaired or repainted surfaces. Check two things:
If either answer is no, do not use the same method across the full wall.
Dust, grease, and moisture can weaken adhesion. Therefore, clean the surface gently and let it dry fully before mounting. Do not use harsh cleaners unless the wall and adhesive instructions allow them.
Do not peel the entire backing at once. Instead, work in short sections. Keep the strip straight, avoid stretching it, and press evenly where the mounting method requires pressure.
For longer runs, use extra support at corners, bends, and vertical runs. These areas often fail first because the strip carries more tension.
Place the power supply and controller where they can be reached without pulling on the strip. Also, avoid routing the strip in a way that requires force during maintenance or removal. Use a compatible power supply based on the LED strip specs. Disconnect power before cutting, adjusting, or handling wiring. If you are still choosing the strip type, review the Tiras de luces LED category and confirm the product instructions before installation.
Strong adhesive may hold well. However, it can also pull paint during removal. For temporary use, stronger is not always lower-risk.
Fresh paint can be more vulnerable to adhesive damage. Therefore, wait until paint is fully cured and check both paint and adhesive instructions before mounting anything.
A test spot can reveal paint weakness, sticky marks, or poor hold before the full install damages a visible area.
Pulling outward can lift paint. If the mounting product has a removal tab or stretch-release design, follow the maker’s removal direction. For many removable strips, slow downward stretching is safer than pulling away from the wall.
Textured walls often reduce adhesive contact. As a result, the strip may fall, or the adhesive may bond unevenly and remove paint from high points.
Corners, bends, hanging loops, and vertical runs need support. Otherwise, the strip may pull on the wall surface over time.
Only cut LED strips at marked cut points if the product is designed to be cut. Also, disconnect power before cutting or adjusting the strip. Use the correct power supply for the strip specs.
Removal is often the moment when wall damage happens. Even a careful install can cause damage if the strip is ripped off too fast.
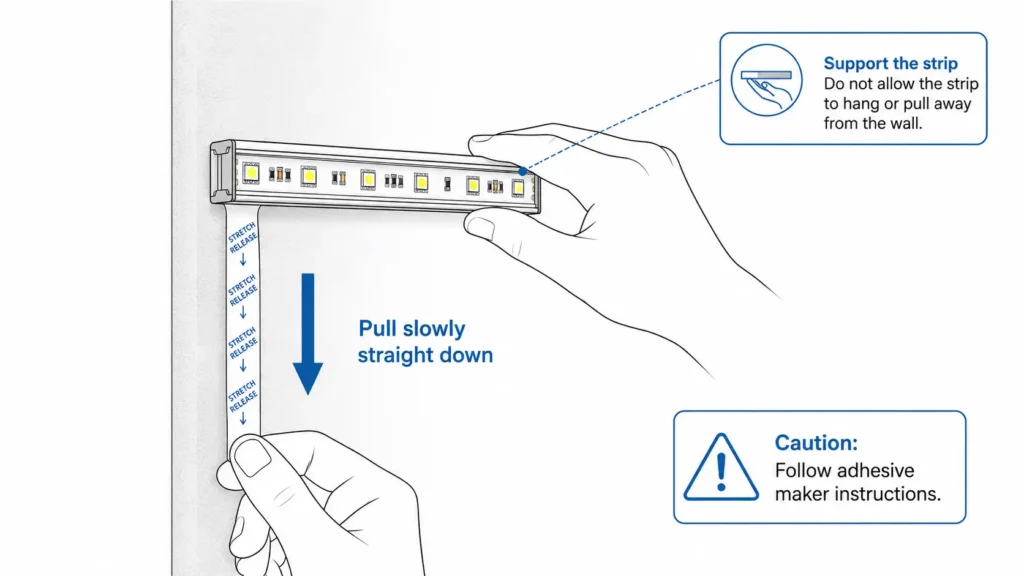
If the strip has been on the wall for a long time, removal risk may be higher. Adhesive can become harder to remove after long dwell time, heat exposure, or repeated temperature changes. Therefore, follow the maker’s removal direction instead of pulling outward.
The same wall-damage problem appears in different settings. However, the best method changes based on the surface, timeline, and removal need.
For temporary or repeated installs, the goal is not just to make the strip stick. Instead, the goal is to control removal, maintenance, and surface repair.
For display and event work, aluminum channels, mounting clips, removable fasteners, or magnetic mounting may be more practical than sticking LED strips directly to a finished wall. The right choice depends on the surface and project needs. For custom strip layout or project planning, the tira de luz LED personalizada page may be a useful internal reference.
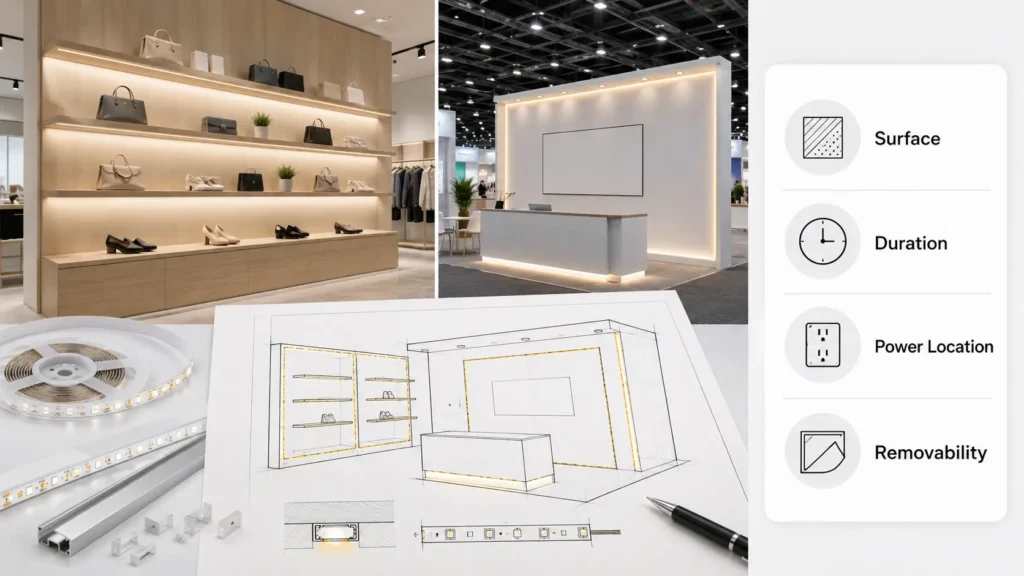
If you are sourcing LED strip lights for a temporary install, retail display, rental space, or commercial project, prepare the details before asking for product or mounting suggestions.
| Detail to Prepare | Why It Matters |
|---|---|
| Surface type | Painted drywall, glass, metal, wood, tile, cabinet, display panel, or temporary structure affects mounting choice. |
| Surface condition | Fresh paint, weak paint, texture, dust, grease, or wallpaper can raise risk. |
| Install duration | A weekend event, seasonal display, and long-term install may need different mounting methods. |
| Strip length and layout | Long runs, corners, and vertical sections may need extra support. |
| Power location | Power supply placement affects layout, access, and cable management. |
| Indoor or outdoor use | Environment affects product and mounting choices. |
| Removal need | Clean removal may be more important than maximum holding strength. |
| Visual finish | Exposed strip, hidden strip, or channel-mounted strip affects the final look. |
| Mounting limits | Rental rules, no-drill needs, or display rules may limit clips, screws, or permanent adhesives. |
When contacting a supplier, avoid asking only, “Which LED strip is best?” Instead, ask a more complete question:
“Here is my surface, run length, install duration, power location, and removal requirement. Which strip and mounting approach should I consider?”
They can, especially if the adhesive bonds strongly to paint, the wall surface is weak, or the strip is pulled off too quickly. Damage risk also depends on paint condition, wall texture, adhesive type, install time, heat, and removal method. Therefore, use lower-risk mounting methods and test a hidden area first.
Choose the mounting method based on the surface. For temporary use, consider removable adhesive strips, clips, channels, Velcro-style fasteners, magnetic mounting on metal, or a temporary backing method. Also, avoid strong direct adhesive on weak paint, wallpaper, fresh paint, or textured walls.
Possibly, but only if the adhesive strips are suitable for the surface and the LED strip setup. Follow the adhesive maker’s surface, weight, install, and removal instructions. Also, do not assume removable strips are safe for every painted wall, wallpaper, brick, textured wall, or rough surface.
They can be better when you want less direct adhesive contact or a cleaner, more supported install. However, clips and channels may require screws, brackets, or another mounting method. Therefore, they are not automatically better for every rental wall.
Disconnect power first. Then, start at one end, remove slowly, and follow the adhesive maker’s instructions. Avoid pulling the strip outward from the wall. If paint begins to lift, stop and reduce force.
Common mistakes include using strong adhesive on weak paint, installing on fresh paint, skipping the hidden-area test, ignoring wall texture, pulling the strip off too quickly, leaving long runs unsupported, and cutting or powering the strip without following the product instructions.
Prepare the surface type, strip length, layout, install duration, power location, indoor or outdoor conditions, mounting limits, visual finish needs, and removal needs. As a result, the supplier can discuss suitable strip and mounting options without guessing.
If you are planning LED strip lighting for a display, rental space, event booth, showroom, or commercial project, prepare your surface type, run length, install duration, power location, and removal needs before asking for product guidance. Contact ElstarLED with your project details so the team can discuss suitable LED strip and mounting options based on the information you provide. For a better recommendation, include photos, drawings, surface details, and any limits on drilling, adhesive, removal, or visible channels.

