Vous avez besoin d'un produit de qualité en peu de temps ? Nous avons un plan pour vous.


Table des matières
LED strip staircase lighting works best when the design starts with placement, glare control, and safe low-voltage wiring. It can make steps easier to see at night and add a clean design feature to a home, hotel, showroom, or project stair.
Therefore, plan the placement, strip type, profile, diffuser, driver, wiring route, and controls before buying parts. As a result, the stairs can look better, feel safer, and stay easier to service later.
Before choosing a strip or profile, decide what kind of stair lighting project you are building. In most cases, stair strip lighting has one of three goals: safety, accent, or feature lighting.
In larger LED strip staircase lighting projects, complexity grows because the lighting must look good and still stay safe, dimmable, and serviceable.
As the project moves from safety lighting to feature lighting, the design needs more checks. For example, you may need more zones, more drivers, smarter controls, and more careful wiring.
Before you finalize the design, also check what the staircase physically allows.
Boundary note: For many projects, one well-chosen placement pattern with clean profiles and wiring looks better than many effects mixed together.
The cleanest stair projects follow a simple process. First, choose where the light should come from. Then, choose the strip, profile, driver, wiring path, and controls.
For this reason, treat LED strip staircase lighting as a planned low-voltage system rather than a decoration added at the end.
LED strips on stairs should normally use low-voltage power at the strip. However, the power supply still connects to mains power. Therefore, use qualified help for mains-side work when local rules require it.
There is no single best pattern for every staircase. Instead, choose a pattern that fits the structure, viewing angle, wiring access, and design goal. As a result, the lighting will feel planned rather than added later.
The best LED strip staircase lighting pattern depends on whether you want safety, accent lighting, or a dramatic feature.
| Pattern | Effect | Glare risk | Retrofit difficulty | Typical use |
|---|---|---|---|---|
| Under-tread / under nosing | Floating step look | Medium | Medium to high | Feature stairs and new builds |
| Riser / side-wall wash | Soft light on step faces | Low | Low to medium | Safety and subtle upgrades |
| Handrail / stringer lighting | Guidance line along path | Low to medium | Low to medium | Minimal stair changes |
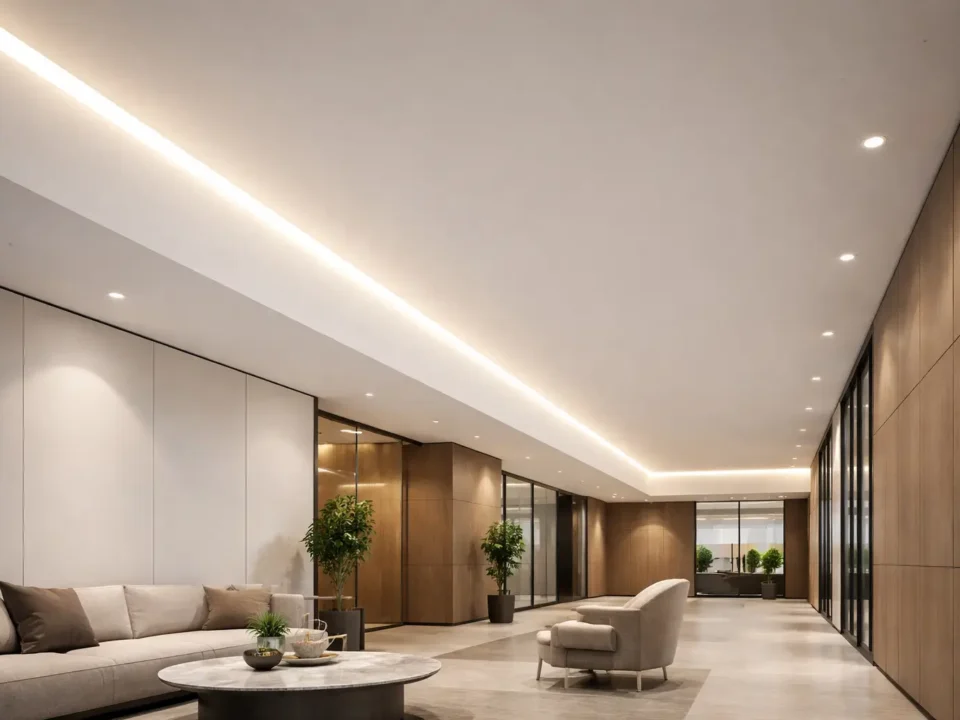
| Ceiling / wall-wash | Stairwell volume glow | Low | Low | Wide stairwells and public areas |
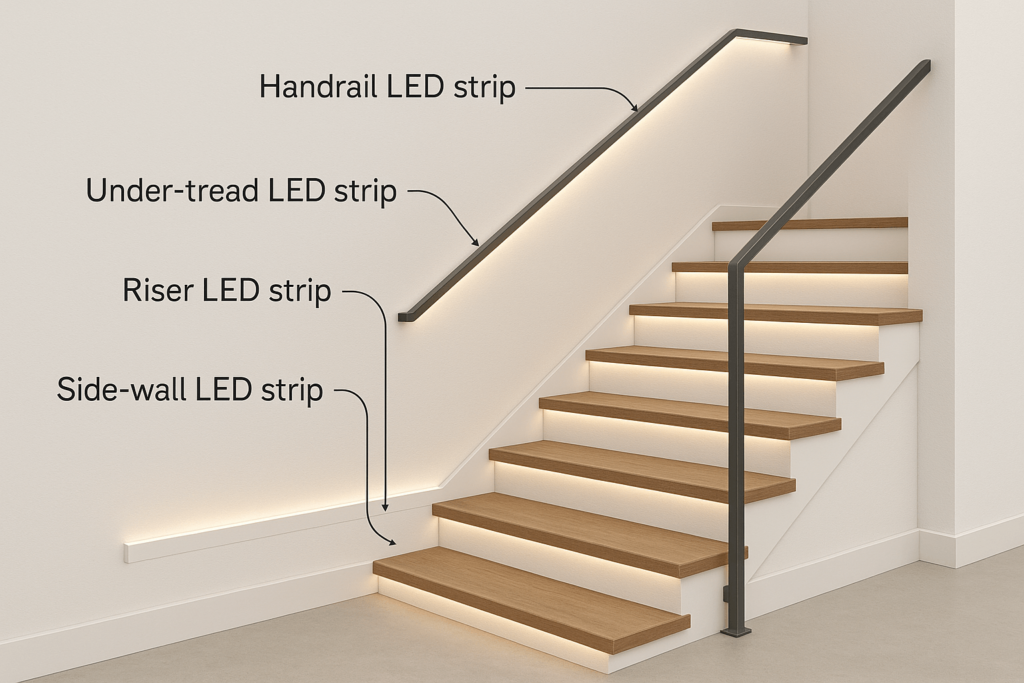
Under-tread lighting places strips in profiles under the tread lip. As a result, the light lands on the tread below and creates a floating look.
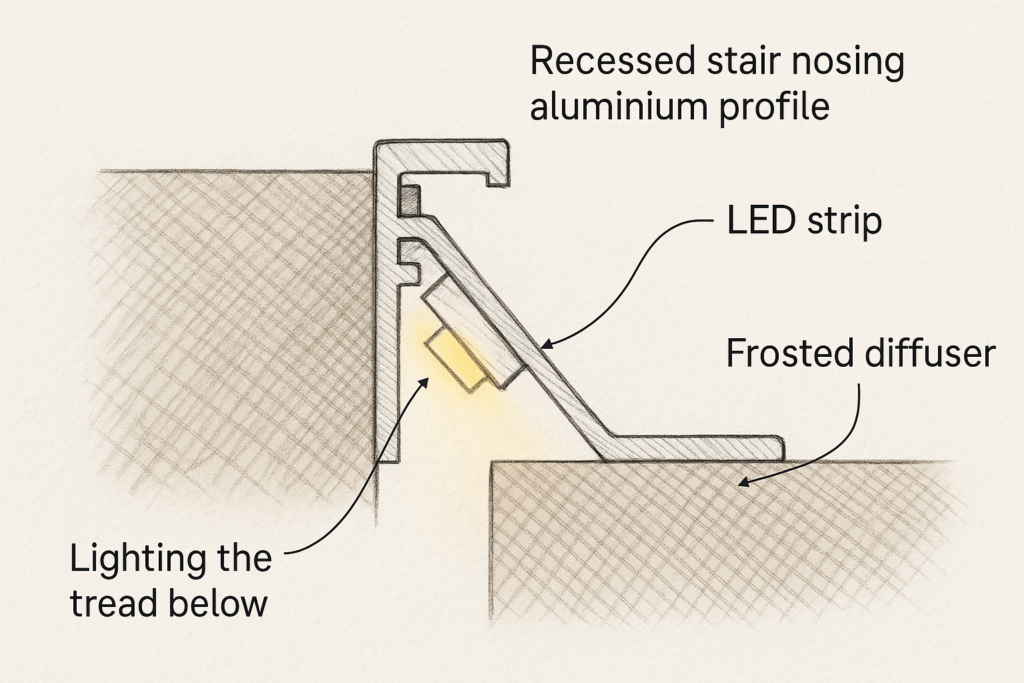
Riser lighting or side-wall lighting is often easier to retrofit. It can give a soft low-glare result because the light is aimed at surfaces, not eyes.
Handrail and stringer lighting adds guidance without touching treads or risers. Meanwhile, wall-wash or ceiling-cove lighting can light the stairwell more broadly.
Once you know where the light will go, choose the strip type, color temperature, brightness, and control style. This helps keep the stair lighting useful and comfortable.
| Strip type | Control level | Typical use on stairs | Pour | Cons |
|---|---|---|---|---|
| Single-color | Low | Night lighting and simple upgrades | Simple, reliable, easy to dim | One color temperature only |
| CCT adjustable | Medium | Day and night tuning | Warm-to-cool control | Needs CCT controller |
| RGB/RGBW | Medium to high | Decorative stairs and hospitality spaces | Colors, scenes, and effects | More wiring and control work |
| COB/dotless | Same as base strip | Premium visible profiles | Smooth line and fewer dots | May cost more and still needs profiles |
For daily-use LED strip staircase lighting, warm dimmable light often feels safer and more comfortable than bright cool light.
Stairs need enough light to read each step, but not so much that they feel harsh. Therefore, use dimming where possible. Also, consider high CRI strips when timber, stone, carpet, or metal finishes matter.
Boundary note: If unsure, choose warm, dimmable, indirect light and test before final install.
Profiles and diffusers often make the difference between a temporary tape look and a professional result. They hide dots, reduce glare, protect the strip, and make replacement easier. Therefore, choose them early in the design.
Good profiles make LED strip staircase lighting look intentional because they hide the strip, soften glare, and protect the hardware.
| Profile type | Typical location | Retrofit friendly? | Notes |
|---|---|---|---|
| Recessed stair nosing | Under tread or nosing | Medium to low | Best for new builds and floating effect |
| Surface riser channel | Riser fronts | Haut | Easy retrofit and soft vertical wash |
| Side-wall / stringer channel | Wall or stringer edge | Haut | Good where stair surfaces should not be cut |
| Corner / 45° channel | Wall or ceiling junction | Haut | Useful for wall and stairwell washes |
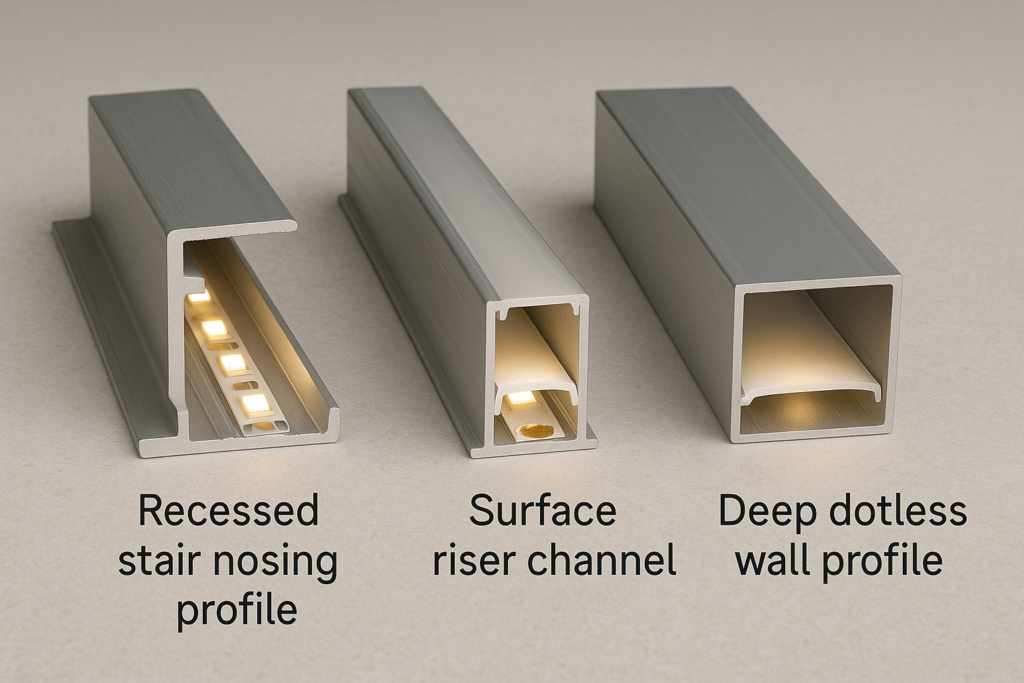
Boundary note: If you can see dots from the top or bottom of the stair, adjust the profile, diffuser, strip type, or angle.
Good placement can still fail if power and wiring are poor. Therefore, plan drivers, low-voltage runs, cable routes, and access points before cutting profiles. Also, keep a simple wiring map for future service.
Start with the strip’s watts per meter. Then, multiply by total active length. After that, add headroom so the driver does not run at full load all the time.
| Example staircase | Strip length | Approx strip power | Driver plan |
|---|---|---|---|
| 8-step small indoor stair | 6–8 m @ 8 W/m | 48–64 W | 1 × 75–100 W driver |
| 14-step medium stair | 12–16 m @ 10 W/m | 120–160 W | 1 × 150–200 W or 2 × 75–100 W drivers |
| Long stair + handrail | 20–24 m @ 12 W/m | 240–288 W | 2 × 150–200 W drivers, separate zones |
For general background on LED efficiency, see LED lighting efficiency from Energy.gov.
Fiable LED strip staircase lighting also needs cable routes that can be reached later for testing or repair.
Before wiring starts, separate the mains side from the low-voltage side in the plan. Also, do not share open boxes or conduits unless the hardware is rated for it. If you are not comfortable with mains work, involve a licensed electrician.

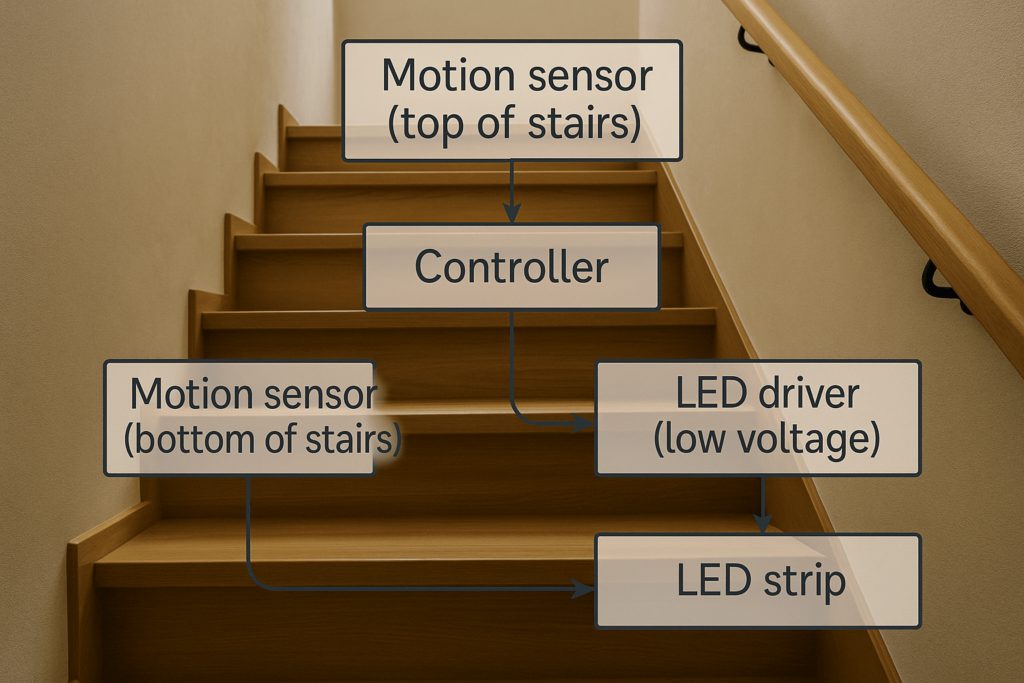
Automation can improve safety and save energy when it is simple and well placed. However, overdone effects can distract people on stairs. For this reason, start with simple motion scenes first.
Motion control can make LED strip staircase lighting more useful at night, but it should not make the stairs distracting.
After the scenes are chosen, check that the control hardware still fits the load and wiring method. Then, add smart control through the correct dimmable driver, relay, or controller. Also, make sure smart devices do not exceed the driver or strip ratings.
LED strips are useful, but they are not perfect. Therefore, plan for the common drawbacks before installation.
When LED strip staircase lighting looks cheap, the cause is often dots, glare, poor wiring, or missing profiles.
| Disadvantage | Likely cause | Mitigation |
|---|---|---|
| Visible LED dots | Shallow profiles, clear covers, or standard strips | Use COB strips, deeper channels, and frosted diffusers |
| Harsh glare | Direct line of sight or poor aiming | Aim at surfaces, lower brightness, and use diffusers |
| Adhesive failure | Poor surface prep or wrong tape | Clean surfaces and use proper clips or profile screws |
| Color inconsistency | Low-quality strips or mixed batches | Specify better strips with good binning and CRI |
| Not enough for egress rules | Strips used where code needs fixtures | Use proper step lights or approved fixtures when required |
Instead of fixing problems later, use this rule while the stair is still easy to change. Build the fixes into the design from the start. Otherwise, you may need to remove profiles, replace strips, or repaint parts of the stair after the project is finished.
Premium stair lighting is not always more complex. Instead, it is better planned and better finished.

If the lighting looks like it has always belonged to the staircase, the design is working. Also, if drivers and profiles can still be serviced, the technical side is working too.
LED strip systems are flexible, but they are not always the right answer. Therefore, compare them with dedicated step lights before final design. In some projects, using both gives the best result.
Start by planning where the light should come from. Then, choose low-voltage strips and profiles. After that, size the driver, route cables, mount profiles, and test the system before final handover.
There is no single best way. For example, under-tread lighting is dramatic, while riser and side-wall washes are soft and handrail lighting gives guidance. Therefore, choose the pattern that fits the stair structure and use goal.
Common placements include under the tread, on risers, along side walls, under handrails, and in wall or ceiling coves. Also, aim light at surfaces instead of eyes to reduce glare.
They can show dots, cause glare, fail at adhesive points, or look cheap if low-quality strips are used. However, profiles, diffusers, better strips, and good wiring can fix most issues.
Hide the strip in a profile, use a diffuser or COB strip, aim light at surfaces, route wiring cleanly, and tune brightness. Also, use warm dimmable light for residential spaces.
Use low-voltage constant-voltage drivers that match the strip voltage. Also, size drivers with headroom, keep them accessible and ventilated, and involve an electrician for mains-side work when needed.
Yes, if strips, profiles, connectors, and power supplies are suitable for outdoor use. Also, use proper IP-rated parts, weather-safe driver locations, and protected circuits where required.
Place sensors at the top and bottom of the stairs, then connect them to a controller or driver system. As a result, lights can turn on with motion or run step-by-step effects.
A successful LED strip staircase lighting project starts with patterns and priorities, not with a product link. Therefore, decide where the light should fall before choosing strips, drivers, and controls.
For more general context on strip types, run lengths, and CCT options, you can review Elstar’s broader LED strip light range and adapt those ideas to staircase projects.

 English
  Spanish
  French
  Arabic