Vous avez besoin d'un produit de qualité en peu de temps ? Nous avons un plan pour vous.


Most DIY neon sign tutorials show what to do. However, this guide focuses on how to do it repeatably, so the sign looks clean, powers well, and can be serviced if a segment fails.
This workflow is for makers, studios, and small teams building neon-style signs with LED neon flex, not glass neon. Therefore, the main tasks are layout planning, clean mounting, safe wiring, and staged testing.
A good DIY neon sign depends on a clear workflow. First, design around bend and cut rules. Next, mount the sign so parts can be serviced. Then, wire with clear polarity and test before final mounting.
Boundary note: Bend limits, cut units, and end methods vary by model. Therefore, confirm the datasheet and install notes for the exact product.
Today, a DIY neon sign usually means a neon-style outline made with low-voltage lighting and mounted to a backer. In many builds, the light source is LED neon flex on acrylic.
Use LED neon flex when the design needs smooth curves, letters, logos, or a clear neon-style outline. However, use channels or other strip systems when the design is mostly straight, modular, or easier to service in sections.
Boundary note: This guide focuses on LED neon flex. Treat glass neon as specialist work.
Choose the build path that reduces rework for your finish goal, timeline, and service needs. As a result, the project is easier to plan and easier to repeat.
| Option | Best when… | Watch-outs |
|---|---|---|
| DIY from parts | You want flexibility and can test as you build | Rework happens if corners, joints, and ends are not planned |
| Kit | You want a faster build with set parts | Design choices and spare parts may be limited |
| Custom | You need a repeatable finish, support, or installed-sign use | Clear specs are needed because supplier scope varies |
Boundary note: For installed signs, check local or project rules for power supplies and installation roles before final use.
You can make a working sign with a small set of parts. However, a clean and serviceable finish usually needs better mounting, cable control, and test steps.
Boundary note: Tool needs vary by backer material, mounting method, and final sign size.
Most messy DIY neon signs start with a layout that ignores bend direction, cut points, or joint placement. Therefore, fix those issues before assembly.

Boundary note: Bend direction and cut rules are model-specific. Therefore, verify the exact product before final artwork.
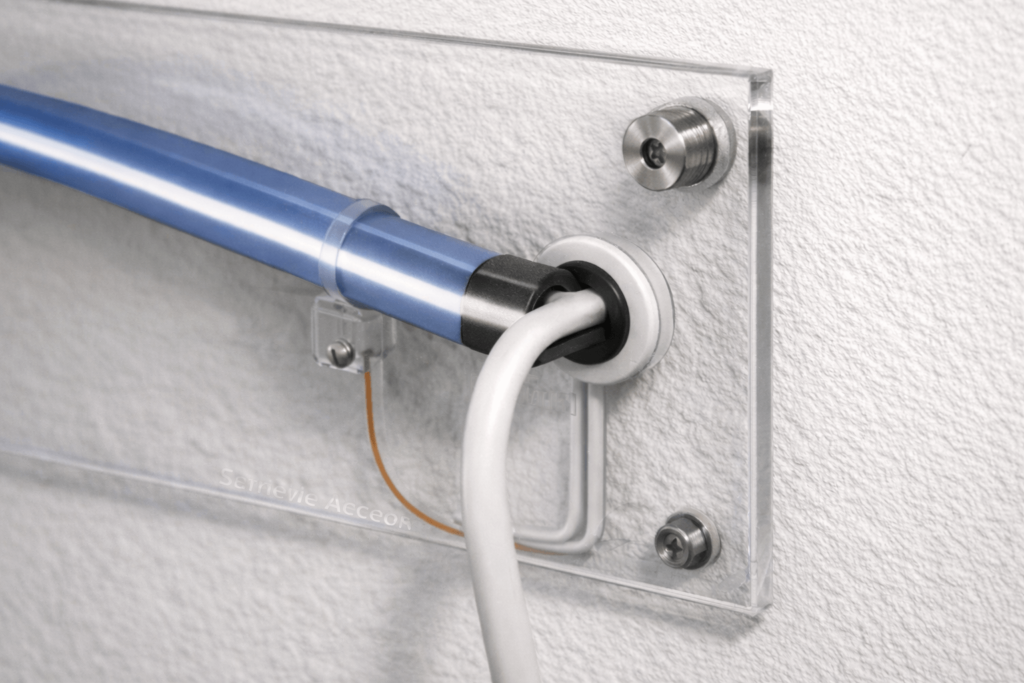
A clean sign comes from consistent curves, hidden wires, and a mounting method that still allows repair. Therefore, plan the backer and wire path before fixing the flex in place.

| Mounting method | Serviceability | Best for | Watch-outs |
|---|---|---|---|
| Adhesive-only | Low to medium | One-offs and quick prototypes | Surface prep and stress can cause lift |
| Clips | Medium to high | Serviceable signs and moderate curves | Clip spacing must support the curve |
| Channels or holders | Haut | Repeat shapes and clean curves | Needs more planning and backer work |
| Standoffs | Haut | Wall signs and hidden cable exits | Hardware must match wall and backer |
Boundary note: Adhesion depends on surface prep, stress, and environment. As a result, adhesive-only signs need extra care.
Reliable signs come from clear polarity, solid joints, and strain relief. Also, staged testing helps catch faults before the sign is mounted or shipped.
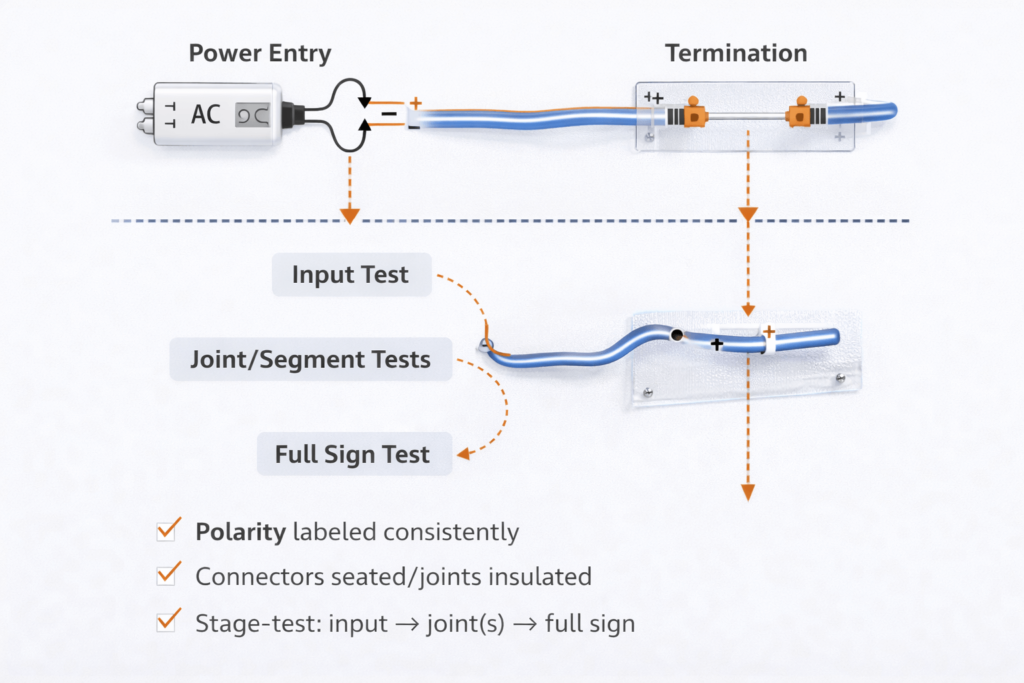
Power off before reworking wires or end connections. OSHA’s electrical safety rule notes that live parts should be de-energized before work, with limited exceptions: OSHA 1910.333.
Boundary note: Power supply and controller fit depends on the exact setup. Therefore, verify the documents for the parts used.
Outdoor use is a system problem. In other words, the LED neon flex, sealing method, cable entry, protected power supply, and install method all need to fit the site.
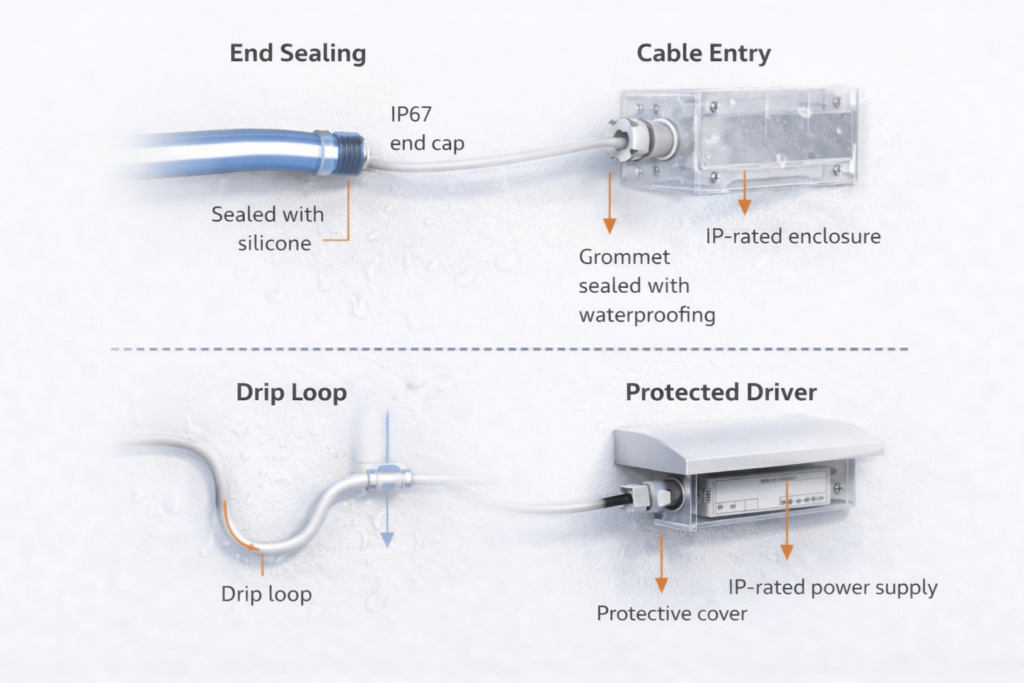
IP ratings describe ingress protection under defined test conditions. For background, see IEC Ingress Protection ratings.
Boundary note: Outdoor suitability depends on the model and install method. Therefore, verify scope and follow project requirements.
Use a steady check order: power, polarity, connector, end connection, and segment test. As a result, you can find the fault faster.
| Symptom | Likely cause | Next check | What to do next |
|---|---|---|---|
| Entire sign will not light | No power or wrong input wiring | Check input wiring and power output | Correct wiring and check for shorts before power-on |
| One segment is dead | Wrong polarity, loose connector, or bad joint | Test that segment alone | Reseat or remake the joint and add strain relief |
| Flicker when moved | Loose connector or cable pull | Gently check joints | Power off, remake the joint, and secure cables |
| Part of sign is dimmer | Power distribution issue | Compare near-feed and far-end brightness | Adjust the feed strategy and check connections |
Boundary note: For installed signs, involve qualified support if site rules require it.
A short spec checklist reduces build mistakes and supplier back-and-forth. This is especially useful for complex lettering, outdoor signs, or controlled mounting systems.
| Spec item | Why it matters | What to ask |
|---|---|---|
| Bend direction and layout fit | Decides feasible letters and curves | Confirm top-bend or side-bend match |
| Cut points | Controls where you can cut and reconnect | Ask for datasheet cut guidance |
| End method | Affects reliability and service | Ask for connector, solder pad, or lead options |
| Power and control | Prevents flicker and mismatch | Ask for wiring and controller notes |
| IP and sealing | Outdoor success depends on sealing | Ask for IP scope and sealing steps |
| Certificate scope | Claims may be model-specific | Ask for scope by exact model or series |
Boundary note: Confirm scope for the exact model you order. Do not assume one claim covers the whole catalog.
A DIY neon sign is usually a neon-style outline made with low-voltage lighting, most often LED neon flex, mounted to a backer such as acrylic.
At minimum, you need LED neon flex, a backer, mounting method, power supply, end method, and template. For a cleaner finish, also add holders, standoffs, labels, and strain relief.
Plan around bend direction and cut points. Also, use smoother shapes, avoid forced sharp corners, and hide joints in less visible areas.
Label polarity, make strong end connections, add strain relief, and test in stages. Then, do a final test after mounting and cable control.
Yes, if the exact product is suitable for outdoor use and the ends, cable entries, and power supply are protected. However, IP scope and sealing steps must be verified.
Choose DIY for flexibility, a kit for speed, and custom for a repeatable finish or business use. Also, check service needs and site rules before deciding.
A dependable DIY neon sign comes from good design rules, serviceable mounting, clear wiring, and staged tests. Therefore, plan bends, cut points, cable exits, and service access before final build.
Remarque : If you are sourcing parts for a sign project, request the exact datasheet, wiring diagram, and controller guide if used. This matters most for outdoor builds, RGB or dimming control, and serviceable mounting designs.
Boundary note: Bend rules, cut rules, IP scope, and certificate claims are model-specific. Therefore, verify them against the exact product documents.


 English
  Spanish
  French
  Arabic