Adding LED strips to your PC case can make your build look like a high-end showroom rig—but doing it wrong can damage hardware, create cable chaos, or just look underwhelming. This guide walks you through the decisions a manufacturer cares about: which strips to choose, how to power them safely, where to place them, and how to tune the effects without overloading anything.
Before you start: what a DIY PC LED strip case mod involves
At a high level, a DIY PC LED strip case mod is about three things:
Choosing compatible hardware – RGB or ARGB strips or a PC LED kit that physically fits and matches your motherboard headers and PSU.
Designing power and control – deciding whether to run everything from motherboard headers or to use a hub/controller powered from the PSU.
Installing safely and cleanly – planning strip placement, testing, mounting, and cable routing so the case stays cool and easy to service.
You do not need to be an electronics engineer, but you should be comfortable:
Opening your PC case and working around components.
Reading labels on headers and power connectors.
Following a step-by-step plan without skipping safety checks.
If any of those feel uncomfortable, consider asking a more experienced builder to help with the physical install while you handle planning and parts selection.
Tools, skills and parts checklist before you begin
Before you order parts or remove a single screw, confirm you have:
Basic tools
Phillips screwdriver
Small flashlight or headlamp
A few zip ties or Velcro cable ties
Optional but helpful
Isopropyl alcohol and a lint-free cloth (for cleaning mounting surfaces)
Plastic cable clips or adhesive cable tie bases
Parts
LED strip(s) or PC LED kit (RGB or ARGB, length enough to cover your layout)
Any required extension cables ou splitters for your motherboard headers
Optional RGB/ARGB controller or hub if you plan a larger setup
Informations
Your motherboard manual (for header types and current limits)
PSU wattage and free Molex/SATA connectors
Having these ready makes the later sections—power design, layout, and installation—much smoother.
Choose the right LED strip type for your PC case
Choosing the right strip type is the foundation of a safe, good-looking mod. You essentially pick between:
12 V RGB strips – all LEDs change together.
5 V ARGB (addressable RGB) strips – individually controllable segments/LEDs.
Pre-built PC LED kits – strips + controller + cables packaged for PC use.
Compare 12 V RGB, 5 V ARGB and PC LED kits
Here’s a simplified comparison to anchor your decision:
Option
Tension
Typical connector
Effects capability
Install complexity
Typical use cases
12 V RGB strip (PC-safe)
12 V
4-pin 12 V RGB header or PSU adapter
Whole-strip colour changes, static and basic effects
Medium
Simple accent lighting, budget builds
5 V ARGB (addressable) strip
5 V
3-pin 5 V ARGB header or controller
Per-LED or per-segment animations, waves, patterns
Medium–High
Modern gaming rigs, advanced effects
Pre-built PC LED strip kit
5 V or 12 V
Usually 3-pin ARGB or proprietary controller
Depends on kit; often multiple presets
Low–Medium
Quick upgrades, first-time modders, plug-and-play
DIY vs kit: quick summary
Approach
Upfront cost
Wiring effort
Flexibility / expandability
Best for…
DIY strip + separate controller
Medium
Plus élevé
Highest
Tinkerers, multi-project builders
Generic PC LED strip kit
Low–Medium
Low
Moderate
First-time PC modders
Premium PC LED kit (brand eco.)
Medium–High
Low–Medium
Medium–High (within brand)
Brand-loyal, ecosystem-heavy rigs
If you need LED strips for other projects as well (kitchen coves, furniture, signage), it can be worth browsing a manufacturer’s broader LED strip light series so you understand how PC strips compare to architectural strips in voltage and power.
Can you safely use generic LED strips in a PC?
Yes, but only if the voltage, connector, and wiring match what your PC expects. If you get those wrong, you can damage strips or headers.
Use generic strips safely when:
The strip is 12 V and you power it from a 12 V source (e.g., Molex/SATA adapter or a dedicated 12 V controller).
Or the strip is 5 V ARGB with a standard 3-pin 5 V ARGB connector clearly labelled, and you plug it into a 5 V ARGB header.
You either use compatible connectors or adapt them with proper adapters and insulation, never by forcing a 3-pin into a 4-pin in the wrong way.
Avoid or treat as advanced-only when:
You cannot clearly confirm the strip’s voltage or current rating.
The strip has bare wires only, and you are not comfortable adding connectors correctly.
The strip is 12 V but you intend to plug it into a 5 V ARGB header, or vice versa (this is unsafe).
When in doubt, treat PC-specific kits as the safer path; they are designed for these headers and usually include clear documentation.
Plan how to power and control your LED strips
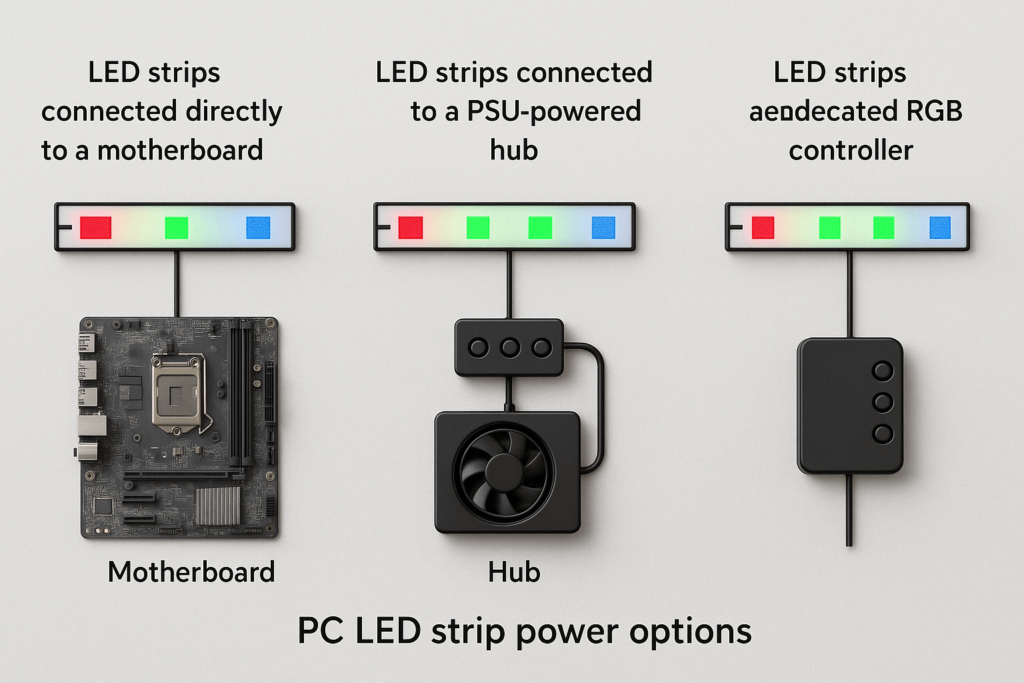
Now that you know roughly what hardware you want, you need to decide how to power and control it. There are three main options:
Motherboard RGB/ARGB headers only – simple, great for small setups.
Motherboard headers + powered hub – for more strips or more devices.
Dedicated RGB/ARGB controller – for the most channels, effects, or when you have no suitable headers.
A good power plan keeps all three in mind and chooses the simplest option that remains within safe current limits.
Using motherboard RGB/ARGB headers safely
Most modern motherboards include:
One or more 12 V 4-pin RGB headers (often labelled “RGB_HEADER”, “12V G R B”, etc.).
One or more 5 V 3-pin ARGB headers (often labelled “ADD_HEADER”, “5V D G”, or similar).
To use them safely:
Match voltage and pin count:
12 V RGB strips → 12 V RGB headers.
5 V ARGB strips → 5 V ARGB headers.
Never force a 3-pin ARGB plug into a 4-pin RGB header offset; that’s how 5 V strips end up on 12 V and die instantly.
Respect the header’s maximum current, usually written in the manual.
Treat the motherboard headers as convenient controllers for modest loads, not as unlimited power sources.
When to add a dedicated controller or PSU-powered hub
Use a hub or controller when:
You intend to run multiple strips plus ARGB fans from the same system.
Les estimated total current for strips + fans approaches or exceeds a single header’s rating.
You want lighting that stays on or behaves independently when the PC is off or in low-power states.
You can think of it as a quick decision tree:
One or two short strips + a couple of ARGB fans? → motherboard ARGB header is often fine.
Several long strips and multiple ARGB devices? → use a powered hub ou dedicated controller fed from the PSU.
No ARGB headers on your board? → dedicated controller is effectively mandatory.
Powered hubs and controllers take the current load off the header while still allowing the motherboard to send control signals (in many designs), so you keep synchronized effects without overloading the board.
How many LED strips per header: simple sizing rules
Every header or controller channel has a current limit. You do not need the exact math for each LED, but you should understand the logic.
A simple way to think about it:
Estimate the strip’s power per metre (W/m) from its datasheet or product page.
Convert that to current by current = power / voltage.
Compare to your header’s max current.
Example (numbers are illustrative):
A 5 V ARGB strip uses about 10 W per metre at full white.
That means 2 A per metre (10 W ÷ 5 V = 2 A).
If the ARGB header is rated for 3 A, a conservative limit would be about 1.5 m of that strip on a single header.
Similarly, if your 12 V RGB strip is 7 W per metre and the header is rated for 2 A (24 W), you probably want to stay under 3 metres total on that header.
When you need more length or more devices, move additional strips to:
Another header, or
A PSU-powered RGB/ARGB hub that’s designed to handle higher loads.
Always treat your calculations as conservative estimates and double-check the motherboard manual.
Power draw and electric bill impact
LED strips draw far less power than your GPU or CPU, but they are not completely free.
For example:
Suppose your LED strips and ARGB fans together draw 20 W when fully lit.
You game or work on that PC for 4 hours per day, most days.
That’s 80 Wh per day, or about 29 kWh per year.
Even at a relatively high electricity rate, that’s typically only a few dollars per year—small compared with the rest of the PC. Most of the time, PSU sizing and header safety are more important concerns than the electric bill.
If you want more background on why LEDs are efficient, the U.S. Department of Energy has a good overview of LED lighting efficiency.
Design your layout: placement and cable routing
The smartest power plan still looks bad if strip placement and cable routing are messy. A simple layout plan answers:
Where will the strips sit so the light is indirect and even?
How will cables travel from the strip ends to headers or controllers without blocking airflow?
Think about your case in zones:
Front panel and intake area
Top and bottom edges
Rear and PSU shroud
Behind the motherboard tray
Where to mount LED strips for even, indirect lighting
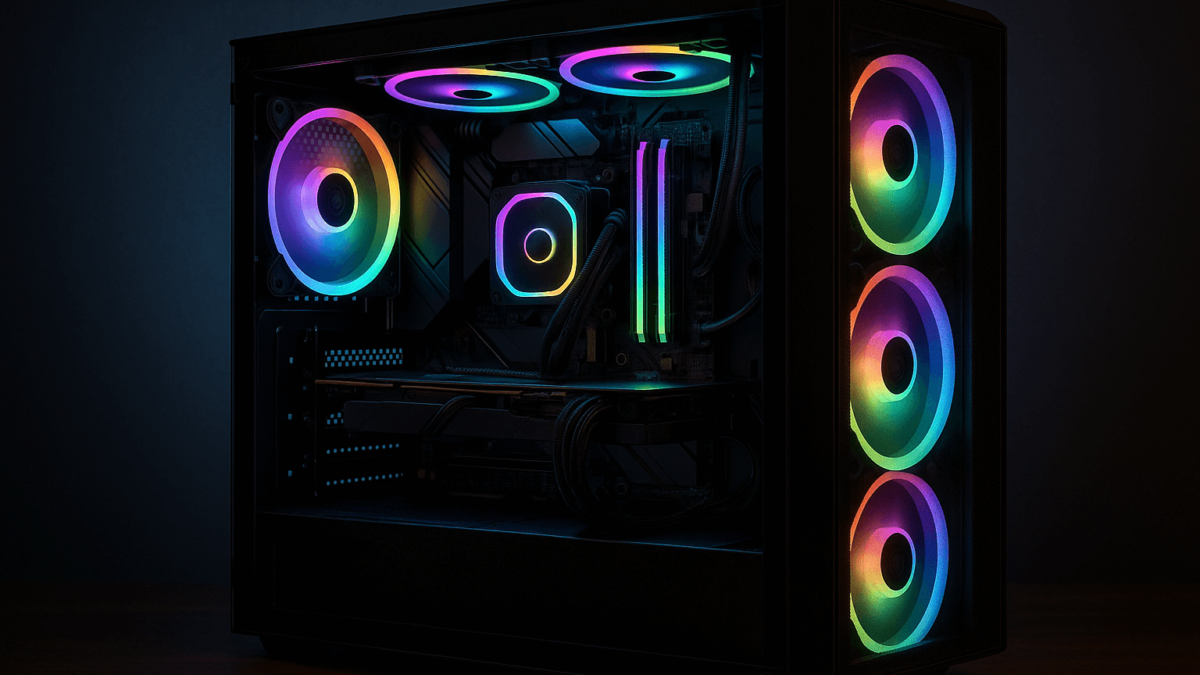
Great PC lighting is about glow, not seeing individual LED dots. Good mounting zones:
Along the inside edge of the front panel, facing inward or toward a diffuser.
Around the perimeter of the glass side panel, tucked where the LEDs are not directly visible from outside.
Behind the motherboard tray or PSU shroud, shining through cut-outs and gaps.
Along the top edge or underside of the case, pointing downwards or upwards to bounce light off metal surfaces.
Diffused or silicone “neon-style” bars are especially useful when:
You want a smooth, continuous line of light rather than dots.
You have clear sightlines into the case and want to hide individual LED points.
You can accommodate their fixed shape and slightly larger size compared with bare strips.
Avoid:
Mounting strips directly in front of the glass so you stare straight at the LEDs.
Placing strips where they will be crushed by panels or constantly flexed when servicing the PC.
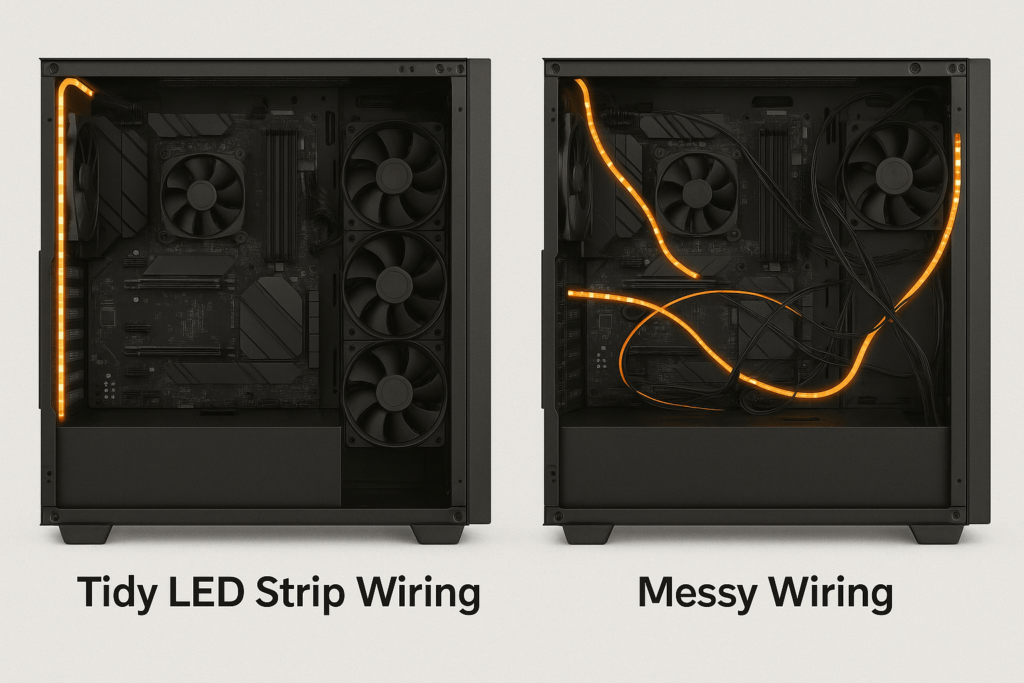
Cable routing patterns that keep airflow clean
Cables are easiest to hide if you plan routes at the same time as strip locations:
Use case cable cut-outs: aim to have the strip’s connector end near a rubber grommet or cut-out so the cable disappears behind the motherboard tray.
Run LED wires along existing cable bundles (24-pin, GPU power, fan hubs) instead of creating new “roads” across the case.
Use zip ties or Velcro straps to secure cables to tie-down points behind the motherboard tray.
Keep cables out of fan intakes and exhaust paths; do not stretch wires across front intakes or top exhaust fans.
Leave a little service loop near controllers and headers so you can unplug things without yanking on solder joints.
A few minutes of planning here is often the difference between a “Christmas lights inside a case” look and a professional, showroom-grade build.
Step-by-step: safely installing LED strips in your PC case
Here’s the high-level recipe before we dive into details:
Plan your strip runs and cable paths on paper or in your head.
Test strips and controllers outside the case to confirm they work.
Dry-fit strips inside the case using tape or magnets.
Route cables and confirm they do not block airflow or doors.
Clean surfaces and mount strips permanently.
Do a final safety check, then power on and verify.
Safety checklist before you power on
Before you ever power the system with LED strips connected, confirm:
You have matched voltage and header type (5 V ARGB strips only on 5 V ARGB headers; 12 V strips only on 12 V RGB/PSU).
All connectors are fully seated and not offset by a pin.
There are no bare copper pads or stripped wires touching the case metal.
Cables have no sharp bends or pinches at panel edges.
Total strip length per header is within your safe rule-of-thumb from the previous section.
If anything feels uncertain, unplug and double-check the motherboard manual or the controller’s documentation before proceeding.
Installation steps: test, mount and tidy
Use this step-by-step process as your blueprint:
Bench test the strips and controller
Connect the strip to the controller or header outside the case with the PSU or a test power supply.
Verify that all LEDs light correctly and that colours/effects work.
Dry-fit inside the case
Place strips where you plan to mount them, using masking tape or magnets instead of peeling adhesive.
Check clearances with side panels installed and removed.
Plan and route cables
Choose which header, hub or controller each strip will plug into.
Route the cables to follow existing bundles and cut-outs, keeping them away from fans.
Prepare mounting surfaces
Clean metal or plastic surfaces with isopropyl alcohol and let them dry.
For silicone diffused bars, ensure mounts or clips are correctly positioned.
Mount the strips permanently
Peel adhesive backing a bit at a time and press strips firmly into place.
For long runs, apply pressure along the full length to get good adhesion.
Secure and tidy cables
Use zip ties or Velcro to bundle LED cables along planned routes.
Trim tie ends so they do not snag on components or panels.
Run the safety checklist and power on
Go through the safety checklist above, then power on and verify lighting.
Watch for any flicker, unusual smell, or heat—if something seems off, shut down and inspect.
This sequence reduces the chance of having to pull everything back out because of one missed cable or misaligned strip.
Configure DIY modes and advanced lighting effects
Once everything is installed and stable, you can start playing with DIY/custom modes and more advanced effects. The key is aligning expectations with your hardware:
RGB strips on 12 V headers: whole-strip colour changes, simple breathing or pulsing.
ARGB strips on 5 V addressable headers or controllers: per-LED animations, waves, rainbows, and more complex patterns.
Kits with proprietary controllers: depend heavily on what the controller and its software support.
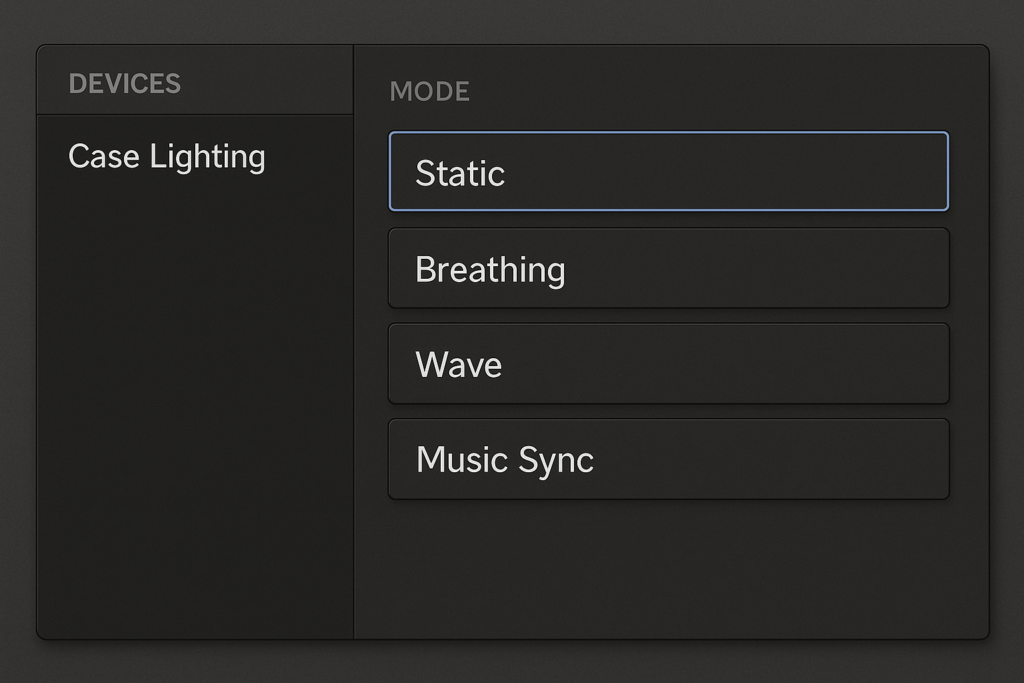
Enabling DIY/custom modes in controllers and software
The exact names differ between vendors, but most software/controllers follow a similar pattern:
Select the device or channel you want to control (e.g., “ARGB Header 1”, “Strip Channel 2”).
Pick a mode type: static, breathing, colour cycle, wave, custom, or DIY.
For custom/DIY modes, choose:
Colours or gradients.
Speed and direction.
Whether the effect is per-strip, per-zone, or per-LED.
Preview the effect and fine-tune brightness and speed.
Save the profile and, if supported, assign it to power states or games.
If your controller uses a remote rather than software, you often get simpler DIY options (a few custom colours/modes) but the same basic idea: pick a base pattern and tweak colours and speed.
Setting up breathing, animation and music-sync effects
For breathing and animation effects:
Ensure your hardware supports them (almost all ARGB setups do; basic RGB strips might have limited patterns).
Use lower speeds and moderate brightness for a more premium, less distracting feel.
Avoid combining too many competing animations in a small case; focus on 1–2 zones.
For music-sync effects:
Confirm that your controller/software has a music or audio-reactive mode.
Check whether it listens to:
System audio,
A specific application, or
A built-in microphone.
Set a reasonable sensitivity so the lights react to rhythm rather than constant full brightness.
Remember that advanced music-sync effects typically require ARGB strips and a controller that can address individual LEDs or zones. A simple 12 V RGB strip on a basic controller cannot do per-LED beat mapping, only whole-strip pulsing.
Common mistakes and safety risks to avoid
Even experienced builders fall into a few classic traps. A quick run through this section before you buy or install can save time and hardware.
Wiring mistakes that damage hardware
Common electrical mistakes include:
Plugging 5 V ARGB strips into 12 V RGB headers
LEDs burn out immediately and may damage the header.
Offsetting connectors by one pin
Forcing a 3-pin plug onto a 4-pin header without aligning the keyed part can short pins.
Ignoring current limits
Chaining many strips and devices on one header can overheat traces or cause unstable lighting.
Leaving exposed copper pads or wire ends
These can short against the case side or other metal parts, especially when cables move.
Avoid these by:
Double-checking header labels and strip markings before connecting.
Respecting the conservative length/current guidelines from the power design section.
Insulating any soldered joints or adapters with heat-shrink or quality tape.
Never forcing connectors; if they do not line up naturally, something is wrong.
Layout and cable mistakes that hurt airflow or aesthetics
Typical layout and cable mistakes:
Running cables directly across front intake fans, restricting airflow and pulling dust.
Placing strips where side panels crush or sharply bend them, causing premature failure.
Sticking strips on dusty or oily surfaces so they peel off quickly.
Mounting strips in direct line-of-sight so you see dots and hot spots instead of a smooth glow.
Better approaches:
Route cables behind the motherboard tray wherever possible and keep the main chamber clear.
Use tie-down points and cable channels to define clean cable paths.
Clean mounting surfaces before applying adhesive, and reinforce long runs with occasional clips.
Aim strips at surfaces (metal, plastic), not at your eyes—let the case surfaces act as diffusers.
Think of your LED mod as a permanent part of the build, not a temporary decoration: installation quality should match the quality of your other components.
PC LED strip mod FAQ
Can you put LED strips in a PC?
Yes—provided the voltage and connectors match your motherboard headers or controller. 12 V RGB strips belong on 12 V RGB headers or suitable PSU-powered controllers; 5 V ARGB strips belong on 5 V ARGB headers. Avoid unknown-voltage strips or forced connectors.
How do I add LED strip lights to my computer case?
Plan strip locations and cable paths, test strips outside the case, dry-fit them, route cables, clean surfaces, mount permanently, then run a safety checklist before powering on. Follow the step-by-step section in this guide as your template.
How many LED strips can I safely run from one RGB or ARGB header?
It depends on the header’s current rating and the strip’s watts per metre. Calculate approximate current per metre, multiply by your planned length, and keep that comfortably below the header limit. If you are close or want to add more devices, switch to a powered hub or controller.
Do LED strip lights raise the electric bill?
A typical PC LED strip setup only adds a small amount of power draw (often tens of watts at most), which usually translates to a few dollars per year of extra electricity for typical use. The bigger concern is PSU headroom and header limits, not the bill.
What’s the best place to put LED strips in a PC case for even lighting?
Mount strips along case edges, behind panels, and around the glass perimeter, pointing at surfaces rather than directly at your eyes. Avoid putting strips straight in front of fans or in the middle of the window; indirect light looks much cleaner.
Should I use a dedicated controller or the motherboard to run my PC LED strips?
For one or two short strips plus a few ARGB fans, motherboard headers are usually fine. If you want longer runs, more devices, or independent zones, a PSU-powered hub or dedicated controller is safer and more flexible.
How to do the DIY mode on LED lights?
In most software, select your LED device or channel, choose a custom or DIY mode, pick colours and effect type, adjust speed/brightness, preview, then save the profile. Dedicated controllers often have a similar sequence through buttons or a remote.
Summary and key takeaways for safe PC LED strip mods
By now, you should be able to:
Choose the right strip type (12 V RGB, 5 V ARGB, or a PC LED kit) based on effects, complexity and budget.
Match strips to headers and power correctly, and know when a dedicated controller or powered hub is a better option.
Size strip length conservatively per header or channel, using watts-per-metre and simple current estimates.
Plan and install your layout so the lighting is indirect and the cables do not hurt airflow.
Avoid the most common wiring and layout mistakes that cause failures or messy builds.
Experiment with DIY modes and effects safely, using your hardware’s capabilities without overloading anything.
If you apply these steps, your LED strip PC case mod will not only look great—it will also be electrically sound, easy to maintain, and ready for future upgrades.


