

Contenido
Outdoor COB LED strip lighting can work well on patios, facades, steps, and architectural accents—but only when it’s specified and installed as an outdoor system, not just a “waterproof strip.”
This guide helps project teams and B2B buyers:
Yes—COB LED strip lights can be used outdoors when the IP rating matches the exposure and the rest of the system (ends, connectors, power/control gear, cable entries) is protected to the same standard.
Quick scenario map (typical guidance—verify by datasheet/model and stated test conditions):
| Outdoor scenario (site exposure) | Typical minimum IP target | Key install note (system-level) |
|---|---|---|
| Covered patio / under eaves (occasional splash) | IP65 | Seal terminations and keep driver/controller in a protected enclosure. |
| Fully exposed rain / frequent splash zones | IP67 | Plan for sealed ends, protected connectors, and protected cable entries (glands/boots/enclosure). |
| Areas with standing-water or sustained immersion risk | IP68 (only if specified for that use) | Verify the stated immersion test conditions for the exact model; protect every connection and enclosure entry. |
Waterproof system micro-checklist (don’t skip these):
Boundary notes
A COB LED strip is designed to produce a smooth, continuous-looking line of light—useful when you want a premium “no dots” appearance without a bulky fixture. Outdoors, that visual benefit only pays off if the strip construction and installation details match the environment.
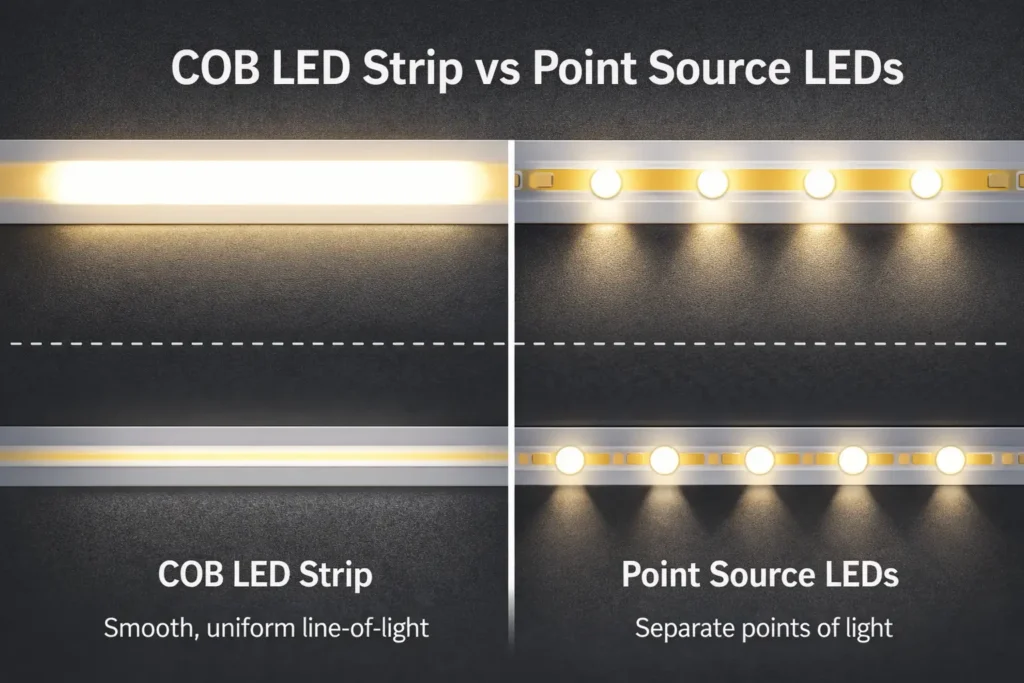
COB (chip-on-board) strip construction packs LEDs in a way that makes the light appear more uniform, often reducing the “point-by-point” look seen in some traditional LED strips.
Key practical takeaways for projects:
Boundary note: construction details vary by model/series. Verify the product’s IP rating, termination method, and stated installation requirements in the datasheet.
COB strips are a good outdoor choice when the site exposure is understood and controlled—and risky when water can reach ends/connectors or when the installation can’t maintain a reliable seal over time.
Good fit outdoors when:
Higher risk when:
Boundary note: outdoor failures often start at ends, joints, and cable entry points—even if the strip itself is rated.
If you need a cleaner “sealed fixture look” outdoors, LED neon (a diffused, enclosed form factor) can be the safer choice in some conditions.
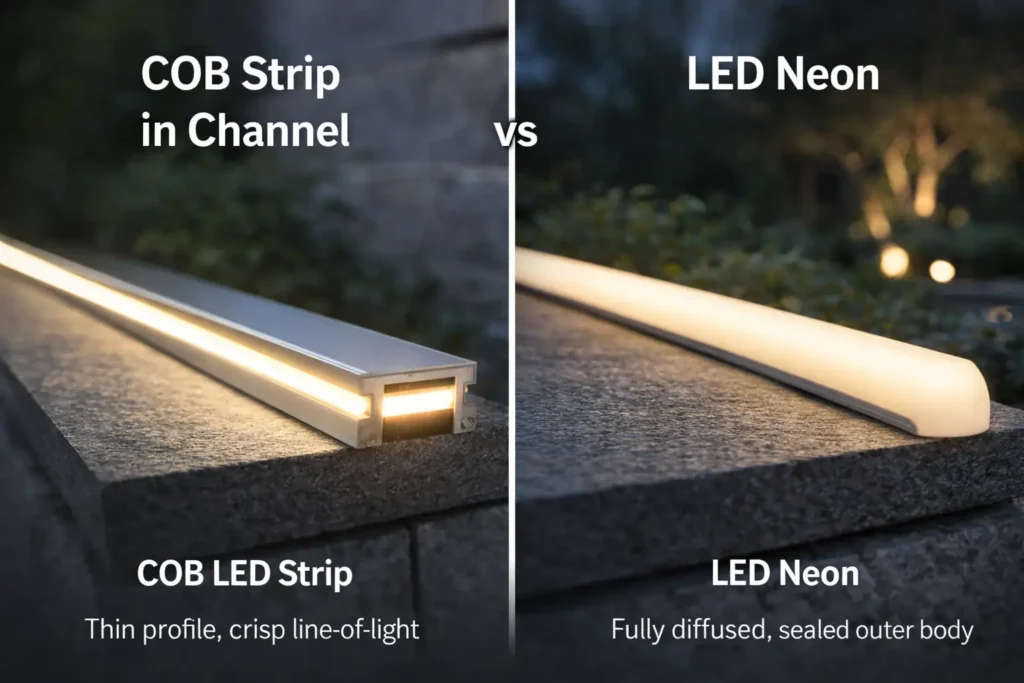
Choose LED neon outdoors more often when:
Choose COB strip outdoors more often when:
Boundary note: “outdoor neon” also varies by product—verify its rating and installation method by datasheet/model.
The right IP rating depends on what the site will actually experience: occasional splashes, direct rain and spray, or sustained immersion risk. Use IP as a starting point—then design the rest of the system to the same standard.
Evidence (official overview of IP ratings and the IP code concept): IEC IP ratings reference
IP ratings describe protection against ingress (solids and water) for an enclosure/product construction—but they do not guarantee a perfect outcome if the installation creates new ingress paths.
What IP ratings help you do:
What IP ratings do not do by themselves:
Boundary note: treat IP as “tested under defined conditions,” not as “invincible in all outdoor situations.”
Use this as a practical selection guide (always confirm the exact model’s stated rating and installation requirements).
| Site exposure example | What’s happening at the strip | Typical IP target | Notes for specifiers/installers |
|---|---|---|---|
| Covered eaves / soffits / under a canopy | Occasional splash and humidity | IP65 | Often workable if ends/connectors and cable entries are sealed and power gear is protected. |
| Open facade accent / railing under direct weather | Direct rain and spray likely | IP67 | Plan sealed terminations and protected connectors; consider channel/profile for added mechanical protection. |
| Near-grade steps / landscaping with heavy splash risk | Repeated wetting, washdown, puddle risk | IP67 (or higher if specified) | Treat connectors and entry points as critical; verify product construction and installation requirements. |
| Locations with genuine immersion risk | Potential sustained immersion | IP68 (only if specified for that use) | Verify the stated immersion test conditions for the exact model; design the entire system around sealed entries and service access. |
Boundary sentence: IPX8 conditions are defined by the manufacturer for the specific product; verify the test description and intended use in documentation.
“Weatherproof” and “waterproof” are often used loosely. To avoid mis-specification, rely on documented ratings and stated test conditions rather than labels.
Practical guidance:
Boundary note: “waterproof” is not a single universal performance promise—it’s a combination of rating + construction + correct installation.
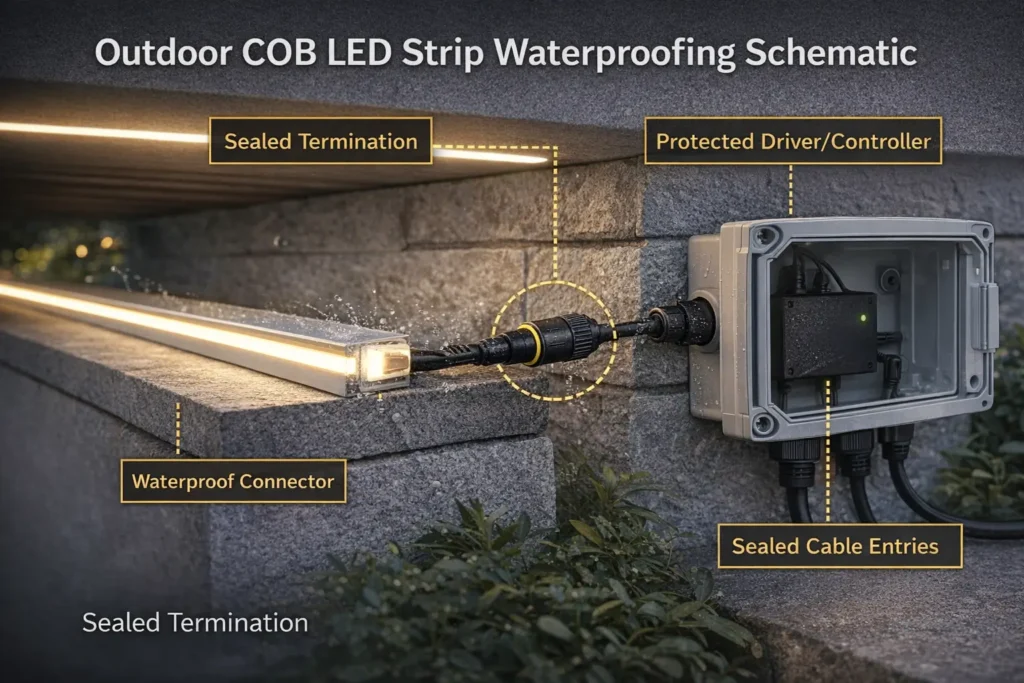
Outdoor reliability depends on the weakest link. Even if the strip is rated, most outdoor failures come from unsealed ends, exposed connectors, or poorly managed cable entries into enclosures.
Evidence (US-facing enclosure type definitions for protecting power/control gear): NEMA enclosure types (PDF)
Use this quick audit before you sign off a design or start installation.
Strip + terminations
Connectors + cable management
Power/control gear
Boundary note: “How protected” depends on exposure and placement. Use project-specific enclosure guidance and documentation.
A good rule: place drivers/controllers where water does not want to live, and treat every enclosure entry as a potential leak path.
Practical placement principles:
Boundary note: electrical compliance and protection requirements vary by project and jurisdiction. Keep decisions site-specific and involve qualified professionals where required.
Most outdoor LED strip “waterproofing” failures aren’t mysterious—they happen in predictable places.
Failure points
Prevention habits
Evidence (general durability considerations for bonding tapes in real environments): 3M VHB durability technical bulletin (PDF)
Boundary note: the best prevention method depends on the strip construction and accessory system. Verify compatibility and recommended methods by model/series.
Cut points and joints are the #1 ingress risk in outdoor strip projects—so the goal is to restore a reliable seal and prevent mechanical stress from reopening it later.
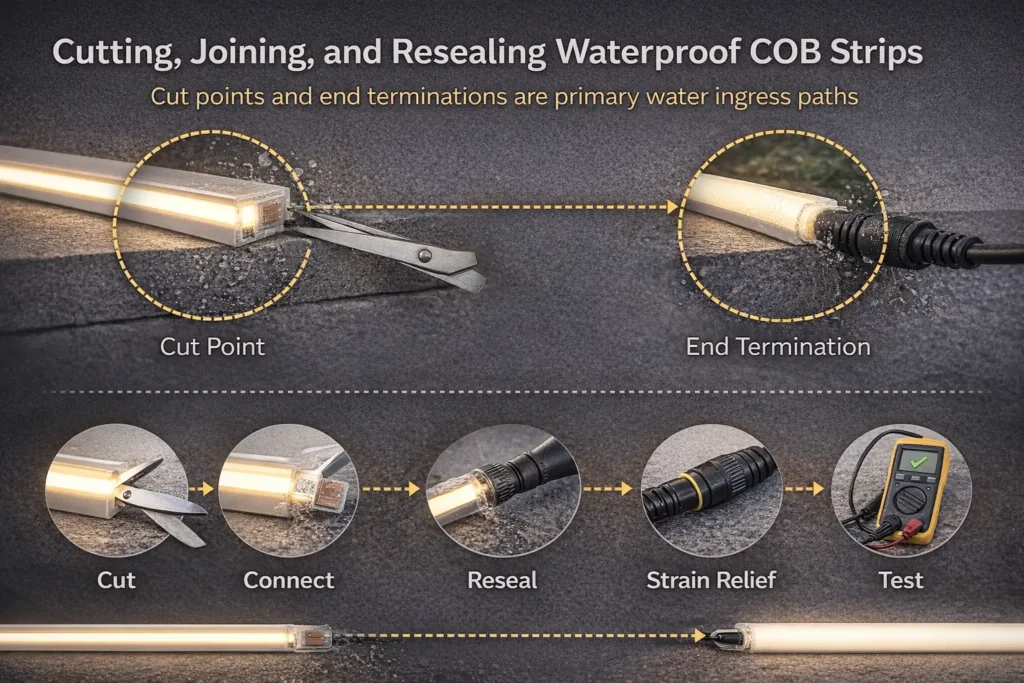
Before you touch the strip, identify where water could enter after installation.
Ingress paths to plan for:
Boundary note: different waterproof constructions use different termination methods. Confirm how the specific product is meant to be terminated and resealed.
Use this workflow as a project discipline (exact materials/methods vary by construction and accessory system).
Boundary note: do not assume one reseal method fits every strip construction. Use supplier-recommended accessories and documented installation guidance for the exact model.
As outdoor exposure severity increases, the risk cost of field work increases too.
Field cuts can be fine when:
Pre-made sealed lengths are often safer when:
Boundary note: “safer” depends on exposure, serviceability constraints, and the chosen product/accessory system.
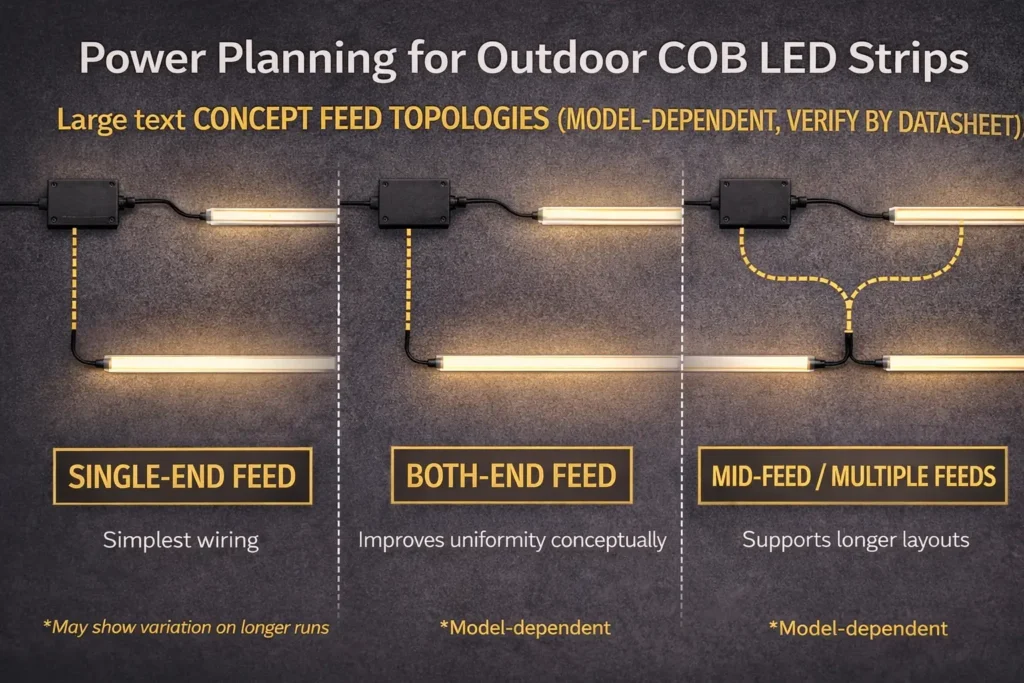
Outdoor power planning is not just “choose a driver.” It’s verifying load by documentation, placing equipment safely, routing cables without creating leak paths, and selecting a feed topology that reduces uneven brightness risk on longer runs.
Without a datasheet, any numeric sizing advice becomes guesswork—so use a verification approach.
Verify these items before finalizing the driver/PSU:
Boundary note: final driver selection depends on the specific strip model and project conditions. Confirm with documentation and project engineering review.
Route cables and feeds as though water will try to follow them—because it often does.
Outdoor routing practices that reduce problems:
Boundary note: site constraints vary widely. Design routing around exposure, access, and maintenance requirements rather than relying on “standard” layouts.
Longer runs can show brightness variation because voltage at the far end may be lower than at the feed end—especially when current is higher. The mitigation is usually a feed topology change.
Topology options (conceptual):
| Topology | Why it’s used | Practical outdoor note |
|---|---|---|
| Single-end feed | Simple and fast | Fewer entry points, but may show variation on longer runs. |
| Both-end feed | Improves uniformity conceptually | Requires careful routing and sealing at additional feed points. |
| Mid-feed / multiple feeds | Supports longer layouts | More cable entries and junctions—plan sealing and service access. |
| Parallel-fed segments | Easier control of zones | More planning upfront, often fewer surprises later. |
Boundary note: when to add feeds and how to wire them depends on the strip’s electrical design and the manufacturer’s guidance. Verify by datasheet/wiring diagram for the exact model.
Voltage choice and mounting strategy should be decided together: voltage affects wiring sensitivity, and mounting affects how well seals and joints survive outdoor stress.
In general, higher voltage systems can reduce current for the same load, which can make wiring and longer runs more forgiving—but the right choice is project-dependent and must match the strip’s rated voltage and the driver/controller ecosystem.
| Decision factor | 12V (conceptual) | 24V (conceptual) |
|---|---|---|
| Wiring sensitivity on longer layouts | Often more sensitive | Often less sensitive |
| Segmenting / feeding strategy | May require more planning for longer runs | Often simpler for longer runs (still model-dependent) |
| Compatibility constraints | Must match strip rating and available drivers/controllers | Must match strip rating and available drivers/controllers |
| Best-fit scenarios | Shorter runs, tight form-factor constraints | Longer runs, project layouts needing fewer feed complications |
Boundary notes:
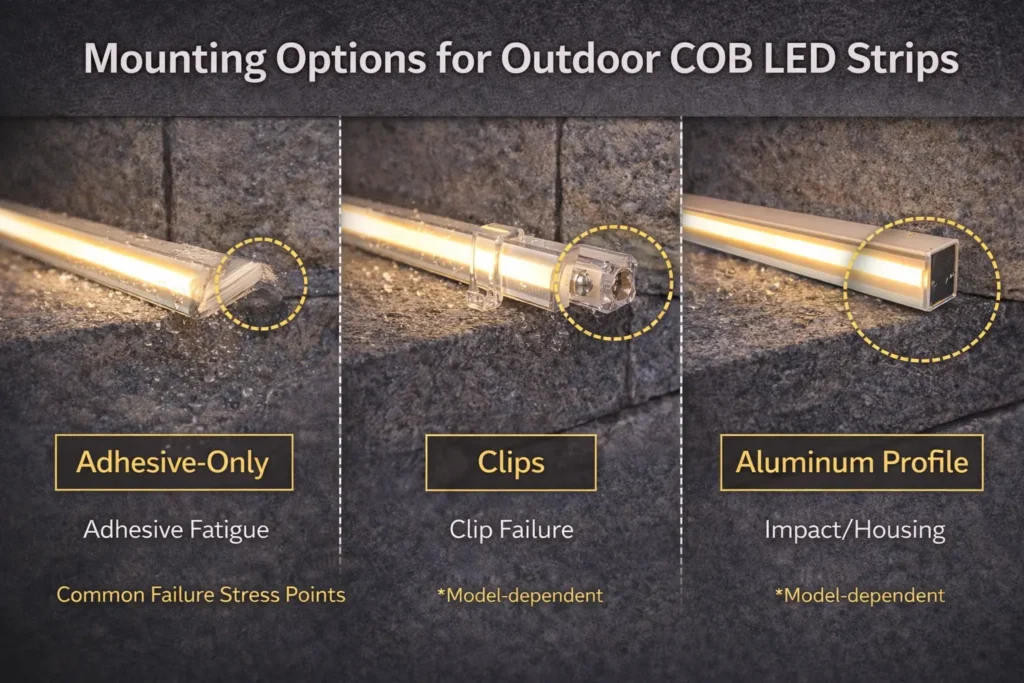
Outdoor mounting should prevent movement, protect the strip, and reduce stress at ends/joints.
| Mounting option | Pros | Common outdoor failure risk |
|---|---|---|
| Adhesive-only | Fast and clean | Can loosen under UV/heat/cold cycling; movement can open joints/ends. |
| Clips + mechanical retention | More secure | Requires planning for fastener points and consistent spacing. |
| Aluminum profile/channel | Clean finish + physical protection | Needs correct end treatment and routing to avoid creating new ingress paths. |
Outdoor durability checklist
Boundary note: best mounting depends on substrate, exposure, and finish requirements. Avoid one-size-fits-all recommendations.
Outdoor control is feasible, but compatibility is system-dependent: control method = driver + controller + wiring approach, and all of it must be protected from the environment.
Common control approaches (examples only—verify compatibility):
Boundary note: do not assume a strip “supports” a control method without the correct driver/controller pairing and documentation.
Procurement success for outdoor strip projects is “verify-by-datasheet”: confirm the exact model, the stated IP test conditions, the termination method, and the wiring guidance before committing to a design or purchase.
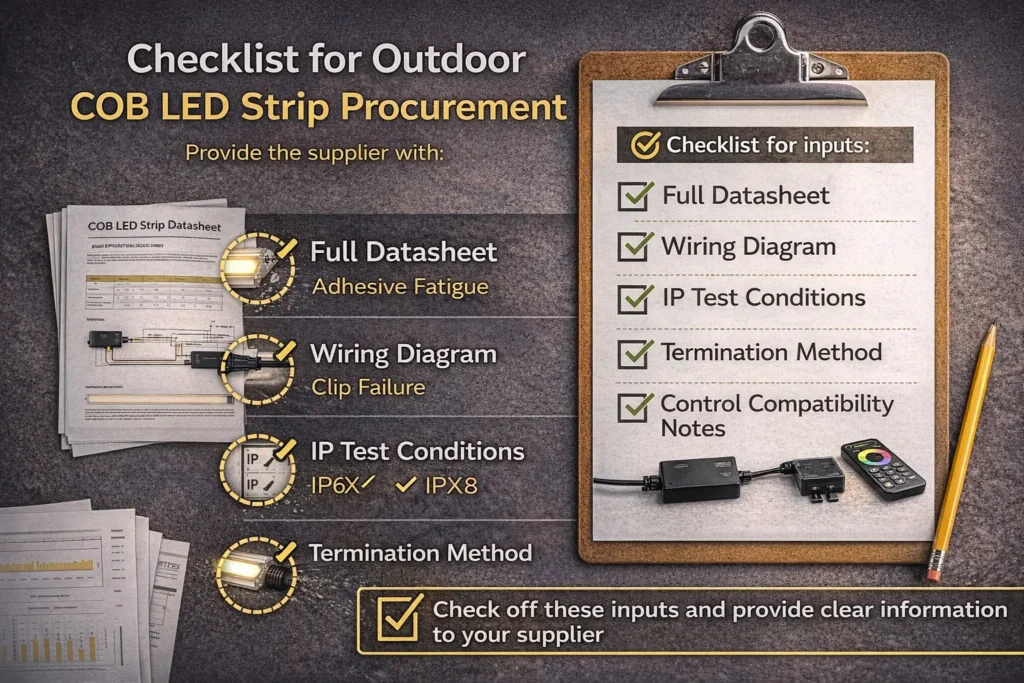
Ask for these items so the project can be specified and installed with fewer assumptions:
Boundary note: certifications are not universal across all products. Confirm scope for the exact model/series and your project requirements.
Provide these inputs to reduce back-and-forth and avoid mis-specification:
Boundary note: unclear exposure and layout assumptions are the biggest drivers of rework. Document assumptions early.
Customization or a different form factor can reduce risk when the site conditions are difficult.
Consider customization (or a different solution) when:
Boundary note: feasibility depends on model construction and project constraints. Confirm by documentation and project requirements.
Need help specifying an outdoor COB strip system for a project layout?
Provide the exposure scenario (covered/exposed/immersion risk), total run lengths per zone, preferred mounting method, and any control requirements. A supplier can then confirm the right IP construction, termination approach (field reseal vs pre-made sealed lengths), and a wiring/power feed plan based on the exact model documentation.
A COB LED strip is built to create a more uniform-looking line of light, often reducing the “individual LED dot” appearance. In projects, COB is typically chosen for clean visual finish and consistent illumination, especially in visible architectural accents.
Boundary note: COB construction details vary by model/series—verify rating, voltage, and installation method in documentation.
Yes, if the strip’s IP rating matches the exposure and the installation maintains protection at ends, connectors, and cable entries year-round. In practice, “year-round” success depends on weather exposure, mounting durability, and whether the power/control gear is protected to the same standard.
Boundary note: outdoor performance is environment- and installation-dependent; avoid assuming “waterproof” means “maintenance-free.”
Choose IP based on exposure:
Boundary note: verify stated IP test conditions (especially for IPX8) and design the whole system to the same protection level.
“Weatherproof” is often a loose label, while “waterproof” should be supported by a documented rating and stated test conditions. The key risk is assuming the strip rating covers ends, connectors, and enclosures—it usually doesn’t unless those elements are addressed explicitly.
Boundary note: rely on documented ratings and installation guidance, not labels.
At minimum: the driver/PSU, controller/dimmer (if used), connectors/splices, enclosure, and all cable entry points. Outdoor failures commonly start at connectors, cut ends, and unsealed enclosure entries.
Boundary note: the required protection level depends on placement and exposure scenario.
Use a defined workflow: cut at the correct mark, connect leads correctly, reseal the termination using the product’s recommended method/accessories, add strain relief, and test before final close-up. Consider pre-made sealed lengths when exposure is heavy or access is limited.
Boundary note: reseal method is construction-dependent—confirm for the exact model.
Choose based on layout constraints and system compatibility. In general, higher voltage systems can be more forgiving on longer layouts, but the correct choice must match the strip’s rated voltage and the available driver/controller ecosystem.
Boundary note: verify by datasheet/model and coordinate voltage choice with feed topology and mounting plan.
Consider LED neon when you need a sealed diffuser body, a more “fixture-like” finish, or fewer exposed joints/edges in heavily weather-exposed locations. COB strip is often preferred when a thinner profile and flexible layout are needed and terminations/connectors can be reliably protected.
Boundary note: confirm the outdoor rating and installation method for the specific neon product.
Key project path (use this as a checklist):
For complex outdoor layouts (long runs, multiple zones, limited access, harsh exposure), prepare a one-page spec brief:
This makes it faster to confirm the right construction and a project-ready installation plan.


