“Common LED strip connection issues like flickering, dimming, or partial failure are often due to loose wiring, incompatible components, or insufficient power. Clearly understanding and quickly resolving these problems ensures reliable, stable LED lighting.”
Introduction to LED Strip Connection Problems
Having personally installed and maintained numerous LED strip lights, I clearly understand how frustrating connection problems can be. LED strip connection issues—such as flickering, dimming, or LEDs not lighting properly—can disrupt your lighting projects and reduce visual appeal.
What are LED Strip Connection Issues?
Connection problems in LED strips typically involve issues like loose wiring, faulty connectors, incompatible components, or insufficient power supply. Clearly recognizing these problems quickly is essential to maintain stable and consistent lighting performance.
Why Address Connection Issues Promptly?
Promptly resolving connection issues ensures stable, consistent lighting, extends LED lifespan, and prevents potential safety risks. Clearly understanding common causes and quick fixes helps you maintain reliable and visually appealing lighting.
Clients often ask me, “Why are my LED strip connections failing?” Clearly, quickly identifying the root causes and applying straightforward troubleshooting steps can effectively resolve these issues.
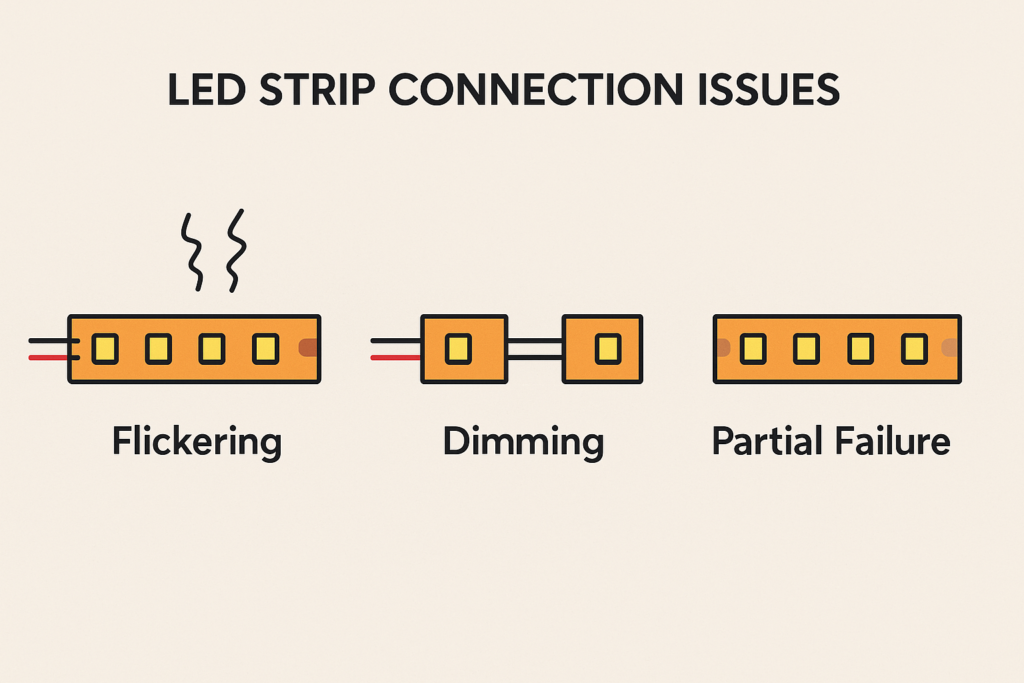
Common Causes of LED Strip Connection Issues
From my hands-on experience installing and troubleshooting LED strip lights, I clearly understand the common reasons behind connection problems. Here’s a straightforward explanation of typical causes to help you quickly identify and resolve these issues:
Loose or Poor Connections
- Issue Clearly Explained:
Loose connectors or improperly secured wiring connections can result in flickering or intermittent lighting.
- How to Identify:
LEDs flicker or turn off when touched or slightly moved.
Faulty or Incompatible Connectors
- Issue Clearly Explained:
Using incompatible or damaged connectors causes certain segments to flicker, dim, or fail entirely.
- How to Identify:
Specific sections clearly don’t illuminate or flicker despite good wiring and power.
Voltage Drop and Power Supply Issues
- Issue Clearly Explained:
Insufficient voltage or improper power supplies can cause LEDs to dim, flicker, or not light at all.
- How to Identify:
LED brightness clearly reduces along the length of the strip or segments randomly dim or flicker.
Improper or Poor Soldering
- Issue Clearly Explained:
Poor-quality solder joints or incomplete connections lead to unstable lighting or flickering.
- How to Identify:
Inconsistent lighting clearly appears around solder joints or connection points.
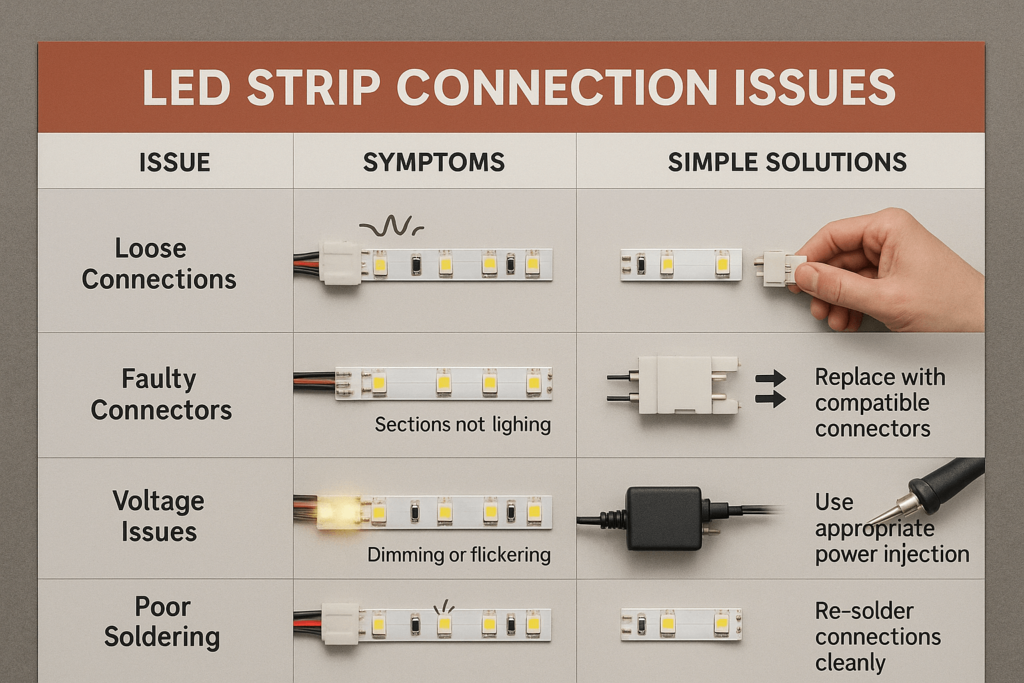
Comparison Table:
| Edición |
Symptoms |
Simple Solutions |
| Loose Connections |
Flickering or intermittent |
Secure and tighten connections |
| Faulty Connectors |
Sections not lighting |
Replace with compatible connectors |
| Voltage Issues |
Dimming or flickering |
Use appropriate power injection |
| Poor Soldering |
LEDs unstable or flickering |
Re-solder connections clearly |
Step-by-Step Guide to Fixing LED Strip Connection Issues
Having personally handled various LED strip connection issues, here’s a clear, straightforward step-by-step guide to help you quickly troubleshoot and resolve problems:
Step 1: Inspect and Secure All Connections
- Clearly check each connection point on your LED strip.
- Ensure connectors and wiring are firmly and securely attached.
- Reconnect any loose or unstable connections clearly and firmly.
Step 2: Replace Faulty or Incompatible Connectors
- Clearly identify connectors that aren’t matching your LED strip type or appear faulty.
- Replace them clearly with compatible, quality connectors suitable for your LED strips.
Step 3: Verify Proper Voltage and Power Supply
- Clearly measure voltage levels with a multimeter to ensure sufficient voltage throughout your LED strip.
- If voltage drop occurs, clearly add power injection points to maintain consistent brightness.
Step 4: Re-solder and Repair Poor Connections
- Inspect clearly for any damaged or weak solder joints or connection points.
- Clearly re-solder connections securely to restore stable lighting performance.
Clients often ask me, “Can I easily fix LED strip connection issues myself?” Clearly, following these simple and clear steps makes troubleshooting and repairing LED strip connection problems straightforward even for beginners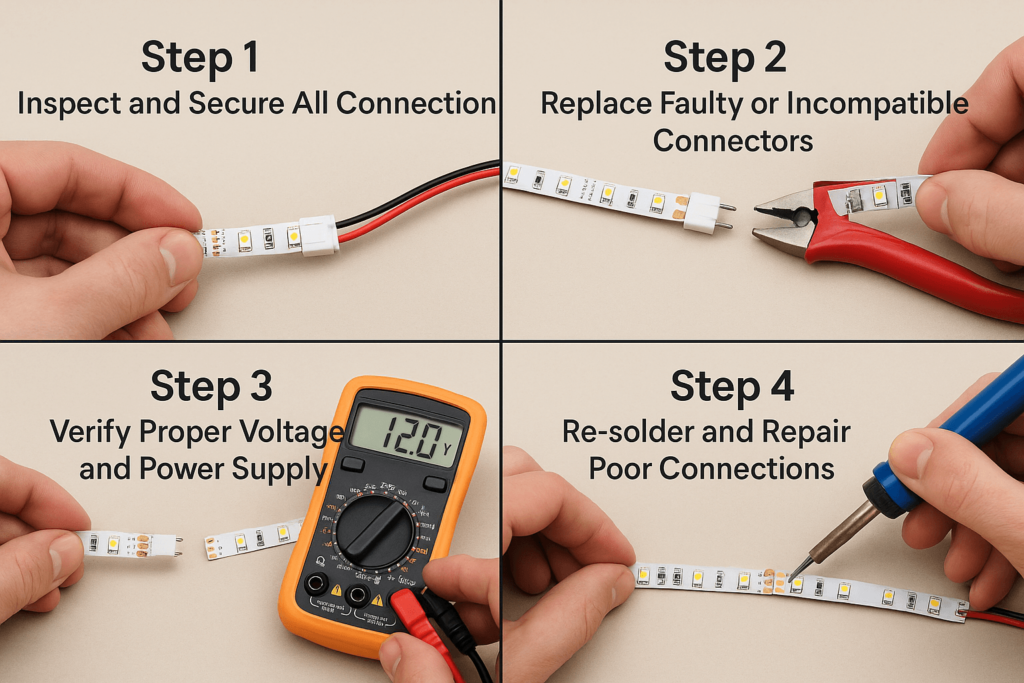
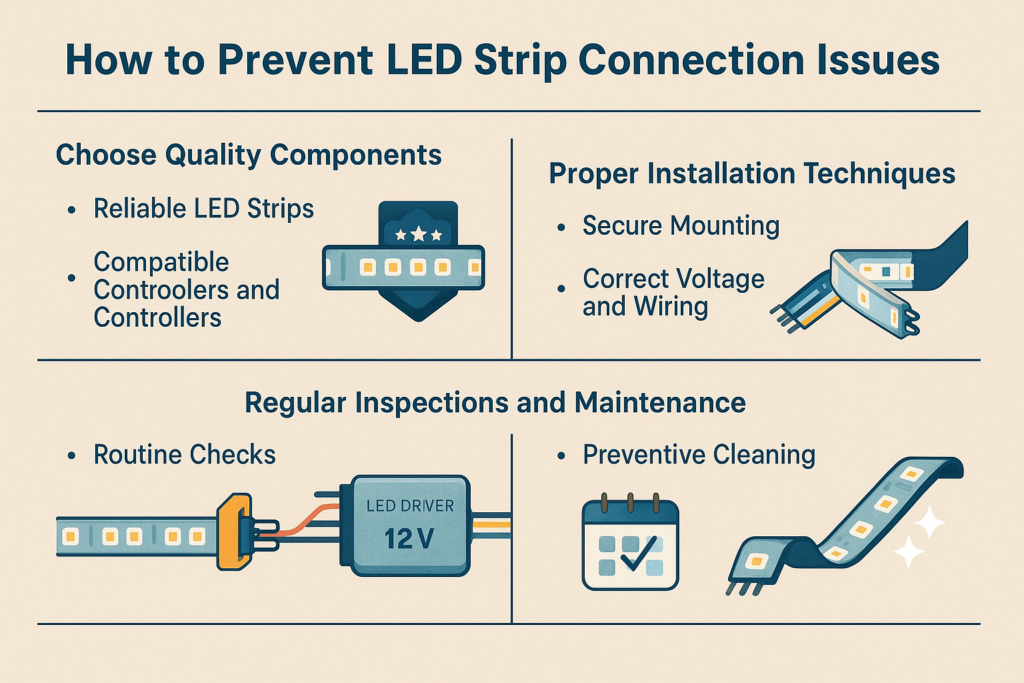
How to Prevent LED Strip Connection Issues
Drawing from my extensive experience installing LED strip lighting, I’ve clearly learned that preventive measures can greatly minimize connection issues. Here’s straightforward guidance on preventing LED strip connection problems from occurring:
Choose Quality Components
- Reliable LED Strips:
Clearly select reputable brands and high-quality LED strips to minimize connection issues.
- Compatible Connectors and Controllers:
Clearly ensure that all connectors, controllers, and dimmers match your LED strip specifications.
Proper Installation Techniques
- Secure Mounting:
Clearly secure LED strips using mounting clips, adhesive tape, or aluminum channels to maintain stability.
- Correct Voltage and Wiring:
Clearly match power supplies to your LED strip requirements, ensuring correct voltage and wiring practices.
Regular Inspections and Maintenance
- Routine Checks:
Clearly schedule periodic inspections of LED strips, connectors, and wiring for secure connections and signs of wear.
- Preventive Cleaning:
Regularly clean LED strips clearly with a gentle cloth, removing dust and debris to maintain consistent performance.
Clients frequently ask me, “How can I easily avoid LED strip connection problems?” Clearly, following these simple yet effective guidelines ensures reliable, flicker-free LED lighting long-term.
Advanced Troubleshooting for Persistent Issues
Based on my extensive hands-on experience with challenging LED strip connection problems, here’s clear, advanced guidance to help you tackle persistent or stubborn issues effectively:
Advanced Step 1: Power Injection for Voltage Drop
- Clearly assess your LED strip setup for voltage drops.
- Implement additional power injection points clearly at appropriate intervals to maintain stable voltage and consistent brightness.
Advanced Step 2: Advanced Controller and Dimmer Checks
- Verify compatibility clearly between your LED strips and controllers or dimmers.
- Consider clearly replacing incompatible or faulty components with high-quality alternatives specifically matched to your LED strip specifications.
Advanced Step 3: Inspect and Replace Faulty Components
- Thoroughly inspect your strips, connectors, and controllers clearly for subtle or hidden damage.
- Promptly replace clearly faulty segments or connectors to ensure stable performance.
Advanced Step 4: Re-solder and Secure Connections
- Clearly re-inspect and re-solder problematic connections to restore stable and secure lighting performance.
- Clearly ensure connections are solid and insulated to prevent future problems.
Clients frequently ask me, “What if my LED strip connection issues persist despite basic troubleshooting?” Clearly, addressing power injection, compatibility issues, and detailed re-soldering can effectively resolve persistent connection issues.

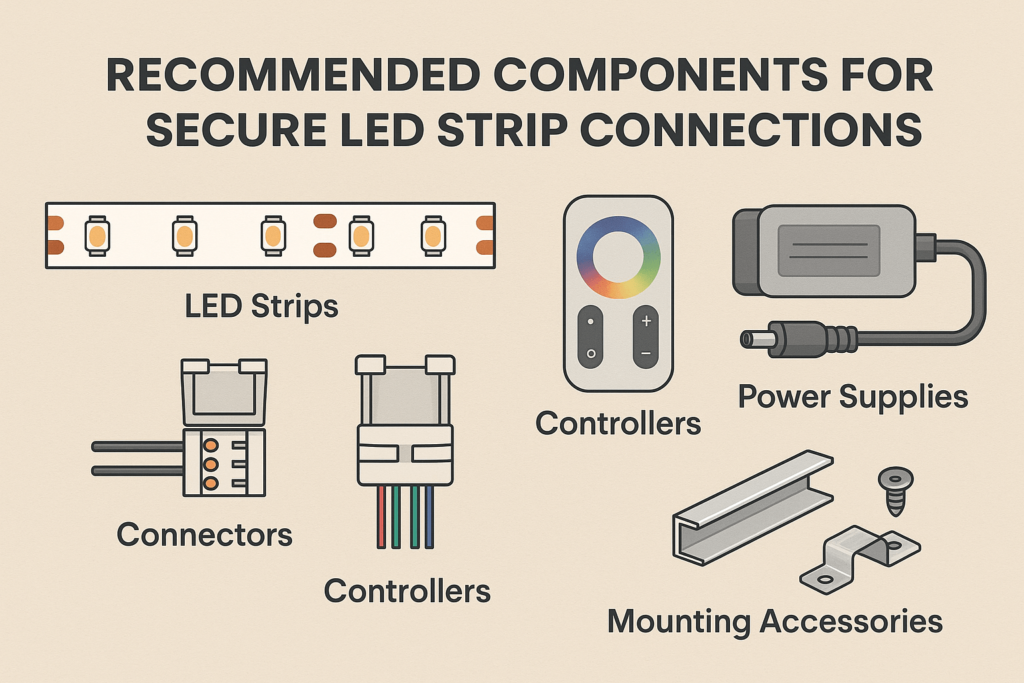
Recommended Components for Secure LED Connections
Drawing from my hands-on experience installing LED strips, I clearly understand that quality components significantly reduce connection issues. Here’s straightforward guidance on selecting reliable, high-quality components to ensure stable LED lighting connections:
Reliable LED Strips
- Clearly choose LED strips from reputable brands known for consistent brightness, durability, and reliable performance.
Compatible Connectors and Wiring
- Select clearly compatible and reliable connectors specifically designed for LED strip use, ensuring stable and secure connections.
- Use clearly labeled, quality wiring clearly suited to your LED strip’s voltage and wattage requirements.
Appropriate Controllers and Dimmers
- Clearly select controllers and dimmers explicitly compatible with your LED strip type, ensuring stable performance and preventing flickering.
Quality Power Supplies
- Choose clearly matched power supplies providing stable voltage and sufficient wattage clearly required by your LED strip setup.
- Consider clearly adding power injection for longer runs to maintain consistent brightness.
Mounting Tools & Accessories
- Use aluminum mounting channels clearly to ensure secure installation, effective heat dissipation, and extended LED lifespan.
- Employ reliable mounting clips and quality adhesive tape clearly designed for LED strip installations.
Clients frequently ask me, “What components clearly prevent LED strip connection issues?” Clearly, selecting quality LED strips, reliable connectors, and compatible controllers and power supplies helps ensure consistent, secure, and reliable LED lighting performance.
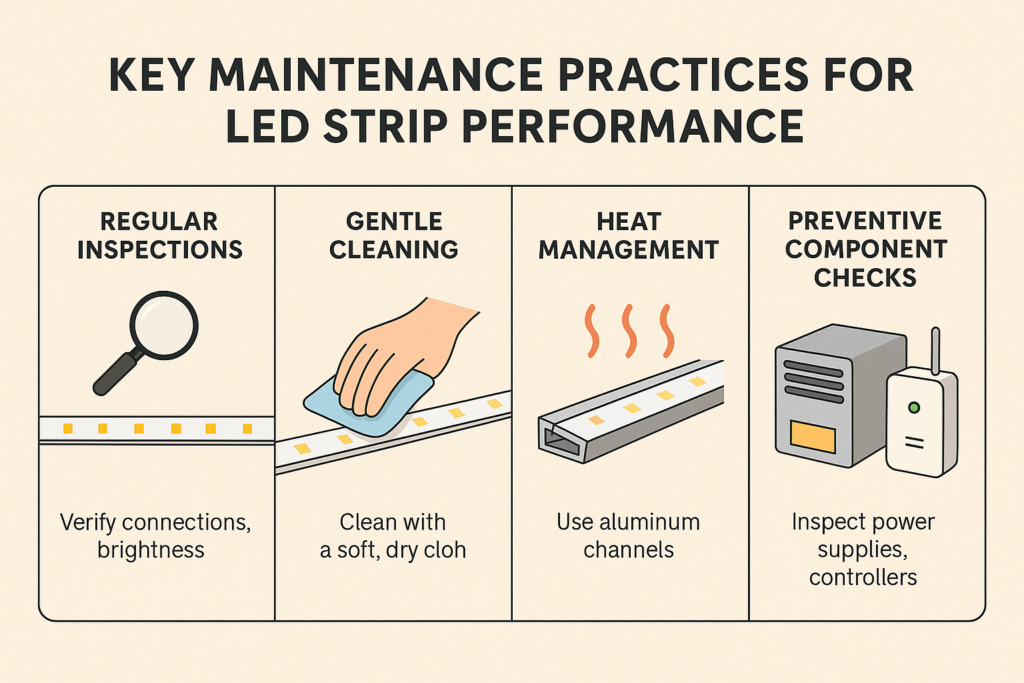
Expert Maintenance & Long-term Care Recommendations
Having personally installed and maintained numerous LED strip systems, I clearly understand that proactive care ensures stable, long-lasting performance. Here’s straightforward advice for effectively maintaining your LED strip connections and avoiding issues over the long term:
Regular Visual Inspections
- Clearly schedule regular checks to verify connections, brightness consistency, and overall lighting stability.
- Quickly address loose connections or damaged components as soon as clearly identified.
Gentle Cleaning and Dust Removal
- Gently clean LED strips periodically with a soft, dry cloth, clearly ensuring dust or debris doesn’t accumulate and affect performance.
- Clearly avoid harsh cleaning agents or excessive moisture to maintain strip integrity.
Proper Heat Management
- Clearly use aluminum channels or heat sinks, particularly in high-brightness installations, ensuring adequate heat dissipation.
- Regularly monitor LED strips clearly for overheating or temperature irregularities to prevent connection issues.
Periodic Maintenance Checks
- Clearly inspect power supplies, controllers, and connectors regularly, ensuring they’re stable, secure, and functioning properly.
- Clearly replace any components showing signs of wear or reduced performance promptly.
Clients frequently ask me, “How often should I perform maintenance on my LED strips?” Clearly, routine inspections every few months and gentle cleaning at least twice per year significantly extend LED strip lifespan and ensure stable lighting performance.
FAQs About LED Strip Connection Issues
Based on my extensive hands-on experience, I clearly understand common questions people ask about LED strip connection problems. Here are straightforward answers to help you quickly and effectively manage your LED lighting:
Why are my LED strips not connecting properly?
Common reasons include loose connectors, improper wiring, incompatible components, or voltage issues. Clearly inspecting and securing these areas quickly resolves most connection problems.
How can I quickly fix LED strip connection issues?
Quickly verify all connections, replace faulty connectors, ensure proper voltage supply, and confirm compatibility clearly between components to resolve connection issues efficiently.
Are LED strip connection issues common?
Yes, clearly they are common, especially if installation practices aren’t carefully followed. Choosing quality components and proper installation techniques can clearly prevent most connection problems.
Conclusion & Next Steps
Clearly understanding how to identify, resolve, and prevent LED strip connection issues ensures your lighting remains consistent, reliable, and visually appealing. From my extensive experience, quickly addressing common causes—such as loose connections, incompatible components, or improper installation—keeps your LED strip lighting performing optimally.
By choosing high-quality components, following clear installation practices, and conducting regular maintenance, you can significantly reduce the likelihood of connection problems and enjoy long-term, stable LED lighting.
Ready to ensure reliable and consistent LED strip connections for your projects?
Explore Elstar’s LED Lighting Solutions →


