

I’ve cut مصابيح شريطية LED dozens of times—successfully, and not so successfully. One time, I trimmed a waterproof RGB strip just a few millimeters off the mark, and the entire section died. No lights. No fix. Just a shorted-out $30 roll of LEDs.
So let’s be clear: yes, you can cut LED strip lights—but only in the right place.
Whether you’re installing lights behind your TV, under a cabinet, or around your ceiling, knowing where to cut is just as important as how. And depending on the type of LED strip you’re using—like Govee smart lights or waterproof RGB strips—the safe cut locations might look very different.
In this guide, I’ll show you exactly where to cut, how to tell if your strip is safe to trim, what to do if you cut the wrong place, and how to reuse or reconnect the pieces correctly.

Yes, LED strips are designed to be cut—but only at very specific points. These points are placed strategically to preserve the electrical circuit inside the strip. Cutting anywhere else can permanently break the flow of current and cause sections to stop working.
LED strip lights are made up of a flexible circuit board with small groups of LEDs connected in parallel. Each group—usually 3 to 6 LEDs—is its own mini circuit powered by two or more copper pads.
The copper pads are your cut points.
They look like shiny dots or short bars across the strip, and they appear regularly—usually every:
These are the only safe places to make a cut.
Most modern LED strips come with:
✅ If your strip has these, you’re good to cut—right on the line.
❌ If your strip has no markings or visible copper, do not cut until you check the manual or contact the manufacturer.
📰 Understanding LED Strip Design – Waveform Lighting
Yes. The cut intervals vary:
| الفولتية | Typical Cut Interval | Marking Frequency |
| 12V | Every 3 LEDs | Every ~5 cm |
| 24V | Every 6 LEDs | Every ~10 cm |
Make sure you don’t assume a uniform cut pattern—always look before you cut.

Not all LED strips are created equal. The cutting method—and even whether you should cut them—depends heavily on the type of strip you’re using. Let me break down the most common types I’ve worked with, and how I safely cut each one.
These multicolor strips typically have 4 or 5 copper pads per cut point:
✅ Cut across all pads in one clean line.
Make sure your connectors or solder match the number of pins.
📌 Tip: RGBW strips are slightly wider than RGB—double-check if your connector is compatible.
Smart LED strips often integrate:
✅ Check the user manual or brand support page—some smart strips cannot be cut at all without losing functionality.
📰 Where to Cut Govee Strip Lights – Govee Support
Waterproof models are sealed in silicone or epoxy for outdoor or damp environments.
📌 Tip: For IP67-rated strips, resealing is critical to prevent shorts.
Some budget or custom strips may have:
❌ Do not cut unless you can trace the circuit or test using a multimeter.
If you’re unsure, skip cutting—or test on a small expendable section.
▶️ Watch: How to Identify Cut Points on Any LED Strip – YouTube

Once you’ve found the right spot to cut your LED strip, here’s exactly how I do it to ensure a clean cut and a working connection every time.
Never cut a powered LED strip. Always unplug the power adapter or disconnect the controller. Cutting live wires—even low voltage—can result in sparks or damage.
Look for the scissor icon or the exposed copper pads. On RGB strips, you’ll usually see 4 pads (R, G, B, V+). On single-color strips, just two.
✅ Make sure you’re cutting on the line, not near it.
Use sharp scissors or wire cutters to slice directly through the cut zone. A jagged or diagonal cut can misalign the copper pads, making reconnection difficult.
📌 Pro Tip: Cut along a table edge or ruler if you want perfect precision.
Depending on your plan, you can either:
Reconnect the strip to your power source or controller and test it.
▶️ Watch: How to Cut and Reconnect LED Strip Lights – YouTube

Mistakes happen—even to experienced installers. I’ve personally cut strips in the wrong place, and while it’s frustrating, not all is lost.
Let’s walk through what happens, and what you can do to fix it (or work around it).
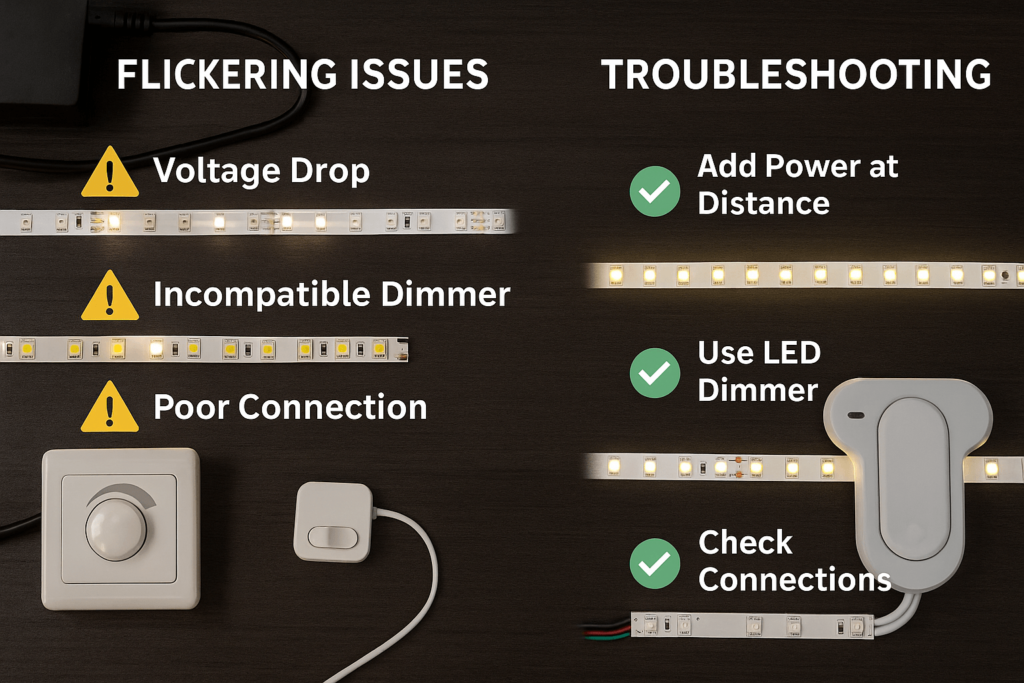
Cutting through the wrong part of the strip can result in:
Yes, sometimes. Here’s how:
Option 1: Cut Again at the Nearest Pad
If there’s enough slack, simply trim again at the next correct copper pad.
Option 2: Expose the Circuit and Repair
Carefully strip back the plastic covering and expose a usable part of the copper trace.
Option 3: Repurpose the Working Segment
If only part of the strip works, you can still use it as a short accent light—under shelves, behind a monitor, or inside a drawer.
Some strips simply can’t be salvaged after a bad cut:
In these cases, it’s usually better to replace the damaged section.
📰 How to Repair Damaged LED Strip Segments – DigiKey Forum

Over the years, I’ve ended up with plenty of leftover LED strip segments. Instead of tossing them, I’ve found simple and creative ways to reuse those cut pieces—saving both money and waste.
Here are some real examples from my own projects:
After trimming a long RGB strip for a living room wall, I used the extra 60 cm segment to frame my bathroom mirror.
It became one of my favorite DIY upgrades—simple, functional, and stylish.
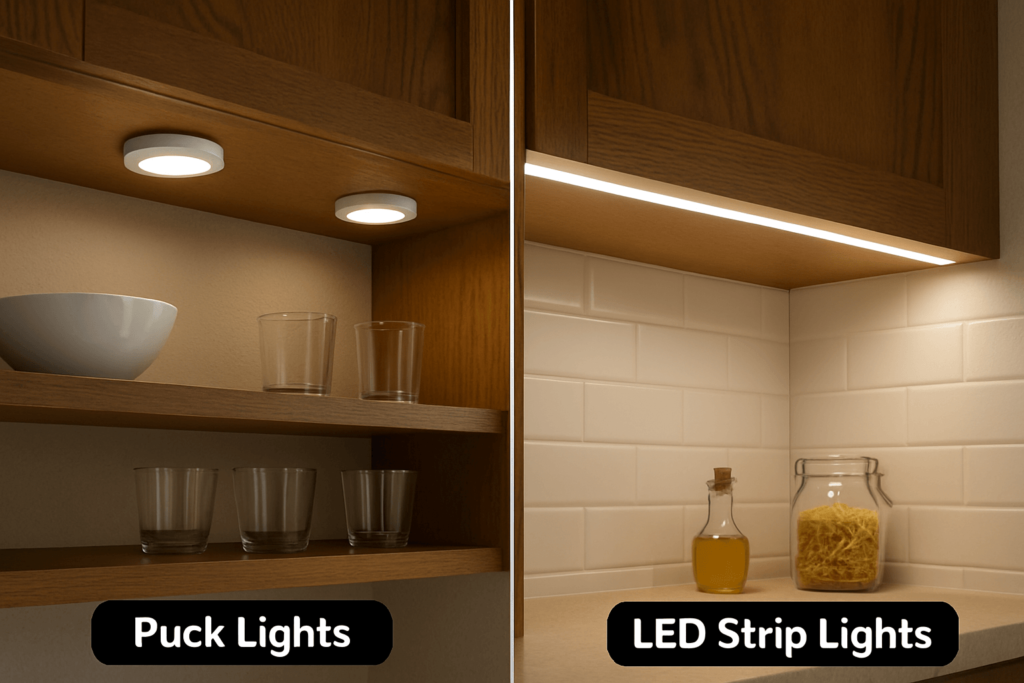
Cut segments are perfect for small spaces:
📌 Tip: Smaller segments draw very little power—ideal for USB adapters.
I had a 5-meter strip but only needed 3 meters for my ceiling. I reused the remaining 2 meters under my sofa for ambient lighting.
📰 How to Connect Multiple LED Segments with One Controller – LEDLightingInfo
▶️ Watch: 5 Smart Ways to Reuse Cut LED Strips – YouTube
Where exactly should I cut LED strip lights?
Only cut along the designated copper pad lines, typically marked with a scissor icon. Cutting outside of these can break the circuit and render the strip unusable.
Can I cut LED strips that don’t have cut marks?
It’s risky. If there are no visible copper pads or printed lines, check the product documentation. You may be able to use a multimeter to test for circuit break points, but cutting blind is not recommended.
What happens if I cut the LED strip in the wrong place?
You may lose electrical continuity, causing the entire segment to stop working. Sometimes, the damage can be repaired by exposing copper traces and reconnecting them with solder.
Can waterproof LED strips be cut?
Yes—but after cutting, you’ll need to reseal the end with silicone or a waterproof cap to maintain protection. Be sure to cut carefully and avoid damaging the internal circuitry.
Can I cut smart LED strips like Govee or Hue?
Some can be cut at designated points, while others may lose functionality if trimmed. Always check the brand’s user guide before cutting.
📰 Can I Cut My Govee Strip Lights? – Govee Help Center
How do I test if a cut LED segment still works?
Use a 12V or 24V power adapter with matching polarity, or a multimeter in continuity mode. You can also test using a clip-on connector before final installation.
▶️ Watch: How to Test LED Strips After Cutting – YouTube
Cutting LED strip lights isn’t difficult—but knowing where to cut makes all the difference between a clean install and a dead segment.
I’ve made plenty of cuts over the years, and the rule never changes: always cut on the copper pads, and always double-check your strip type. Whether you’re trimming RGB lights for a gaming setup or slicing waterproof strips for a bathroom mirror, the same principle applies—measure, mark, and cut carefully.
With the right tools and a little planning, you can create customized lighting that fits perfectly—and reuses every inch of your strip.
👉 Browse LED Strip Lights by Elstar
👉 Shop LED Strip Connectors & Accessories
👉 Learn More: How to Connect LED Strips at Corners
Elstar offers high-quality LED strips, connectors, and cutting tools to help you get the perfect fit—whether you’re a beginner or lighting pro.
