Vous avez besoin d'un produit de qualité en peu de temps ? Nous avons un plan pour vous.


Table des matières
DIY LED strip photography lighting means building your own continuous lights from flexible LED strips, a simple frame and diffusion so you can shoot photos or video without buying expensive panels. It makes a lot of sense for small studios, product work and YouTube setups, but it has limits in power, robustness and features compared with commercial fixtures.
At its core, a DIY LED strip photography light is:
Compared with commercial LED video panels and tubes, DIY strip lights can offer:
Pour tabletop products, portraits in a small room and talking-head videos, well-designed DIY strip panels are usually “good enough” — and often excellent — as long as you pick high-CRI strips and design the panel sensibly. For large studios, high-speed action or harsh mixed light, commercial panels or flashes are still the better tool.
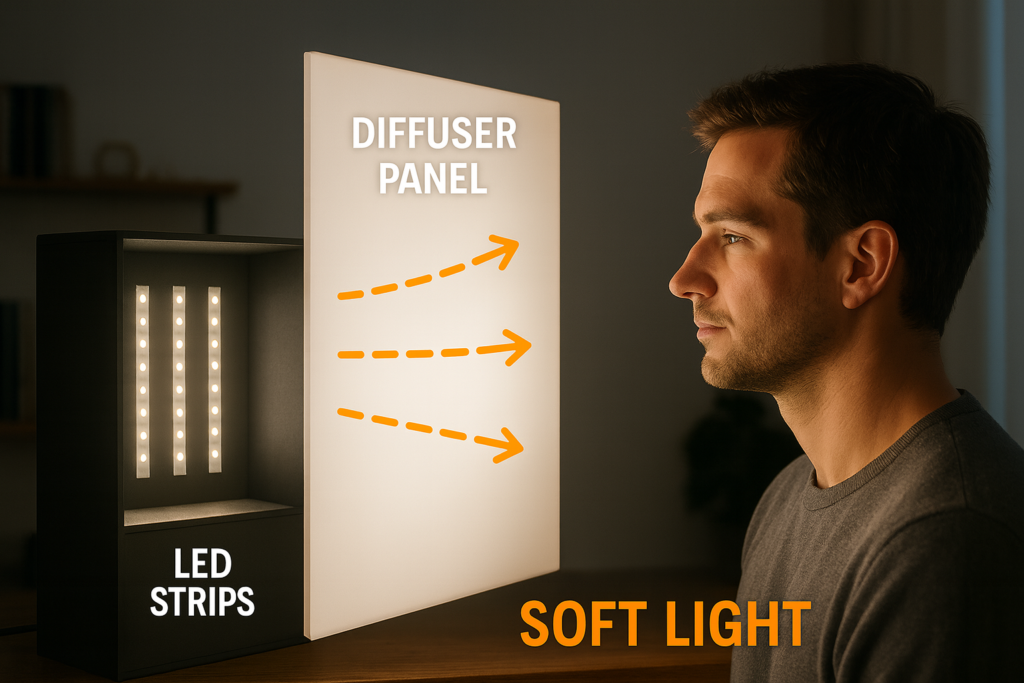
You can build a simple DIY LED strip light panel by sticking high-CRI LED strips to a flat backing, wiring them to a suitable power supply and dimmer, and placing a diffuser a short distance in front. The steps below are the fast “recipe” version you can skim before diving into details.
This quick recipe gives you the big picture; the later sections break down components, specs, layout, wiring, diffusion et setups so you can adapt the idea to your own space safely.

You need only a handful of components to build a solid DIY LED strip photo light, but each one matters: the wrong strip or an undersized power supply will show up immediately in your photos. Plan panel size, strip quantity and budget before you order anything.
At minimum, a reliable DIY LED strip light for photography consists of:
A simple way to choose specs is:
We strongly recommend high-CRI white strips as your main subject light. RGB/RGBIC strips are great for coloured backgrounds and accents, but rely on white strips if you care about skin tones and product colour accuracy.
You can always explore the broader Elstar flexible LED strip portfolio for project-scale options once you’re comfortable with the basics.
Table 1 – Component checklist
| Component | Role in the light | Key spec(s) to watch |
|---|---|---|
| High-CRI white strip | Main key/fill light on subject | CCT (e.g. 5000–6500 K), CRI ≥ 90, W/m, 12 V or 24 V |
| RGB/RGBIC strip | Background or accent colour | Colour range, pixel or segment control, W/m, voltage |
| Power supply | Feeds all strips at constant voltage | Output voltage, wattage ≥ total strip W × 1.2–1.3 |
| Dimmer/controller | Adjusts brightness/colour, may use PWM | Compatible with strip voltage and current |
| Backing panel | Supports strips and wiring | Flat, heat-tolerant, easy to drill/mount |
| Diffuser | Softens light and hides hotspots | Translucency, size, distance from strips |
| Mounting hardware | Fixes light to stand/tripod/boom | Strong enough for panel size and weight |
| Wiring/connectors | Bring power from PSU to strips | Correct gauge for current, secure and insulated |
You’ll get better results if you think about where et how far you’ll use the panel before you fix its size and strip length.
A simple planning approach:
Example – starter product panel
If your strip is rated at 14 W/m, then 3 m needs about 42 W of power; a 60 W 12 V supply gives comfortable headroom.
Denser rows and a larger panel yield more light and smoother diffusion, but every extra metre of strip adds cost and power draw, so start modest and scale up once you’ve tested a build.

You get far better photos if you treat CCT, CRI, wattage and voltage as design choices, not afterthoughts. For most small studios, high-CRI white strips around daylight colour, sized for your working distance, are the safest and most flexible choice; RGB/RGBIC strips are best kept for backgrounds and effects.
For photography, colour temperature (CCT) et colour rendering index (CRI) determine how natural your images look and how easy it is to white-balance.
A practical approach:
If you want to dive deeper into colour science later, resources like the colour rendering index (CRI) et color temperature articles are good starting points.
You don’t need exact lumen calculations to build something useful, but you do need a sense of brightness vs distance vs aperture/ISO.
Rules of thumb:
Remember that diffusion eats light: thicker diffusers and more distance between strips and diffuser produce softer shadows but reduce brightness. If your first build feels dim, options include:
The cleanest approach is to treat high-CRI white strips as your key/fill lights et RGB/RGBIC strips as your background and accent lights.
Use high-CRI white strips when:
Use RGB/RGBIC strips when:
Combining them can be powerful, for example:
Just keep in mind that intense RGB effects can complicate metering and colour grading. Test a few frames and keep a neutral reference shot in case you need to correct later.
A sensible build process takes you from a rough sketch to a sturdy panel you can safely aim at a subject. The idea is to translate your chosen size and strip specs into a layout, assemble the panel or light box, and mount it securely so it behaves like a real piece of kit.
Start with your main use case:
Then:
If your panel would require running more than one full strip roll in a single chain, plan to split the panel into segments and feed power from multiple points (we cover this in the wiring section).
Once the layout is clear, assembling the panel is straightforward.
The aim is a repeatable pattern you can rebuild or resize later, not a one-off gimmick.
A well-lit scene is useless if the light falls over or droops mid-shoot. The mounting needs to be at least as considered as the electronics.
Good options include:
Safety checks:

Good lighting is useless if the wiring is unsafe or unreliable. You should size the power supply correctly, choose a sensible wiring layout, and understand how dimmers and batteries affect both flicker and runtime.
A safe, reliable power setup follows three simple rules: match voltage, respect current, and minimise voltage drop.
Keep all mains-voltage connections inside a proper PSU enclosure, and only expose low-voltage DC wiring on the panel itself. When in doubt, consult a qualified electrician or resources like the U.S. Department of Energy guidance on lighting for general safety principles.
Never leave bare copper, loose connectors or overloaded splitters in a light you plan to use regularly.
You can run many DIY panels from batteries, but you must respect voltage and current requirements, and manage expectations for runtime.
Rough runtime estimate:
Guidelines:
Flicker or rolling bands in video usually come from interactions between PWM dimming (or mains frequency) and your camera’s frame rate and shutter speed.
To minimize problems:
A quick flicker test before a real shoot — even just waving your hand in front of the light while recording — is far cheaper than discovering banding in your final footage.

Raw LED strips are harsh and full of hotspots; diffusion and colour control are what make a DIY panel look professional on camera. You’ll get the best result by treating diffuser choice, distance and colour handling as design variables, not decoration.
The goal of diffusion is to turn many small point sources into one larger, soft source. That means hiding the individual LEDs and giving light room to spread before it leaves the fixture.
Options for DIY diffusers:
Principles:
Test by shining the panel at a white wall and checking for visible strip lines or uneven patches; adjust strip spacing and diffuser distance until the pattern disappears.
Shot colour is much easier to manage when your DIY panel and your environment agree. You have three basic strategies: match, dominate ou separate.
When in doubt, turn off as many other light sources as you can and treat the panel as your single “sun”.
Many RGB/RGBIC controllers have “DIY” or custom modes that let you set your own colours or animations. These can be very useful for background washes and accents, as long as you keep things video-friendly.
Guidelines:
Example creative uses:
If a pattern looks cool to the eye but strange on camera, trust the camera: adjust colour, brightness or speed until both agree.
Once you have one or two DIY strip panels, you can adapt them to many common photography and video scenarios. The key is panel size, distance and how you mix in background or accent strips.
For small products, think in terms of controlled reflections and even coverage.
A simple starting setup:
This gives clean, even light with soft shadows and controllable highlights.
For talking-head video, you want flattering, repeatable light that doesn’t blind you while filming.
A basic layout:
Keep the key panel just out of frame; the closer it is, the softer the light and the lower you can keep ISO.
Portraits benefit from larger, softer sources and controlled background separation.
Try this:
The white key panel keeps skin tones neutral; the RGB strip adds mood and depth without staining faces.

DIY strip panels can save money and offer custom sizes, but they don’t completely replace purpose-built lights. A simple comparison helps you decide when to keep building and when to buy.
Table 2 – DIY strip panel vs mid-range LED video panel
| Aspect | DIY LED strip panel | Ready-made LED video panel |
|---|---|---|
| Upfront cost | Lower for parts, especially if you build several | Higher per unit, but predictable |
| Build time | Several hours for planning, assembly and testing | None |
| Luminosité | Flexible; depends on strip choice and size | Specified output, often higher efficiency |
| Colour quality | Depends on strip CRI and consistency | Often CRI/TLCI rated and factory-tested |
| Caractéristiques | Whatever you build (basic dimming by default) | Built-in controls, presets, sometimes wireless |
| Robustness | Depends on your framing and mounting | Designed for transport and frequent adjustment |
| Scalability | Easy to customise sizes for your space | Easy to add more identical units |
DIY makes the most sense when:
A ready-made panel is the better route when:
Over time, many creators end up with a hybrid kit: commercial panels for critical or mobile work, DIY strip lights for background, tabletop or studio-fixed roles.
Even good parts can give poor results if you make a handful of common design mistakes. A quick checklist before your first “real” shoot can save a lot of frustration.
Watch out for these pitfalls:
Treat this as your pre-flight checklist: if you can say “no” to each mistake above, you’re in good shape.
Can LED strip lights be used for photography and video?
Yes — high-CRI LED strips behind good diffusion can work very well for tabletop products, talking-head video and small portraits, as long as you size brightness correctly and respect their limitations in power and robustness.
What do I need to make LED strip lighting for photography?
You need high-CRI white strips, a matching low-voltage power supply and dimmer, safe wiring and connectors, a backing panel, decent diffusion and a way to mount the light on a stand or support.
How do I safely power and wire a DIY strip photo light?
Match strip voltage and PSU voltage, calculate total strip wattage and add 20–30 % headroom, use correctly rated wire, insulate all joints, and keep mains wiring inside proper enclosures.
How bright should my DIY panel be for products and portraits?
For small products at 30–60 cm, a modest panel with mid-power strips is usually enough; for portraits or talking heads at 1–1.5 m, you’ll want a larger or more powerful panel and may shoot at somewhat higher ISO or wider apertures.
Can I power a DIY LED strip photography light from a battery or power bank?
Yes, if the battery can provide the correct voltage and enough current; estimate runtime as battery Wh ÷ panel W and be realistic about how long you need the light to run.
How should I use DIY or custom colour modes on RGB strips?
Use static or slow-changing colours mainly on the background or as accents, keep the key light white and avoid fast flashing patterns that can cause flicker and distraction on camera.
What camera settings work well with LED strip lighting?
A good starting point is your usual frame rate (e.g. 25/30/60 fps), shutter speed close to double that frame rate, an aperture that gives the depth of field you want, and ISO adjusted until exposure looks right — then tweak shutter speed if you see flicker.
DIY LED strip photography lights can give you clean, flexible lighting at a fraction of the cost of some commercial fixtures, as long as you treat strip choice, diffusion and wiring like real design decisions. If you plan panel size and power sensibly, one or two DIY panels can carry a lot of product, portrait and video work.
Key points to remember:
As you refine your builds, you can explore more advanced options like COB strips, tunable-white systems or project-scale installations using professional strip families such as those in the Elstar COB and high-CRI strip options.


