If you are sourcing high CRI COB LED strip lights in bulk, the main risk is not only finding a supplier. Instead, the main risk is buying the wrong version, getting uneven batches, or using a system that flickers, dims, or fails on site.
Therefore, use a clear buying flow. First, define the strip version. Next, send a full RFQ. Then, approve samples. After that, run a pilot order. Finally, scale only after QC and documents match the approved spec.
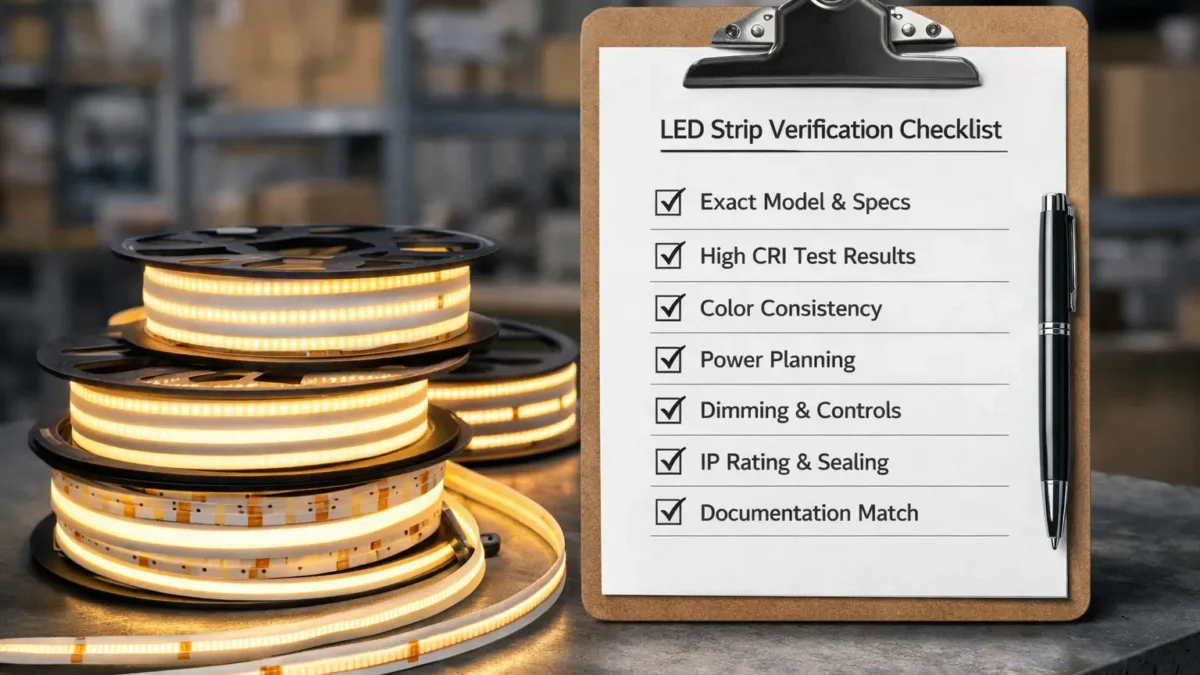
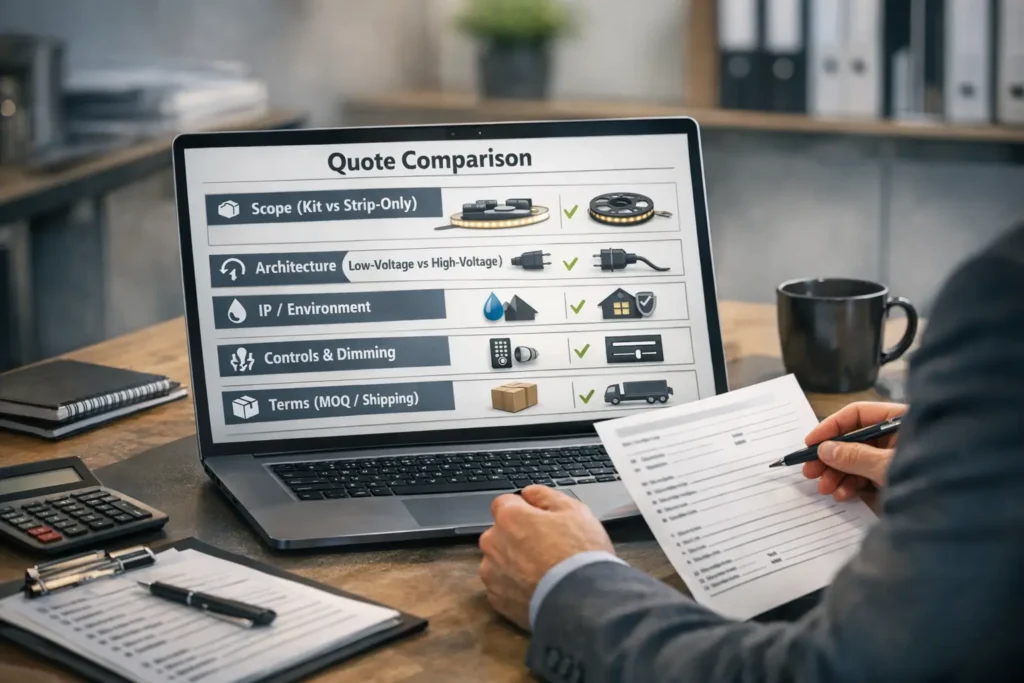
High-CRI COB LED Strip Wholesale Verification Checklist
Bulk-ready sourcing means checking the exact strip version before you scale. In addition, it means checking color quality, batch labels, power behavior, controls, and documents.
Fast verification table
Verify
How to verify before bulk order
Exact strip version
Match model, voltage, CCT, IP build, reel label, and datasheet.
Color quality
Use CRI as a start. Then, check samples under real materials and dim levels.
System behavior
Test strip, power supply, controller, wiring, and connectors together.
Power plan
Share the run layout. Then, plan feed points and power injection.
Batch consistency
Use a pilot order. Also, record batch and lot codes for future matching.
Documents
Make sure reports and certificates match the exact SKU shipped.
Recommended buying flow
First, send the RFQ.
Next, approve samples.
Then, place a pilot order.
After that, run incoming QC.
Finally, scale to repeat orders.
Boundary notes
However, specs can vary by model and series.
Also, “compatible” depends on the full system, not the strip alone.
Therefore, archive datasheets, sample notes, and labels by SKU and batch.
“High CRI” for Buying: What It Means and What to Ask Beyond the Number
High CRI describes how well a light source shows colors compared with a reference. However, a high CRI number does not always mean the strip will look right in every space.
What CRI tells you
First, CRI helps screen color quality at a basic level.
Next, it gives buyers a way to compare product groups.
However, it does not show every color issue in real rooms.
Therefore, CRI should be a filter, not the final approval.
What CRI does not tell you
It does not show how wood, stone, fabric, or paint will look in your project.
Also, it does not guarantee the same look across all reels.
In addition, it does not prove dimming will look smooth.
As a result, sample checks still matter.
Beyond-CRI questions
First, which exact model and CCT does the CRI claim cover?
Next, can the supplier explain color consistency across batches?
Also, can reels for phased jobs come from matched lots when needed?
Then, what test report scope applies to the shipped SKU?
In addition, how many reels should be sampled for long visible lines?
Finally, what happens if the first sample does not match the target look?
Sample validation steps
First, test the sample against the real surfaces, such as wood, stone, fabric, or paint.
Next, check the strip at normal dimming levels, not only full output.
Then, compare more than one reel if the job is long or phased.
Finally, write down the accepted sample version before bulk order.
Boundary conditions: If CCT, IP build, voltage, or controls change, re-check the sample. Otherwise, a small change can shift the final look.
Choosing the Right Continuous Line: COB vs SMD and When Neon Flex Fits Better
COB strips often give a smoother line. Meanwhile, SMD strips can work well when the diffuser is deep enough. Also, neon flex may be better when the line is directly visible or needs a stronger outer body.
Comparison table
Decision factor
COB strip
SMD strip
Visual line
Often smoother at common viewing distances
Can show dots unless the diffuser and depth are right
Diffuser need
Still useful for glare and finish
Often needed for smooth output
Cutting and joining
Rules vary by series
Also varies, but installers may know it better
Best fit
Coves, cabinets, clean lines, close-view details
General strip use and broad SKU ranges
Common risk
Assuming “dotless” without checking profile depth
Assuming a diffuser will hide all dots
When neon flex may fit better
Choose neon flex if the light line is directly visible.
Also, choose it if the project needs a stronger outer jacket.
In addition, choose it if curves and a fixture-like look matter more than tape-light form.
Boundary conditions: Dotless appearance depends on distance, profile depth, and diffuser choice. Therefore, test the real setup before a large order.
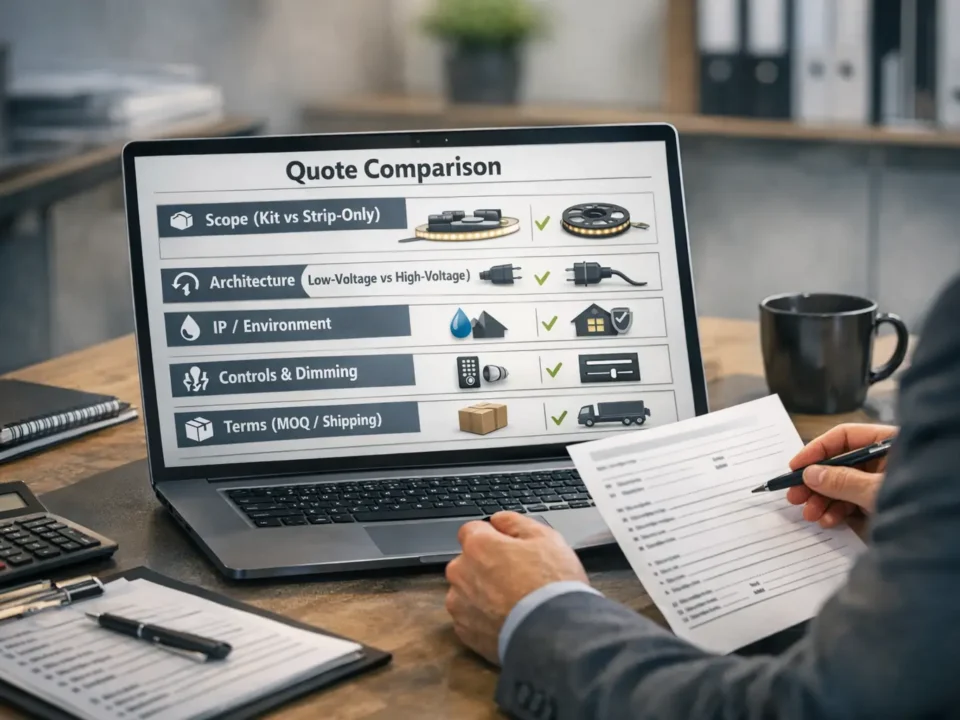
RFQ & Spec Lock: What to Send a High-CRI COB LED Strip Wholesaler/Manufacturer
A strong RFQ helps suppliers quote the same scope. As a result, you get fewer revisions and better samples.
RFQ table
RFQ item
What to specify
Why it matters
Application
Retail, hotel, office, home, signage, or other use
Sets color and install needs
Install method
Profile, diffuser, surface, visible or hidden use
Affects look and long-term fit
Environment
Dry, damp, wet, covered outdoor, or exposed outdoor
Sets IP and sealing needs
Electrical plan
Run layout, feed points, zones, and driver locations
Helps avoid voltage drop
Controls
Dimming method, interface, and where dimming happens
Prevents flicker and wrong parts
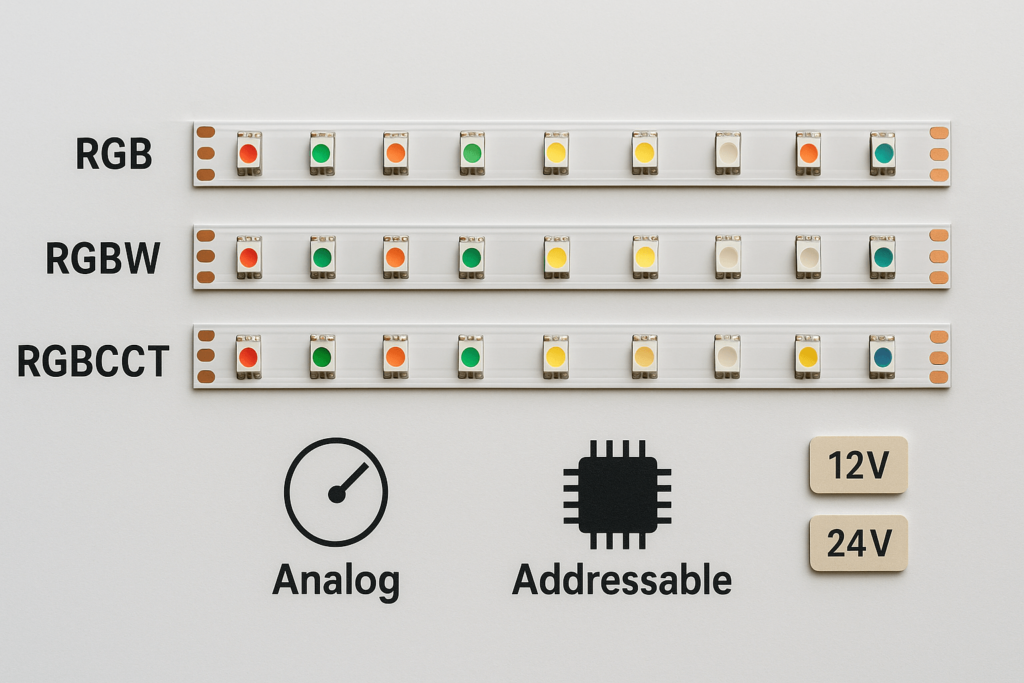
Variant list
Voltage, CCT, IP build, CRI tier, and SKU names
Prevents wrong version orders
Documents
Datasheet, wiring notes, labels, scope statements
Supports handover and repeat orders
Packaging
Reel labels, carton labels, SKU rules, and batch codes
Supports QC and tracking
Copy-paste RFQ inputs
First, state the application and mounting method.
Next, describe the site exposure, such as dry, damp, wet, or outdoor.
Also, state the visual goal, such as smooth line, low glare, or direct view.
Then, list CCT, CRI, voltage, IP build, and SKU variants.
In addition, share run lengths, turns, feed points, and control method.
Finally, state sample quantity, acceptance checks, and document needs.
Spec-lock steps
First, create a simple SKU matrix.
Next, approve samples against written criteria.
Then, run a pilot order before scaling.
After that, lock PO names to match the approved SKU names.
Finally, re-sample if CCT, IP build, voltage, or controls change.
If you want a quote or sample plan, share your application, environment, control method, and SKU list first. That information usually reduces quote revisions and speeds sampling.
Boundary conditions: Custom options, minimum order amounts, and timelines vary. Therefore, confirm them for the exact request.
Sample → Pilot → Scale: Quality, Consistency, and Incoming QC for Wholesale Orders
A sample reel shows whether the product can meet your target. However, a pilot order shows whether the supplier can repeat it. Therefore, use both before large orders.
Workflow steps
First, approve a sample in your real profile, control setup, and dimming range.
Next, place a pilot order to check repeatability across more reels.
Then, run incoming QC on labels, appearance, function, and documents.
Finally, archive batch IDs and documents before scaling.
Incoming QC checklist
First, confirm reel and carton labels match the PO SKU names.
Next, record batch or lot IDs for tracking.
Also, spot-check the light line for obvious mismatch or defects.
Then, run a power-on test with a suitable power supply.
In addition, check dimming or control behavior if required.
Finally, match datasheets, reports, and certificates to the shipped SKU.
Boundary conditions: If the variant, controls, or site use changes, treat it as a new validation loop.
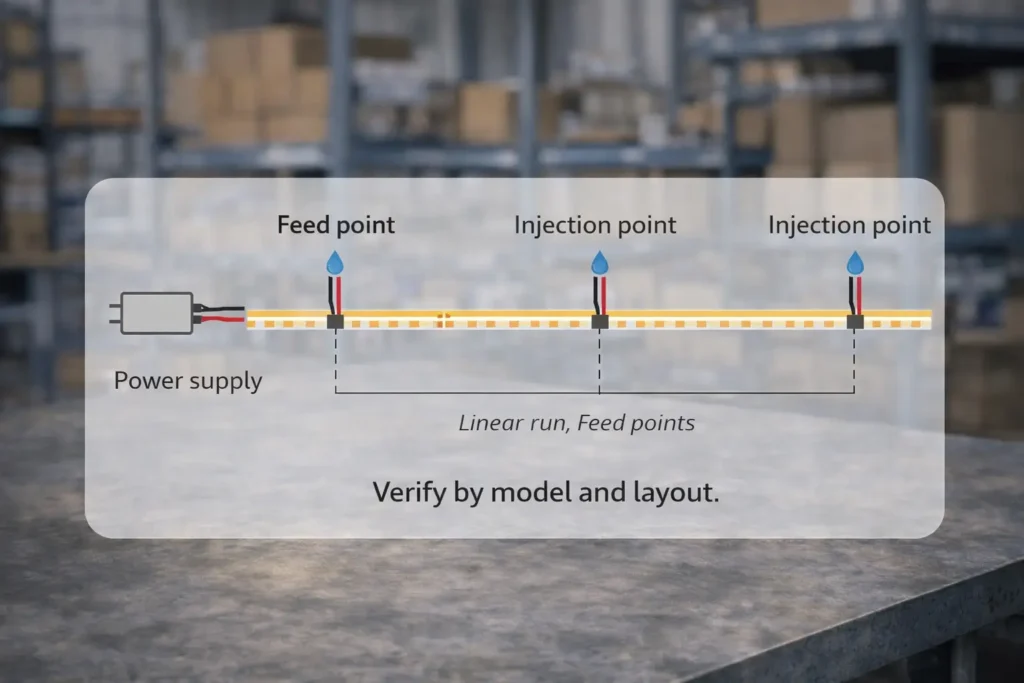
Power Planning for Projects: Voltage Drop and Power Injection (Verification-First)
Voltage drop is a system issue. In other words, layout, wires, connectors, and feed points all matter. Therefore, plan power from the project layout instead of using a fixed run-length promise.
Power planning steps
First, map run lengths, corners, and access points.
Next, decide whether the run uses one feed or several feed points.
Then, place feed points where they are easy to install and service.
Also, size power supplies from total load and control method.
After that, test the layout with the intended connectors and wiring.
Finally, document feed points and wiring notes for installers.
Common mistakes
Planning only total power while ignoring where power enters the run.
Also, using weak connectors or joints in long or harsh runs.
Next, testing on a bench but changing wire routes in the field.
Boundary conditions: There is no universal max run length. Therefore, test with the chosen model, wiring, controls, and layout.
Dimming & Controls: What to Verify to Avoid Flicker and Compatibility Surprises
To avoid flicker, test the full control chain. That means strip, power supply, controller, dimmer, wiring, and load together.
Control checklist
First, confirm where dimming happens: controller output or dimmable power supply.
Next, confirm the site control interface and any needed bridge hardware.
Also, test low, middle, and high dim levels.
Then, test with the intended wiring and load.
Finally, lock the tested pairing for repeat orders.
Sample test steps
First, build a short test run with the planned driver and controller.
Next, check low and middle dim levels, where issues often appear.
Then, repeat the test in the intended mounting setup if heat or enclosure conditions may differ.
Boundary conditions: “Compatible” depends on the full system. Therefore, validate before scaling.
Environment Fit: IP Rating Selection and Waterproofing Boundaries (Ends, Joints, Cuts)
Choose IP protection by the real environment. However, the rating alone will not save a poor seal. Therefore, plan ends, joints, cuts, connectors, and cable entries together.
IP decision table
Environment
Typical approach
Boundary notes
Indoor dry, hidden in profiles
Open strip or low protection
Focus on clean mounting and avoid unwanted exposure
Kitchens or counters
Splash-resistant approach
Seal ends and keep power parts protected
Bathrooms or wet-adjacent zones
Wet-location approach
Plan ventilation and every joint seal
Outdoor under cover
Weather-resistant approach
Check UV, heat, cable entries, and connectors
Outdoor exposed or washdown
High water exposure approach
Plan service access and strong physical protection
Submersion
Submersible-rated solution
Confirm test conditions and consider special products
Waterproofing checklist
First, locate all ends, joints, and connectors.
Next, decide how each one will be sealed.
Also, define who reseals field cuts.
Then, plan cable entries with strain relief and protected routing.
Finally, confirm whether the section can be serviced and resealed later.
Boundary conditions: IP performance depends on sealing and work quality at ends, joints, and cuts. Therefore, confirm the real environment before choosing the build.
Installation Practices for Uniform Appearance and Reliability (Procurement-Relevant)
For a clean line and fewer failures, check the mounting plan before bulk order. Also, make sure the supplier knows the profile, diffuser, cut rules, and field handling needs.
Appearance checklist
First, use a consistent profile and diffuser plan.
Next, plan viewing distance and glare control.
Also, decide where seams and joints will fall visually.
Finally, test color-critical samples in the actual profile and diffuser.
Reliability checklist
Confirm mounting surface, heat, humidity, and cleaning conditions.
Also, avoid adhesive-only mounting when the site needs physical support.
Next, add strain relief and connector protection.
Then, confirm cut points, join method, and resealing steps.
Boundary conditions: Best practice depends on the site. Therefore, confirm the model and install notes before bulk order.
US Documentation and Scope-by-Model Checks (What to Request and How to Verify)
For US projects and distribution, request model-specific documents. Then, match those documents to the exact SKU shipped. As a result, support and compliance checks become easier later.
Documents to request
Datasheet for the exact model and version.
Also, wiring notes or install guidance for the intended control method.
Next, reel and carton label fields for tracking.
Finally, reports or certificates if the project or customer requires them.
Scope check steps
First, identify the exact SKU name on the PO.
Next, request documents tied to that SKU, not only the product family.
Then, check model, CCT, IP build, voltage, and conditions in the scope statement.
Also, match documents to reel and carton labels at receiving.
Finally, archive documents by SKU and batch or lot code.
Common document mistakes
Treating a family certificate as coverage for every version.
Also, mixing documents between similar-looking SKUs.
Next, using a report without checking the model and conditions.
Boundary conditions: Project needs vary by customer and authority. Therefore, confirm what is required before ordering.
Risks & Common Mistakes When Buying High-CRI COB LED Strips Wholesale (and How to Prevent Them)
Wholesale failures are often predictable. Therefore, use simple gates to stop the most common issues before they reach customers.
Risk checklist
Spec drift: wrong voltage, CCT, or IP build shipped.
Color surprise: CRI looks good on paper but wrong in the space.
Voltage drop: long runs dim or shift color.
Flicker: controller and power setup do not match.
Water ingress: ends, cuts, or joints are not sealed well.
Scope mismatch: documents do not match the shipped SKU.
Prevention gates
First, use an RFQ with a clear SKU matrix.
Next, approve samples in the real setup.
Then, place a pilot order before scaling.
Also, run incoming QC and label checks.
Finally, archive scope documents by SKU and batch.
Boundary conditions: Avoid universal guarantees. Instead, verify by model, system, and install detail.
FAQ: High-CRI COB LED Strip Wholesale and Project Questions
What is a COB LED strip, and why does it look dotless?
Answer: A COB LED strip uses closely packed LED emitters, so it can look more continuous than many point-source layouts. However, the final dotless look still depends on viewing distance, profile, and diffuser.
What does high CRI mean for LED strips?
Answer: High CRI means the light can show colors closer to a reference. However, the real look still depends on CCT, materials, dimming, and batch match. Therefore, sample testing is still needed.
Can COB LED strips be dimmed?
Answer: Many COB strip systems can dim when the power supply and controller match. However, flicker can happen when control methods, loads, or wiring do not fit. Therefore, test the full control chain before bulk order.
Can you cut COB LED strips?
Answer: Usually, yes, at marked cut points. However, cut and join rules vary by series and IP build. Also, protected strips may need resealing after cutting.
How do you plan power for long COB strip runs?
Answer: First, map segments and feed points. Next, choose the wiring plan. Then, test a sample run with the real power supply, controller, and wiring.
How do you choose the right IP rating?
Answer: Choose by real exposure: dry, damp, wet, outdoor, or submerged. Also, plan seals for ends, cuts, connectors, and cable entries. For IP background, see IEC: Ingress Protection (IP) ratings.
Finally, the safest way to buy high CRI COB LED strips wholesale is to turn the order into a clear process. First, lock the variant. Next, test samples. Then, run a pilot order and check incoming goods before scaling.
Key takeaways
Do not buy only the headline CRI number.
Instead, buy the verified version: model, voltage, CCT, IP build, and labels.
Also, test appearance and dimming in the real setup.
Then, use pilot and incoming QC checks to catch batch issues.
Finally, keep documents tied to exact SKU and batch.
Next steps by buyer type
Brands: create a SKU matrix and a standard RFQ template.
Distributors: set up receiving QC and batch tracking.
Project teams: share run layout, control method, and waterproofing needs early.
Elstar supports bulk sourcing workflows with sampling, small-batch flexibility, customization support, and document coordination on request. Start by sharing your application, environment, control method, and SKU list.


