Vous avez besoin d'un produit de qualité en peu de temps ? Nous avons un plan pour vous.


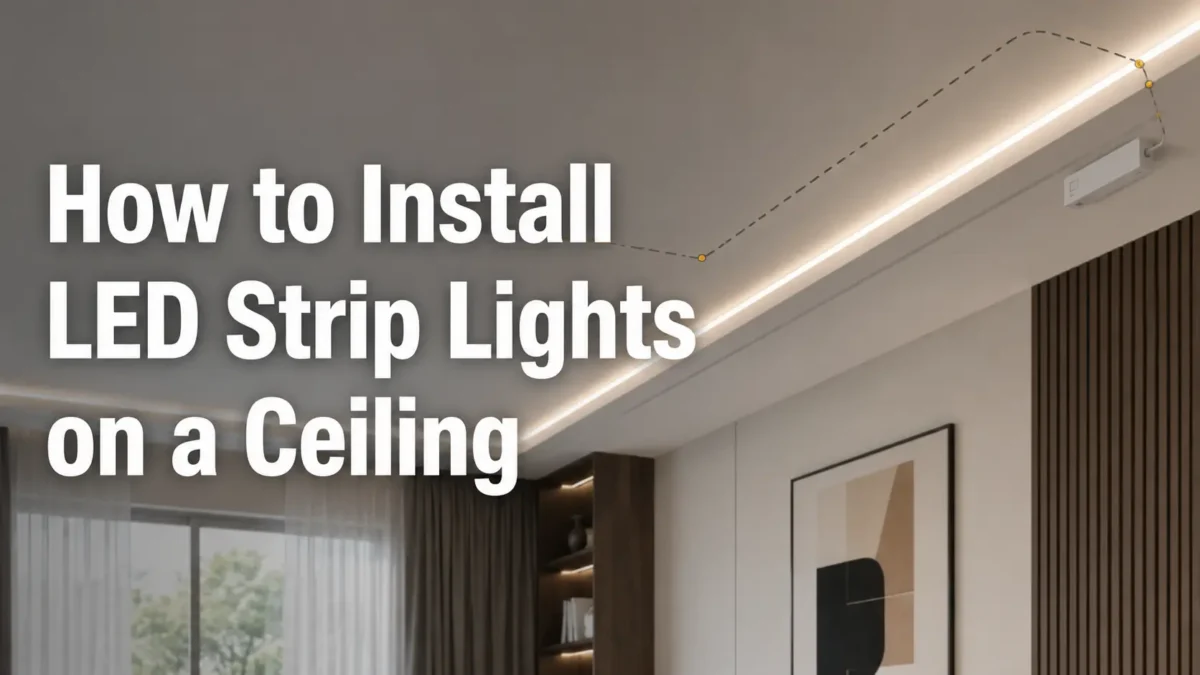
First of all, putting LED strip lights on a ceiling takes more than peeling off the backing and pressing the strip into place. First, plan where the power will come from. Then, check how the strip will turn corners. Also, check whether the ceiling surface can hold the strip and whether the strip, driver, and controller fit the job.
In addition, this guide keeps the work in a safe scope. It covers planning and low-voltage or plug-in LED strip setup. However, if your project needs hard-wired or mains work, use a qualified electrician.
First, plan the route and power point. Next, measure the ceiling path and clean the surface. Then, cut only at marked cut points, mount the strip with a suitable method, connect the matching power supply and controller, and test before final fixing. Finally, use a qualified electrician for hard-wired work.
Before you install anything, walk through the room and mark the route. Also, many ceiling LED strip problems start early. For example, the power supply may be in the wrong place, the strip may be too short, the corner plan may be unclear, or the surface may not hold the strip well.
Therefore, use this checklist before cutting, peeling, or mounting the strip.
| Check | What to Confirm | Why It Matters |
|---|---|---|
| Ceiling route | Where the strip will start, turn, and end | Helps avoid poor joints and visible wires |
| Power access | Where the power supply, driver, and controller will sit | Helps keep power parts easy to reach and safer to service |
| Total length | Straight runs, corner turns, and any extra length needed | Helps with strip amount and power planning |
| Corners | Whether corners need bending, connectors, or separate strip sections | Helps lower the risk of damaged strips or poor links |
| Ceiling surface | Smooth, clean, dry, and stable surface condition | The strip may not hold well on dusty, oily, rough, textured, or loose surfaces |
| Mount method | Stick-on backing, clips, channel, diffuser, cove, or false ceiling placement | Another mount method may help, based on the surface and site conditions |
| Strip type and control | Single color, tunable white, RGB, RGBW, smart control, or dimming needs | The controller and wiring may differ |
| Test plan | How you will test before final fixing | It is easier to fix problems before the strip is fully set |
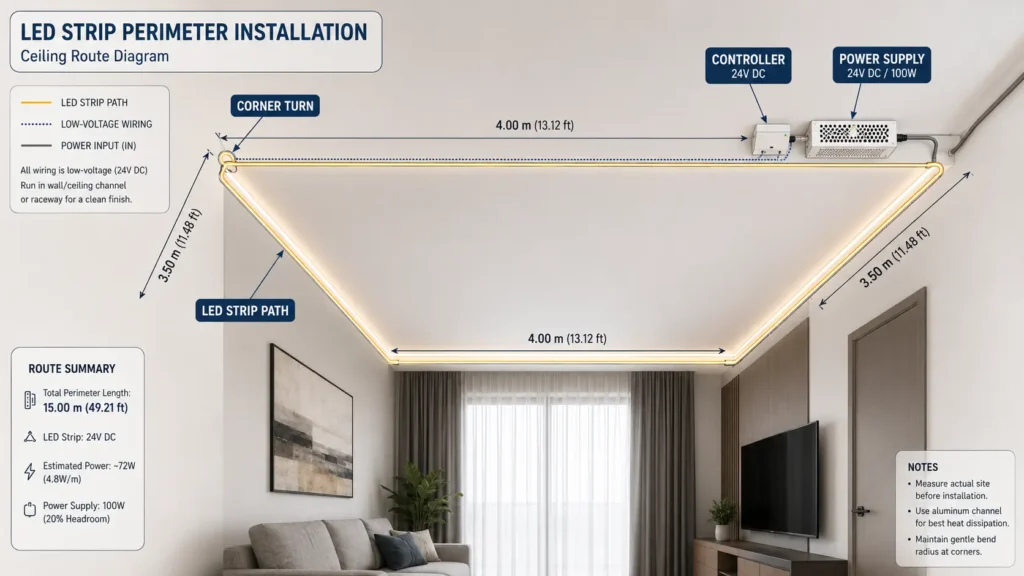
In addition, take ceiling photos or make a simple sketch for larger jobs. Also, mark the power point, controller spot, total strip length, corners, and any area where the strip will be hidden.
Once the route is mapped, choose the mount method that fits the ceiling surface and the look you want. For example, stick-on backing may work on a smooth, clean, dry surface. However, it should not be assumed to work on every ceiling. Also, textured ceilings, dusty surfaces, loose paint, rough materials, or warm areas may need clips, channels, profiles, or another support method.
| Ceiling or Design Condition | Possible Mount Method | What to Check First | Avoid |
|---|---|---|---|
| Smooth painted ceiling | Stick-on backing, clips, or channel | Surface is clean, dry, and stable | Sticking over dust, grease, or loose paint |
| Textured or rough ceiling | Clips, mount channel, or profile | Whether the backing can make full contact | Relying only on stick-on backing |
| Cove or recessed ceiling edge | LED strip in cove or hidden ledge | Light direction, access, and heat space | Sealing the strip where service access is hard |
| Exposed straight run | Metal channel with diffuser | Channel size and mount points | Leaving wires loose or visible |
| False ceiling or drop ceiling | Hidden edge, profile, or channel | Access to power supply and service points | Blocking access to driver/controller |
| Damp or wet-prone ceiling area | Product rated for that area, if needed | Exact product rating and site conditions | Assuming indoor strips fit damp or wet areas |
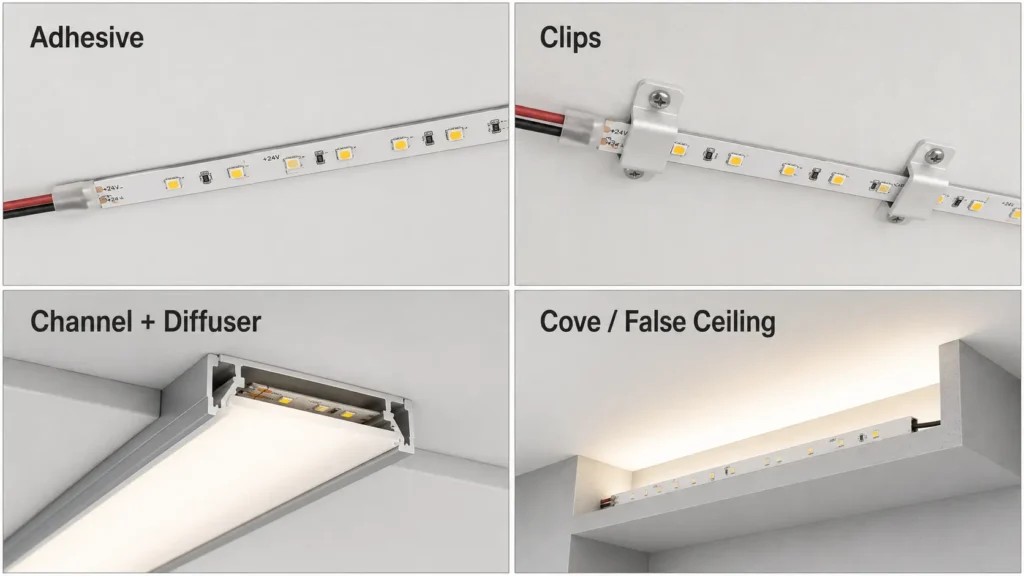
As a result, many projects use a channel or diffuser for a cleaner finish. Also, the strip can look straighter and less exposed. Still, the right choice depends on the ceiling design and product size.
After the mount method is clear, plan how power and control will reach the strip. First, ceiling LED strips need a matching power supply or driver. Also, many setups need a controller or dimmer. Before mounting the strip, check the product specs and confirm the power setup. For more detail, review this LED driver and strip light guide and this external LED strip power supply guide.
| Power Planning Item | What to Check |
|---|---|
| Strip voltage | The power supply/driver voltage must match the LED strip voltage |
| Total strip length | Longer runs may need more power-feed planning |
| Total load | Use product specs or supplier advice to check the power supply size |
| Controller type | RGB, RGBW, tunable white, addressable, or dimmable strips may need different controllers |
| Power supply location | Keep the driver/power supply easy to reach for checks or service |
| Airflow | Do not bury power parts where heat cannot escape |
| Cable path | Plan how low-voltage wires will reach the strip without being visible or strained |
| Hard-wired work | Use a qualified electrician for mains or hard-wired electrical work |
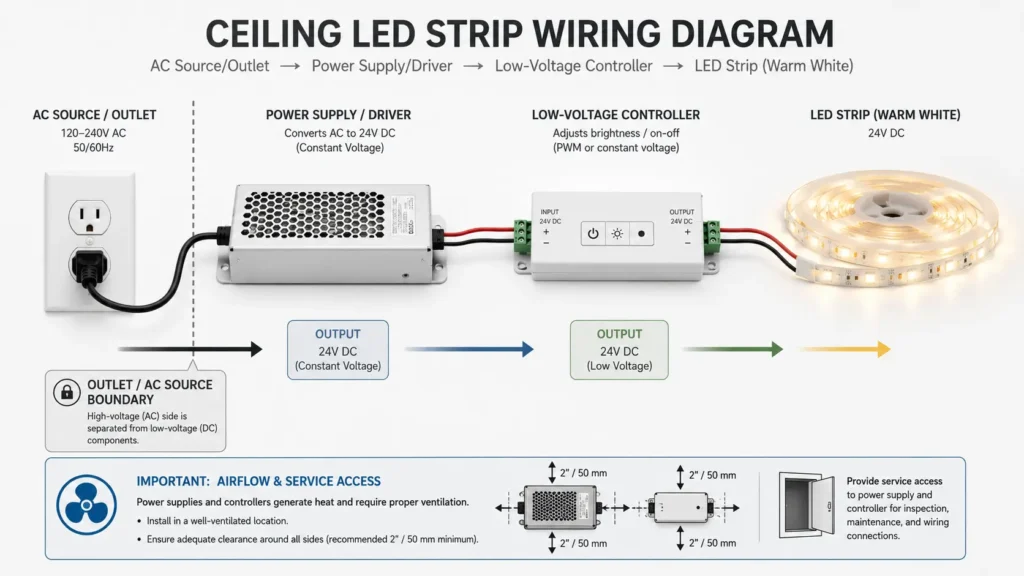
However, do not treat existing ceiling wiring as a simple DIY connection point. Also, this guide does not give hard-wiring steps. If the setup needs mains wiring, wall switches, junction boxes, or existing ceiling fixtures, bring in a qualified electrician.
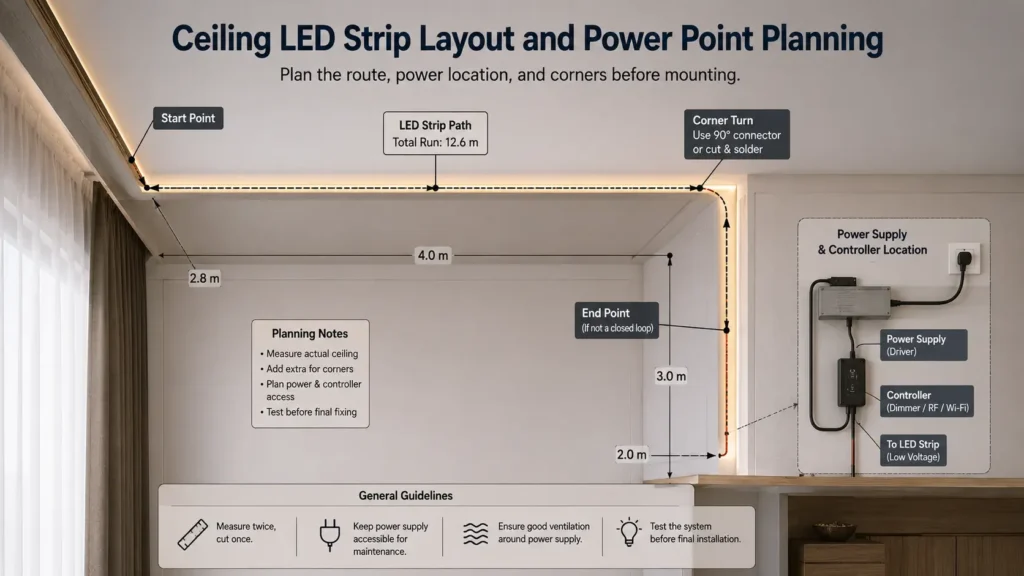
Once the power plan and mount method are set, measure the strip path. First, start with the point where the strip will receive power. Then, measure each straight section on its own. Also, mark every corner, gap, return, or area where the strip will be hidden behind a cove or channel. If the strip will run around the full ceiling edge, measure each wall line instead of guessing the full room in one number.
Next, plan each corner. Then, decide whether the strip can turn smoothly, whether it needs a connector, or whether separate strip sections are better. However, do not force a bend that can damage the strip, solder pad, LEDs, or cover.
For example, a simple ceiling sketch should include:
Next, check the cut rules before trimming the strip. Most LED strips have set cut points. For example, these points are often marked by lines, symbols, or copper pads. However, if you cut outside the marked points, you can damage the circuit and stop part of the strip from working. For more detail, see this LED strip cutting guide.
| Check | Safer Action |
|---|---|
| Cut marks | Find the marked cut points before trimming |
| Puissance | Follow the product guide and do not cut or connect while the strip is powered |
| Connector type | Confirm the connector fits the strip width, contact layout, and strip type |
| Plus/minus marks | Check + and – marks before joining sections |
| Corner method | Test the connector or corner layout before final mounting |
| Product guide | Follow the strip maker’s guide for cutting and joining |
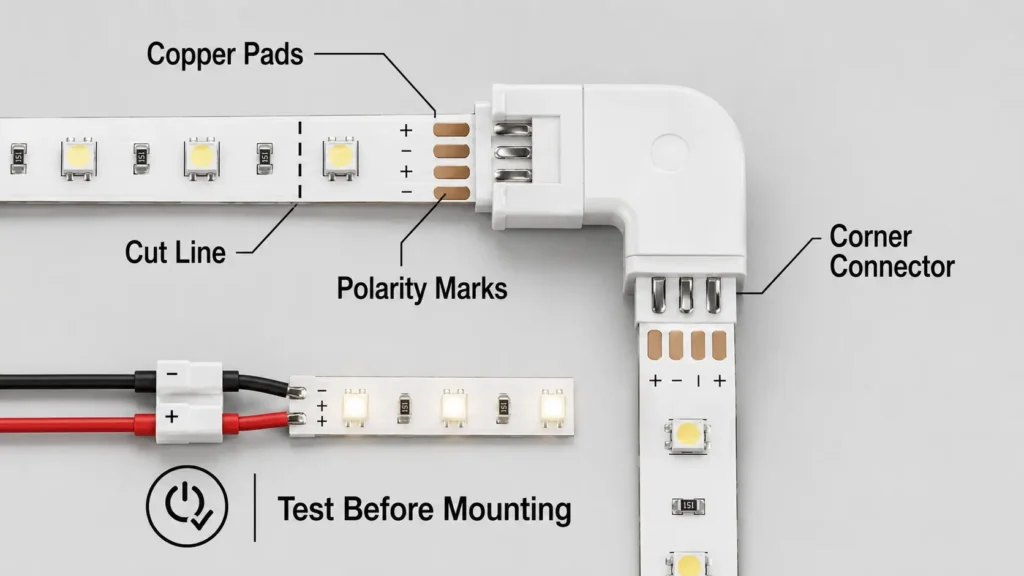
If the strip has no visible cut marks, do not guess. Instead, check the product guide or ask the supplier before cutting.
Before final mounting, prepare the surface. For example, a ceiling may look clean from the floor, but it may still have dust, oil, loose paint, moisture, or texture that blocks good contact. In general, tape works best on clean, dry, even bonding surfaces. Also, some rough or oily surfaces need extra prep, as shown in 3M’s surface preparation guidance.
Therefore, do not depend on stick-on backing alone if the ceiling surface is rough, dusty, unstable, freshly painted, or exposed to heat or moisture. In those cases, clips or channels may be safer.
After the route, power plan, surface, and cut points are ready, start the install. First, work in small sections so you can still fix a problem. Also, keep the power supply and controller easy to reach.
If something does not work during testing, stop before you keep going. Then, check the cut point, plus/minus marks, connector fit, power supply match, and controller setup.
Even after the main steps are clear, some mistakes can still lead to extra work. Therefore, check them before you close the job.
| Mistake | Why It Matters | Safer Check | When to Ask for Help |
|---|---|---|---|
| Sticking the strip before planning power | The strip may end far from the driver or controller | Mark power location before mounting | If wires must be routed through walls or ceiling |
| Using the wrong power supply | Wrong voltage or too little capacity can cause poor results | Match voltage and check total load with product specs | If load calculation is unclear |
| Cutting outside marked points | The strip can be damaged | Cut only at marked cut points | If cut marks are not visible |
| Ignoring ceiling surface condition | The strip may release later | Clean, dry, and test the surface first | If the surface is textured, rough, or unstable |
| Hiding the power supply permanently | Future checks or service become hard | Keep driver/controller easy to reach | If the setup needs hidden electrical work |
| Running long strips without checking limits | Long runs may dim or act unevenly | Check max run and power-feed guidance | If the ceiling edge is large |
| Using strips in damp areas without checking rating | The product may not fit the area | Confirm the rating before use | If the install is near moisture |
| Treating hard-wired work as DIY | Mains wiring can create safety risk | Use plug-in or low-voltage scope only | For ceiling fixtures, junction boxes, or wall-switch wiring |
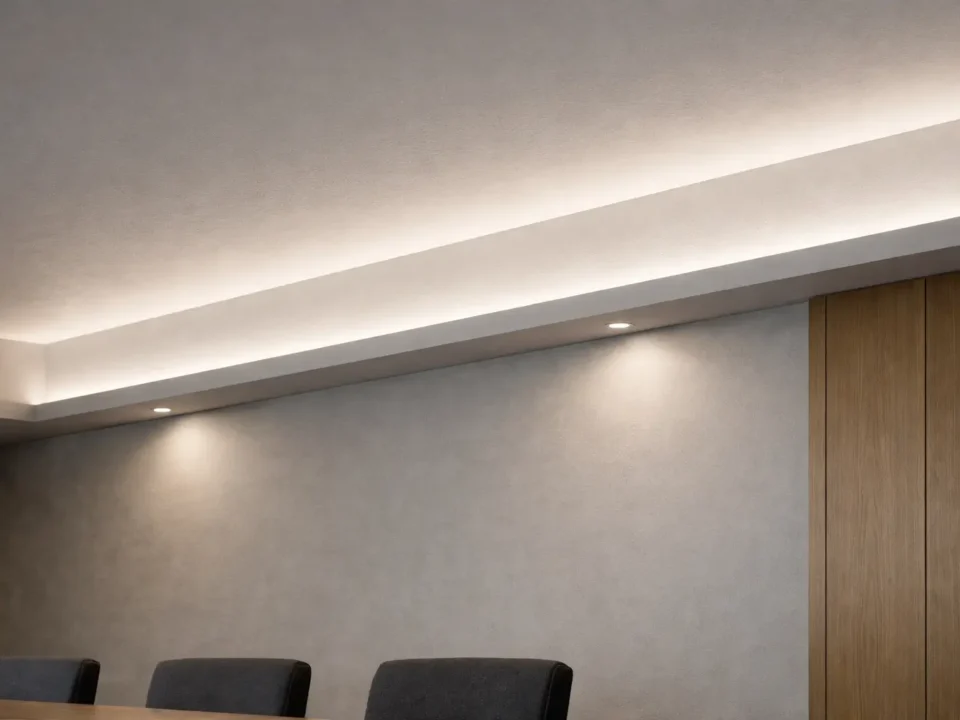
After the strip works correctly, review the visible finish. For example, a visible LED strip can work for some designs. However, many ceiling projects look cleaner when the strip is hidden or softened.
Still, the best option depends on the ceiling design, strip brightness, beam direction, service access, and whether the power supply and controller can be placed safely.
For larger or repeat ceiling LED strip projects, turn the setup plan into a clear spec checklist before asking for a quote or product review. As a result, the supplier can better understand the layout, power needs, control method, and mount conditions. Also, you can review the LED strip lights category or the custom project page if those pages are approved for this article.
| RFQ Item | What to Prepare |
|---|---|
| Project layout | Ceiling sketch, photos, or drawing |
| Total strip length | Each run length and total planned length |
| Voltage preference | Required voltage if the project already sets it |
| Color type | Single color, CCT/tunable white, RGB, RGBW, or addressable |
| Control method | Switch, dimmer, remote, app, controller, or building system |
| Mount method | Stick-on backing, clip, metal channel, diffuser, cove, or custom profile |
| Site condition | Indoor, damp-prone, display area, work space, or other condition |
| Quantity | Number of rooms, runs, or project units |
| Access needs | Where driver, controller, and service points can be placed |
| Document needs | Ask what spec sheets, test reports, or rule documents are available |
| Review request | Ask for project review if layout, voltage, or controller choice is uncertain |
Also, do not rely on general product claims for project approval. If the project needs specific documents, ratings, or proof, request those documents before buying.
First, plan the route and power point. Next, measure the ceiling path and clean the surface. Then, cut only at marked points, mount the strip with a suitable method, connect the matching power supply and controller, and test before final fixing. Finally, use a qualified electrician for hard-wired work.
First, they need access to a matching power supply, driver, and controller. However, the outlet or power source does not always have to sit beside the strip. Still, you should plan the power path before mounting. Also, do not run mains wiring as a DIY shortcut.
First, you can hide ceiling LED strips in a cove, false ceiling edge, metal channel with diffuser, or behind trim. However, the right option depends on the ceiling design, light direction, service access, and strip/profile size.
Yes, many LED strips can be cut, but only at the marked cut points set by the maker. Also, connector type, strip width, plus/minus marks, and strip model all matter. Therefore, check the product guide before cutting or joining sections.
There is no single best method for every ceiling. For example, stick-on backing may work on a clean, smooth, dry surface. However, clips, channels, diffusers, coves, or profiles may be better for textured surfaces, exposed runs, work spaces, or cleaner visual results.
Ceiling LED strips may fall if the surface is dusty, oily, textured, rough, damp, unstable, or not prepared well. Also, stick-on backing can struggle if the strip is under tension or mounted poorly around corners. Therefore, clean the surface first and consider clips or channels where needed.
First, use a power supply or driver that matches the strip voltage and can support the total strip load. Also, check the product specs, total length, controller type, and supplier advice before install. For long runs, check maximum run and power-feed guidance as well.
No. First, do not treat existing ceiling wiring as a simple DIY connection point. If the install involves mains wiring, junction boxes, wall switches, or existing ceiling fixtures, use a qualified electrician.
First, prepare the ceiling layout, total length, voltage, color or control type, mount method, site conditions, quantity, power/controller location, and document needs. Also, photos, sketches, or drawings can make project review easier.
Finally, before requesting a quote or project review, prepare your ceiling layout, total strip length, voltage, color/control type, mount method, site conditions, quantity, and document needs. With clear project details, it is easier to review suitable strip, driver, controller, mount accessory, and project review options.

 English
  Spanish
  French
  Arabic