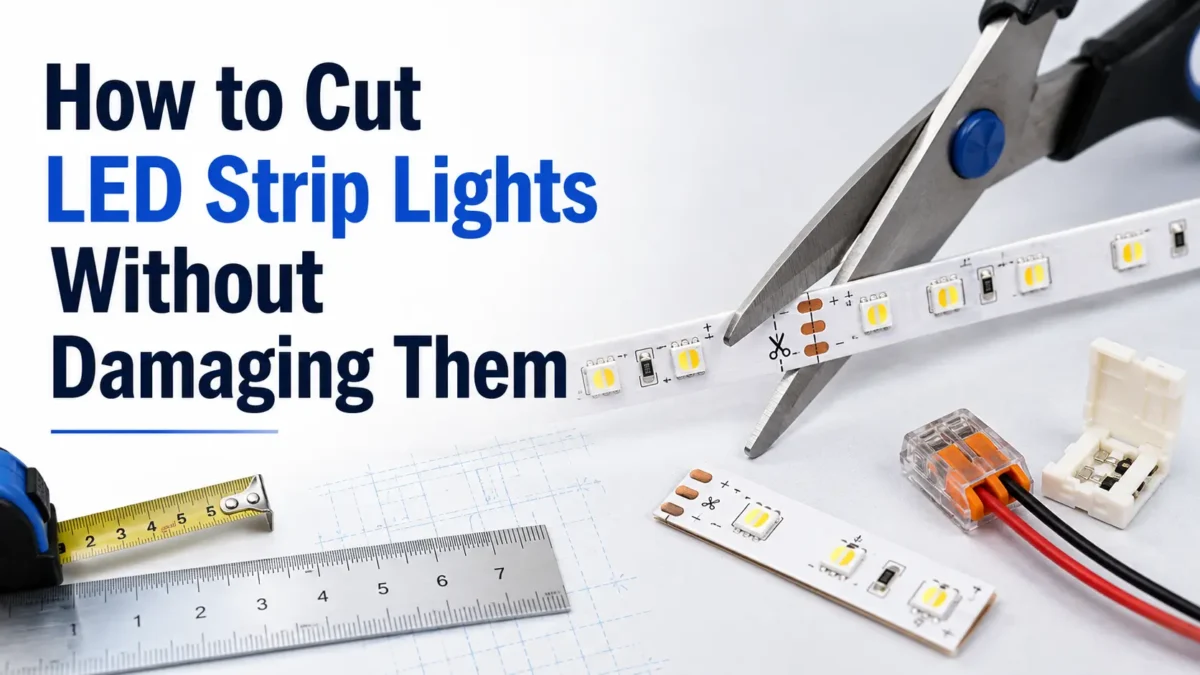
Yes, many LED strip lights can be cut, but only if the strip is designed for cutting and only at the marked cut points. Disconnect power first, then look for a scissor icon, printed cut line, or copper-pad area. After cutting, reuse depends on connector fit, polarity, strip type, and product instructions, especially for waterproof, COB, RGB, smart, or addressable strips.
Do not start by cutting the strip wherever the length looks convenient. LED strips are built in electrical sections, and cutting through the wrong part can leave a section unusable.
Use this checklist before making the first cut.
| Check | What to Look For | Why It Matters |
|---|---|---|
| Power disconnected | Unplug the strip from the power supply or controller. | Avoid cutting while the strip is energized. |
| Marked cut point | Scissor icon, dashed line, printed line, or copper-pad area. | These are the intended cutting locations on cuttable strips. |
| Strip type | Single-color, RGB, RGBW, COB, waterproof, smart, or addressable. | Different strip types may need different connectors or handling. |
| Strip width | Check the physical width of the PCB. | Solderless connectors must match the physical strip width. |
| Pin or channel count | 2-pin, 3-pin, 4-pin, 5-pin, or another pad layout. | Multi-color strips need connectors with matching channels. |
| Polarity marks | “+”, “-”, voltage labels, or channel labels. | Reversed polarity or misaligned channels can stop the strip from working. |
| Coating or waterproof sleeve | Silicone coating, tube, or sealed outer layer. | Cutting may require resealing or special connector handling. |
| Product manual | Especially for smart, RGBIC, addressable, or waterproof strips. | Some cutting limits are not obvious from appearance. |
If the strip has no visible cut marks and no product instructions confirming it is cuttable, do not assume it can be cut.
For project selection, you can also review Elstar’s مصابيح شريطية LED, RGB/RGBW strips, شرائط COB LEDو شرائط LED قابلة للعنونة pages before choosing a strip type.
Cut only at the designated cut point. On many LED strips, this appears as one of the following:
The copper pads matter because they provide the contact area for reconnection. If you cut through the middle of an LED section, resistor area, IC area, or printed circuit path, the remaining piece may not work correctly.
Do not rely only on distance. Some strips may be cut every few LEDs, while others have different cut intervals. The correct interval depends on the product design, voltage, LED density, and strip type. When in doubt, follow the cut marks on the actual strip or the manufacturer’s instructions.
Related Elstar guide: Where to Cut LED Strip Lights. External technical reference: LEDVANCE’s LED strip cutting guide.
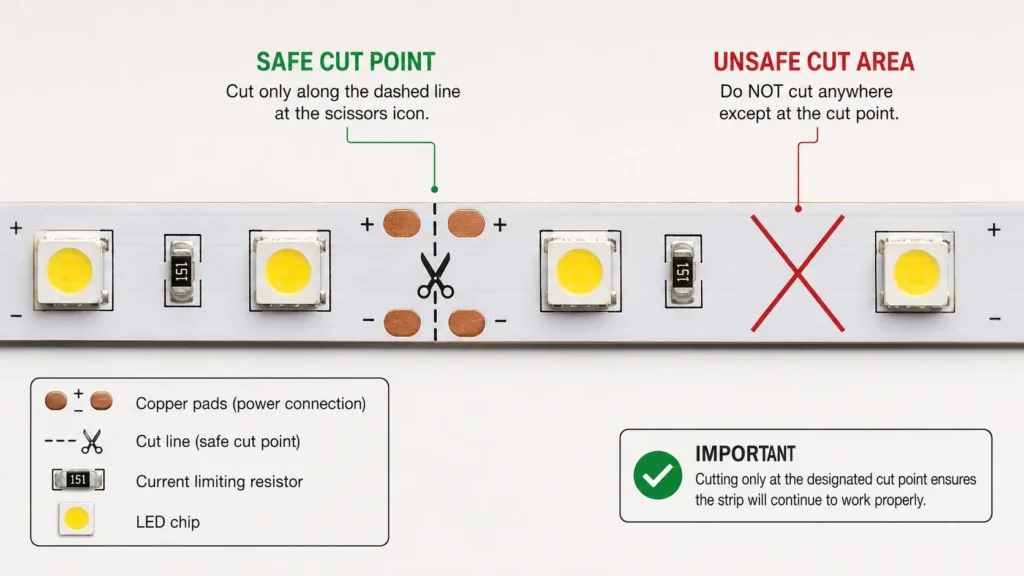
Follow a simple process rather than cutting by guesswork.
A clean cut at the correct point gives you the best chance of reusing the cut section. A cut in the wrong place may damage the circuit or leave one section unusable.
After cutting, the remaining strip section will only work if power and signal can reach the correct pads. This usually requires a compatible solderless connector or a soldered wire connection.
The connector must match the strip. A connector that fits one strip may not fit another.
| Item to Match | What to Check | Why It Matters |
|---|---|---|
| Strip width | Physical width of the strip PCB. | The strip must fit inside the connector contacts. |
| Pin/channel count | 2-pin, 3-pin, 4-pin, 5-pin, or other layout. | Single-color, RGB, RGBW, and addressable strips use different pad layouts. |
| Pad alignment | Copper pads must contact the connector terminals. | Poor contact can cause flickering or no light. |
| Polarity | Match “+” and “-” or labeled channels. | Reversed polarity or channel mismatch can stop the strip from working correctly. |
| Coating | Bare PCB, silicone-coated, or waterproof sleeve. | Coating may need to be removed or handled with a suitable connector. |
| Controller type | Single-color dimmer, RGB controller, smart controller, or addressable controller. | Controller wiring must match the strip type. |
Related Elstar category: موصلات شريط الصمام الثنائي الباعث للضوء LED. External connector reference: Flexfire LEDs solderless connector guide.
Solderless connectors are convenient, but they are not universal. Soldering can provide a more direct connection, but it requires the right tools and skill. If the strip is part of a larger project, confirm the connection method before final installation.
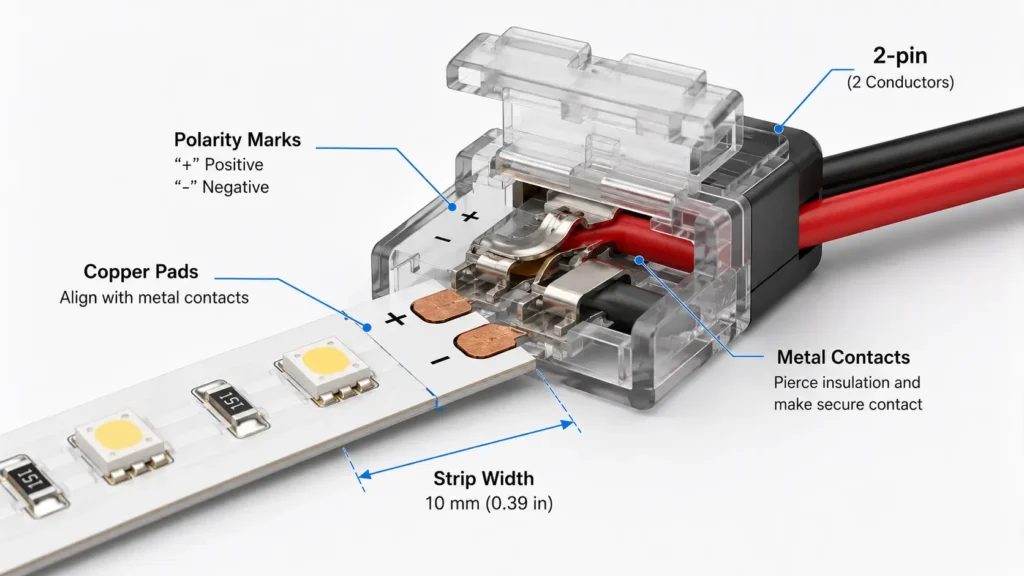
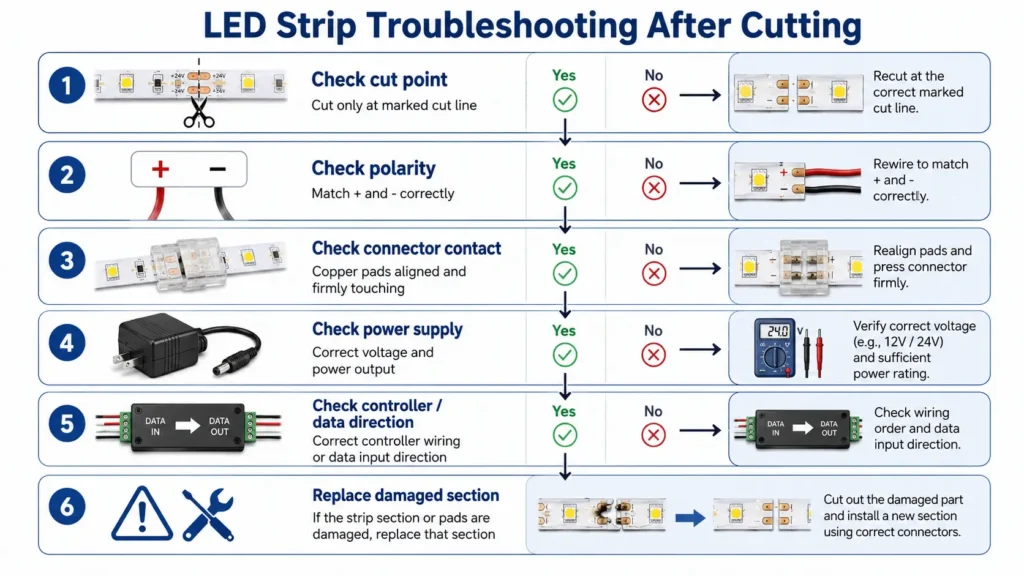
The basic cutting rule is similar: cut only at approved cut points. The risk changes by strip type.
| Strip Type | Can It Usually Be Cut? | What to Check First | Reconnection Caution |
|---|---|---|---|
| Single-color LED strip | Often, if marked for cutting. | Cut marks, voltage, width, polarity. | Usually needs a matching 2-pin connector or soldered wires. |
| RGB LED strip | Often, if marked for cutting. | Pad labels for positive and color channels. | Needs a matching multi-pin connector and correct channel alignment. |
| RGBW / CCT strip | Often, if marked for cutting. | Extra channels and pad labels. | Connector must match all channels, not just strip width. |
| شريط COB LED | Depends on product design. | Manufacturer cut marks and instructions. | Dense light surface can make cut points less obvious. |
| Waterproof LED strip | Sometimes, if marked for cutting. | Coating, sleeve, end cap, and sealing method. | Cut ends may need proper resealing; do not assume original protection level remains. |
| Smart / addressable strip | Product-dependent. | Manufacturer manual, data direction, controller wiring, segment rules. | Cutting or wiring the wrong data end may stop the cut section from working. |
Related Elstar resources: How to Cut a COB LED Strip, RGB/RGBW stripsو شرائط LED قابلة للعنونة. External technical references: Adafruit NeoPixel Überguide for addressable-strip data direction, and Wired4Signs waterproof LED strip cutting/resealing guide.
For smart, RGBIC, addressable, or app-controlled strips, do not rely on generic LED strip advice alone. Check the product manual before cutting. Some strips have controller zones, data direction, or IC layouts that affect whether a cut section can be reused.
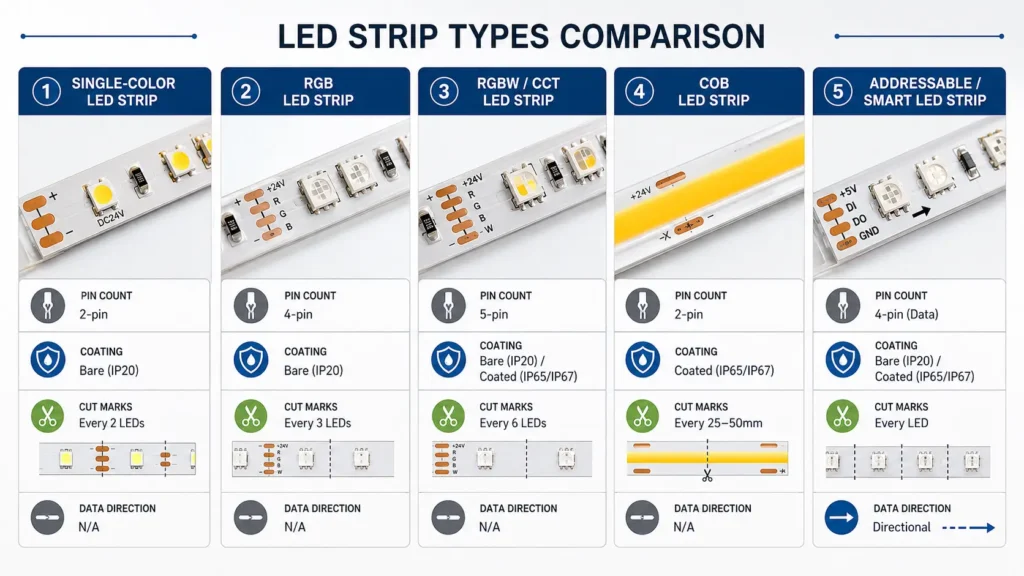
If the strip does not light after cutting, do not immediately assume the whole strip is defective. Start with the simplest checks.
| Symptom | What to Check | Possible Next Step |
|---|---|---|
| Cut section does not light | Was it cut at a marked cut point? | If copper pads are missing or damaged, that section may not be reusable. |
| Only one side works | Check whether the powered side still has a complete circuit. | Test the strip from the correct input side. |
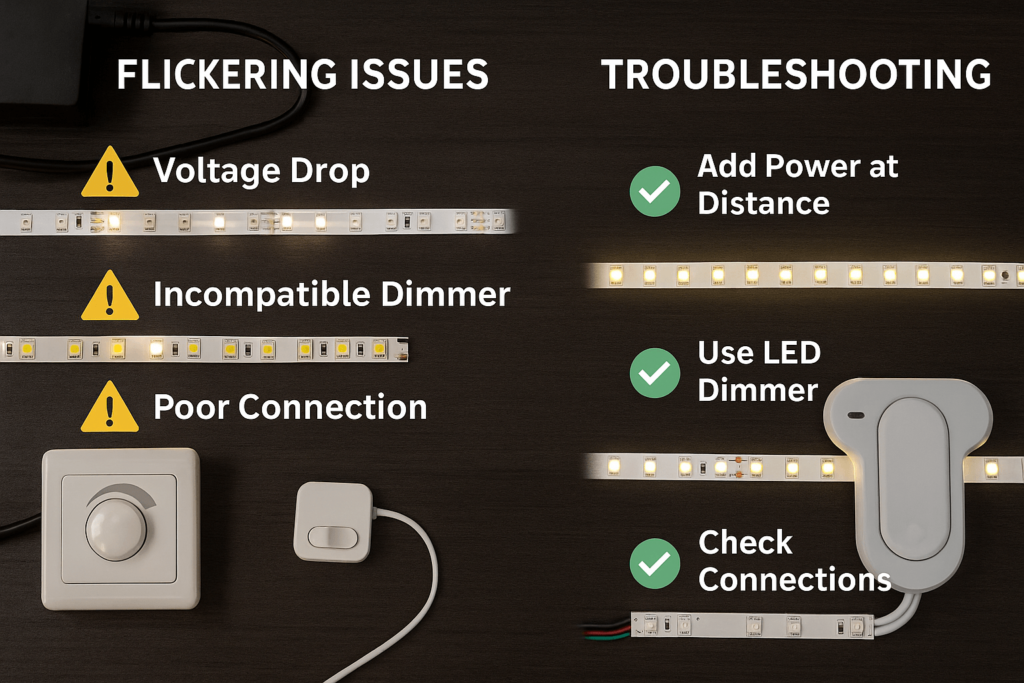
| Strip flickers | Connector contact may be loose or misaligned. | Re-seat the connector and check pad contact. |
| Wrong color appears on RGB strip | Channel pads may be mismatched. | Align R/G/B or other channel labels correctly. |
| No light after reconnecting | Check polarity, connector fit, controller output, and power connection. | Test with the correct polarity and matching connector. |
| Waterproof strip fails near cut end | Coating or resealing may be affecting the connection. | Inspect the cut end and use a suitable sealing or connection method. |
| Smart/addressable strip does not respond | Data direction or controller wiring may be wrong. | Check the manual for data input direction and segment rules. |
Avoid repeated cutting and reconnecting without identifying the cause. Each extra cut reduces the usable length and may remove the contact area needed for a clean connection.
For a small DIY installation, you may only need to trim one strip to length. For commercial, cabinet, signage, retail, architectural, or OEM-style projects, cutting affects layout, accessories, installation labor, and future maintenance.
Before ordering LED strip lights for a project, confirm these details:
| Project Detail | Why It Matters |
|---|---|
| الفولتية | Must match the power supply and controller. |
| Strip width | Affects connector and channel compatibility. |
| Cut interval | Determines how accurately the strip can fit the layout. |
| LED density | Affects spacing, brightness uniformity, and cut-point frequency. |
| Strip type | Single-color, RGB, RGBW, COB, waterproof, or addressable strips have different requirements. |
| IP requirement / coating | Cutting waterproof strips may require sealing planning. |
| Controller type | RGB, dimming, smart, or addressable systems need matching wiring logic. |
| Total run length | Longer runs may require layout and power planning. |
| Connection method | Solderless connector, soldering, pre-wired section, or supplier review. |
| Installation layout | Corners, gaps, cabinet runs, channels, and hidden wiring affect cut planning. |
| Quantity and spare length | Helps avoid shortage if sections are cut wrong or need adjustment. |
Before cutting or ordering for a project, confirm the strip type, voltage, width, cut interval, controller type, IP requirement, connection method, layout, and quantity. Share those details with your LED strip supplier and ask them to review the strip and connector match before installation.
No. Cut only at the designated cut points, such as a scissor mark, printed line, or copper-pad area. Cutting through the wrong part of the circuit may stop a section from working.
Yes, if the strip is designed to be cut and the cut is made at the correct point. The cut section also needs the correct power connection, polarity, and connector or soldering method.
Look for the repeated cut mark on the strip. It may appear as a scissor icon, a printed line, or copper pads between LED sections. If no cut mark is visible, check the product instructions before cutting.
Often, yes. You need a connector or soldered wire connection that matches the strip width, pad layout, pin or channel count, polarity, and strip type. A random connector may not work.
Many RGB strips can be cut if they have marked cut points. Reconnection needs the correct multi-channel connector and proper alignment of the positive and color-channel pads.
Some waterproof LED strips can be cut at marked points, but the cut end may need proper resealing. Do not assume the original protection level remains unless the product instructions or supplier confirms the correct sealing method.
It depends on the product. Smart, RGBIC, and addressable strips may have data direction, control zones, or IC placement that affects cutting and reuse. Check the manufacturer’s guide before cutting.
Check whether usable copper pads remain on the section you want to reconnect. If the circuit or pads are damaged, that piece may not be reusable. In a project installation, replacing the damaged section may be more reliable than trying repeated repairs.
Cutting LED strip lights is easier when the strip, connector, controller, and installation layout are planned together. Before cutting or ordering for a project, confirm the strip type, voltage, width, cut interval, controller type, IP requirement, connection method, layout, and quantity.
Share those details with your LED strip supplier and ask them to review the strip and connector match before installation.
For an Elstar project inquiry, use the contact page and include the strip type, voltage, width, cut interval, controller type, IP requirement, connection method, layout, and quantity.


 English
  Spanish
  French
  Arabic