

I’ve fixed dozens of شرائط LED over the years—some that flickered, some that refused to light up, and even a few that looked completely dead. At first, I used to panic, thinking I’d have to replace the entire strip. But with time (and trial and error), I realized most of these issues can be solved quickly—and cheaply—right at home.
If your LED strip is acting up—maybe only half is lighting, or it’s dim, or it won’t respond to the remote—don’t throw it away just yet. The solution might be easier than you think.
In this guide, I’ll walk you through the exact steps I take whenever an LED strip fails. Whether you’re dealing with a cut wire, a broken segment, or a flickering mess, you’ll find practical fixes here—no technical experience required.
✔ How to identify and troubleshoot common LED strip issues
✔ How to repair broken or dim LED strips with or without soldering
✔ Real scenarios, DIY tips, and pro tricks that actually work
✔ Bonus: How to prevent your LED strips from failing again
Let’s get started—your lights can shine bright again, and I’ll show you exactly how.

Before you start repairing your LED strip light, it’s important to gather the right tools. The good news? You don’t need a full toolbox—just a few essential items can handle most LED strip repairs.
Here’s a breakdown of what I use in almost every repair project:
🔗 External Reference:
📰 How to Use a Multimeter to Test LED Strip Lights – LEDSupply
Before you grab your scissors or multimeter, it’s important to slow down and take a few safety precautions. LED strip lights operate on low voltage, but incorrect handling—especially when power is still connected—can still lead to short circuits, damaged components, or even injury.

Here’s what I always check before starting any LED repair:
Always disconnect your LED strip from its power source before touching it.
Even low-voltage DC power can cause sparks if you’re cutting or reconnecting wires while the strip is energized.
Make sure the power supply you’re using matches the voltage و wattage required by your LED strip. Using the wrong one is a common cause of damage.
For example, using a 24V adapter on a 12V strip can burn out your LEDs instantly.
Work on a clean, dry surface with enough light.
If you’re soldering, make sure you’re in a well-ventilated area to avoid inhaling fumes.
If you’re repairing waterproof LED strips, cutting into the silicone sleeve can expose internal components. You’ll need to re-seal them properly after the fix to maintain water resistance.
🔗 External Reference:
📰 Basic Electrical Safety for Low Voltage LED Lighting – LED Journal
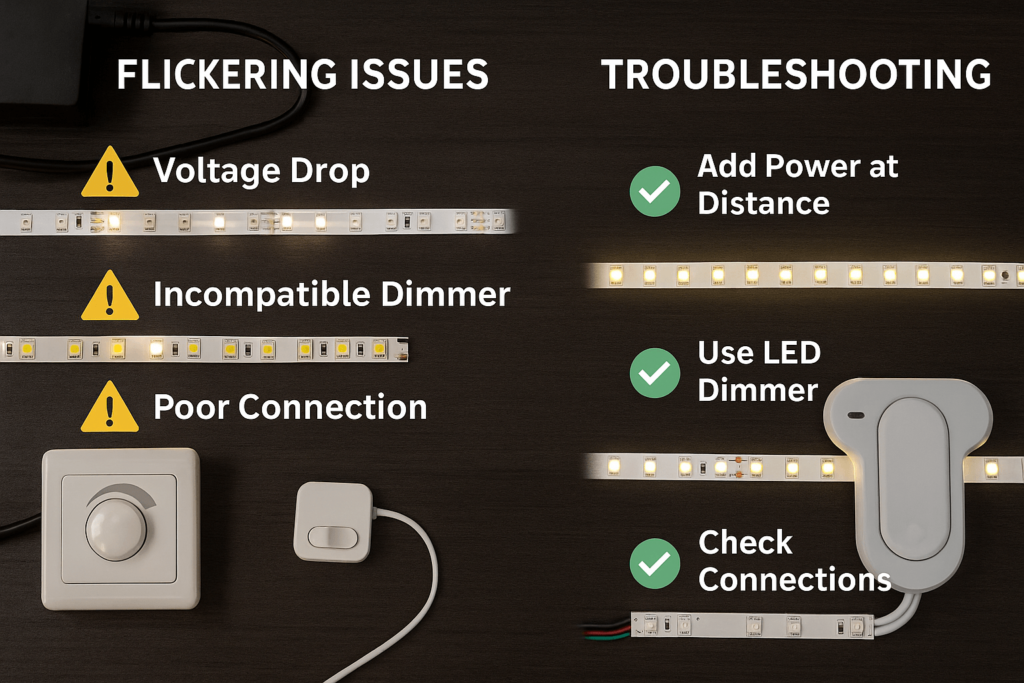
Even with proper precautions, LED strip lights can encounter issues over time. Understanding common problems and their solutions can save you time and money. Here are some typical issues and how to address them:

Possible Causes:
Solutions:
Possible Causes:
Solutions:
Possible Causes:
Solutions:
Possible Causes:
Solutions:
🔗 External Reference:
📰 Troubleshooting LED Strip Problems – Waveform Lighting
Recommended Video:
For a visual guide on troubleshooting and fixing broken LED strips, watch this step-by-step tutorial:
Once you’ve identified the issue with your LED strip, it’s time to roll up your sleeves and fix it. Whether it’s a dead segment, a cut strip, or a loose connection, these repair steps are simple enough for beginners yet effective enough for experienced DIYers.

Let’s walk through the process step by step.
Before doing anything, make sure the LED strip is completely disconnected from its power source. Working on a live circuit—even low voltage—can cause shorts or damage the components.
Look for common signs of damage such as:
You can also use a multimeter to test for continuity across copper pads. This helps pinpoint exactly where the strip is broken.
▶️ How to Test LED Strip with a Multimeter – YouTube
Most LED strips are designed to be cut at clearly marked sections, typically every 3 or 6 LEDs. Use scissors or a precision knife to make a clean cut on both sides of the damaged segment.
Make sure to cut directly on the copper pads to allow for clean reconnection.
You have two common ways to rejoin the working ends:
📰 Soldering vs. Clip-on LED Connectors – LEDSupply
If you soldered the connection, wrap it with heat shrink tubing أو electrical tape to protect it from shorting or physical stress. For waterproof LED strips, re-seal the silicone sleeve using clear adhesive or silicone caps.
▶️ How to Reconnect Cut LED Strip Lights – YouTube
Before mounting the LED strip back into place:
If everything works as expected, you’re ready to reinstall the strip using clips or adhesive backing.
Sometimes a standard repair guide isn’t enough. Real-world LED strip problems don’t always follow a template—and I’ve definitely faced a few odd ones myself. Below are common user scenarios I’ve encountered, along with how I solved them.

If you’re dealing with one of these specific issues, the following examples might save you hours of frustration.
This happened to me once when I was installing under-cabinet lighting. I measured wrong and ended up cutting the strip too short—so it couldn’t reach the power supply.
What I Did:
▶️ How to Extend LED Strip Lights – YouTube
This is a common problem, especially with budget RGB strips.
What I Found:
Solution:
📰 Why Your RGB Strip is Stuck on One Color – LEDInfo
Fixing waterproof LED strips is a little trickier because of the silicone coating.
What I Did:
This kept the IP65 rating intact—and my outdoor lights have been working fine since.
▶️ Fix Waterproof LED Strips Without Losing Water Resistance – YouTube
After fixing an LED strip light, the last thing you want is for the same problem to happen again. Over the years, I’ve found that a few simple habits can make a huge difference in how long your LED strips last—and how reliable they are.

Here are the practices I now follow for every LED installation and maintenance routine.
Always make sure your power adapter provides at least 20–30% more wattage than your LED strip needs. This gives you headroom and prevents the adapter from running hot or cutting out.
If you’re not sure how to size your power supply:
📰 How to Calculate Power Supply Needs for LED Strips – Waveform Lighting
Cheap or incompatible controllers often cause flickering, delayed responses, or voltage spikes. I recommend using a controller that’s specifically rated for your LED voltage and type (RGB, RGBW, or single color).
For smart lighting setups, make sure your controller supports platforms like Alexa or Google Home if needed.
One of the most common causes of strip damage is physical stress.
If you need to make a turn, use an LED strip corner connector instead of folding the strip.
🔗 Consider: How to Install LED Strip Lights for more mounting tips.
Before sticking your LED strip to any surface, clean it with rubbing alcohol to remove dust and grease. Poor adhesion can lead to strips falling off and getting damaged.
If mounting outdoors or in high-temperature areas, consider using mounting clips or aluminum channels for heat dissipation and durability.
If your LED strip is over 5 meters (16.4 ft), voltage drop can cause uneven brightness. To prevent this:
📰 What Is Voltage Drop in LED Strips and How to Fix It – LEDSupply
How do I fix an LED strip that is not working at all?
Start by checking the power supply and connections. Make sure the adapter provides the correct voltage and that the strip is properly connected. If everything seems fine, use a multimeter to test for continuity and identify potential breaks in the circuit.
Why is only half of my LED strip working?
This usually means there’s a break or fault between two segments. Cut out the damaged section and reconnect the working ends using a solderless connector or soldering. If the power supply is too weak, upgrading to a higher wattage adapter may also help.
Can I fix a cut LED strip without soldering?
Yes, you can use solderless LED connectors designed for your strip type (single color or RGB). These clip-on connectors allow you to rejoin two pieces easily and are ideal for quick repairs without special tools.
📰 Solderless LED Strip Connectors – LEDSupply
What causes LED strip lights to flicker?
Flickering is often caused by voltage instability or incompatible dimmers/controllers. Try using a regulated power supply and ensure all accessories match your LED strip’s specifications.
Can I repair waterproof LED strip lights?
Yes, but you’ll need to carefully remove the silicone coating, perform the repair, and then reseal the area using clear silicone glue و end caps to maintain waterproof protection.
What’s the best way to test an LED strip light?
Use a multimeter in continuity or voltage mode to check individual segments. Alternatively, plug the strip directly into a known working power supply to see which parts light up.
▶️ How to Test LED Strips with a Multimeter – YouTube
How long do LED strips usually last?
High-quality LED strips can last up to 50,000 ساعة, depending on how well they are installed and cooled. Avoid overheating and always use the correct power supply to extend their lifespan.
Fixing a faulty LED strip might seem intimidating at first—but as you’ve seen, it’s often a simple process that anyone can handle with the right tools and a little guidance. Whether it’s a dead segment, a dim end, or an unresponsive controller, most issues can be resolved without replacing the entire strip.
I’ve personally revived dozens of LED strips using these same methods. With each fix, I not only saved money but also learned more about how these amazing little light sources work.
If you’ve followed this guide step by step, your LED strip should now be shining bright again—and lasting even longer thanks to the preventive tips.
If you’re looking to upgrade or replace your current setup, we’ve got you covered:
👉 Explore Our High-Quality LED Strip Solutions
👉 Learn How to Connect Multiple LED Strips to One Power Source
👉 Discover Design Ideas: Where to Use LED Strips in Your Home
From flexible design options to powerful accessories and expert advice, Elstar is your trusted partner for all things LED.
