

If you are comparing a 230V COB LED strip for a project, start with the whole system. The lowest price may look attractive at first. However, the safer question is which strip, dimmer, end cap, seal method, and install plan will reduce site risk.
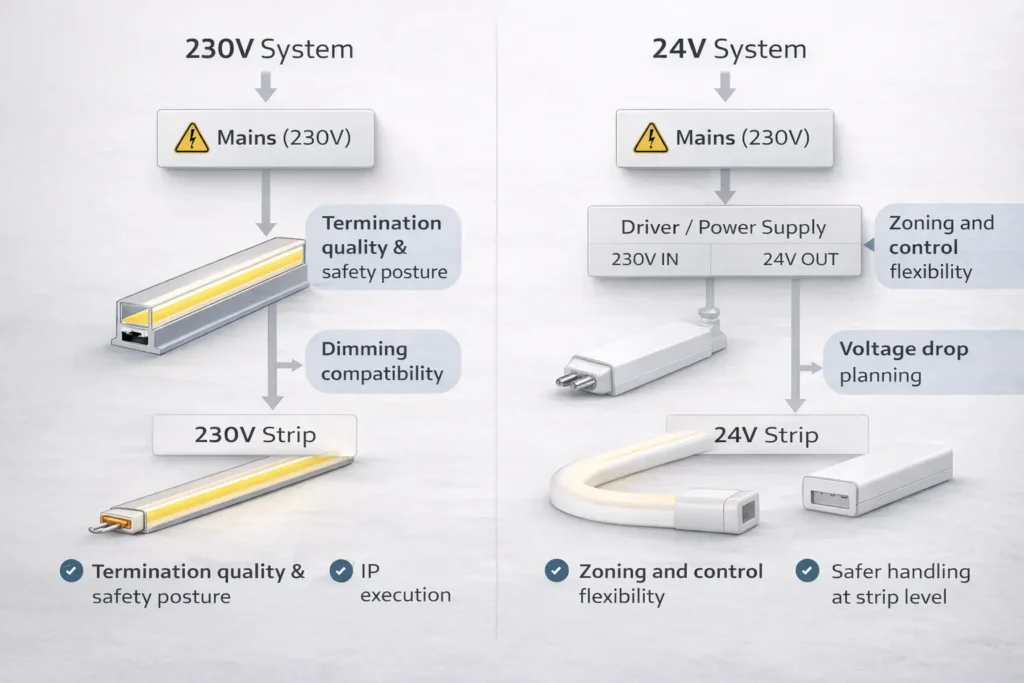
Because 230V strips use mains voltage, they can help with long light lines and may reduce the need for many separate power supplies. Still, the project only works well when the team confirms the dimming method, cut points, end connections, IP rating, and service access before buying.
This guide is written for B2B buyers, brands, distributors, contractors, and project teams. It shows how to choose between 230V and 24V COB strips, how to avoid dimming issues, and how to write a clear supplier request.
A 230V COB LED strip is a mains-voltage linear light for 220–240V markets. It gives a smoother, more dot-free light line and can suit long runs. However, it needs the right end parts, safe installation, clear dimming support, and a real IP plan if the area is damp or outdoors.
| Decision point | 230V COB strip | 24V COB strip |
|---|---|---|
| Choose it when… | You need long light lines, fewer power-supply points, and a trained install team. | You need safer low-voltage handling at the strip, flexible zones, or driver-based control. |
| Dimming reality | It may use phase-cut dimming, but the dimmer must match the strip model. | It often uses drivers or controllers such as PWM, 0–10V, or DALI. |
| Main risk | Poor end connections, unsafe mains work, weak sealing, or a dimmer mismatch. | Voltage drop, driver choice, wiring layout, and heat control. |
A 230V COB LED strip combines two ideas. First, COB means chip-on-board LED packing, which helps create a smooth light line. Second, 230V means the strip works with mains power in many 220–240V markets.
As a result, this product can suit long runs in coves, signs, facades, retail spaces, and other linear lighting jobs. However, it should not be treated like a simple low-voltage tape light.
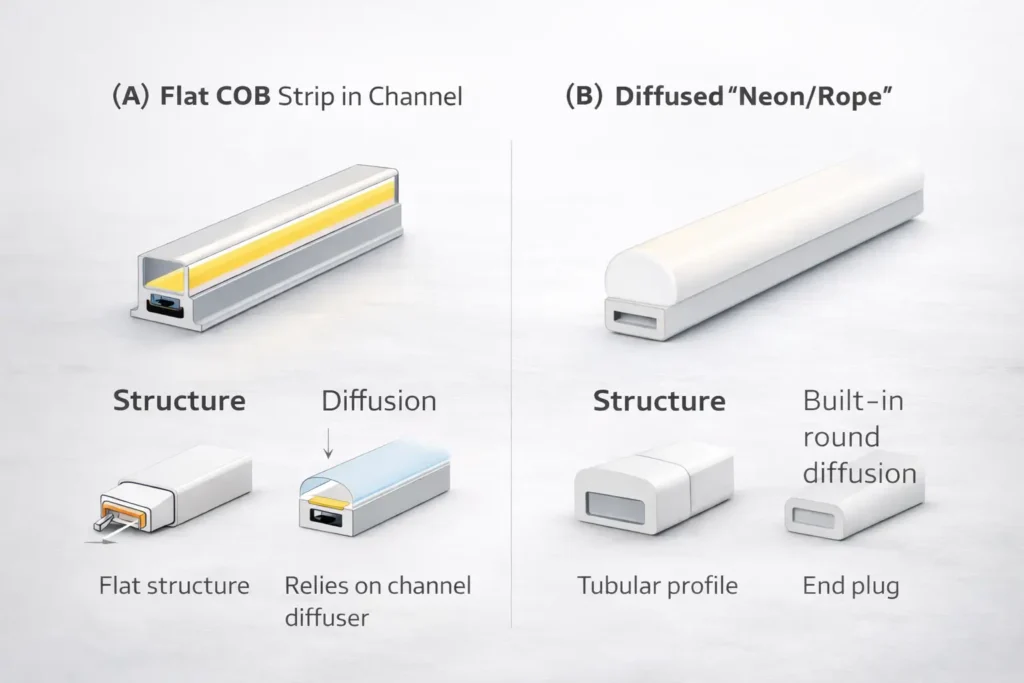
Some listings use similar names for different products. Therefore, check the shape before you order.
Many 230V products say “no transformer.” In practice, this usually means the system may not need a separate 24V power supply. However, it does not remove the need for safe mains wiring, correct end parts, dimmer checks, IP checks, and service access.
For this reason, treat the “no transformer” claim as a reminder to verify the wiring diagram, not as a reason to skip project checks.
Choose between 230V and 24V COB strips by looking at the site, control plan, safety needs, and repair access. A single marketing claim cannot decide the best setup.
| Project factor | 230V COB strip | 24V COB strip |
|---|---|---|
| Power setup | Mains-voltage setup. End quality and safe work matter a lot. | Low-voltage strip. The driver or power supply becomes the key part. |
| Controls | Dimming may depend on phase-cut dimmer fit. Check by model. | Control paths are often easier to plan with drivers and controllers. |
| Install work | Can look simpler in long runs. However, errors at ends can be serious. | Needs more parts, but the strip level is lower voltage. |
| Wet areas | Success depends on end caps, connectors, and seals. | Still needs sealing, but low voltage may reduce some handling risk. |
| Service access | Joints and ends should stay easy to inspect when possible. | Repairs may focus more on drivers, zones, and wiring. |
| Buying checks | Ask for wiring guide, end method, dimming scope, and IP notes. | Ask for driver specs, voltage-drop notes, and control support. |
A 230V COB LED strip can be dimmable. However, the dimmer and strip must match. In many cases, flicker is not caused by one bad part. Instead, it comes from a mismatch between the dimmer type and the strip design.
For example, a technical report from Pacific Northwest National Laboratory notes that LED dimming performance depends on the fit between the LED source and the dimmer, not only on either part alone. See the report here: PNNL LED dimming compatibility report.
| Symptom | Likely cause | First checks |
|---|---|---|
| Flicker at low levels | Dimmer and strip do not match well. | Check dimmer type, strip dimming scope, and test another approved dimmer. |
| Dead zone in the dim range | Minimum-load or control issue. | Ask for tested conditions and test at real project load. |
| Buzzing or whining | Phase-cut interaction or loose contact. | Try a tested dimmer and inspect end connections. |
| Works on bench but not on site | Install stress, connector issue, or poor contact. | Check strain relief, connectors, and end caps. |
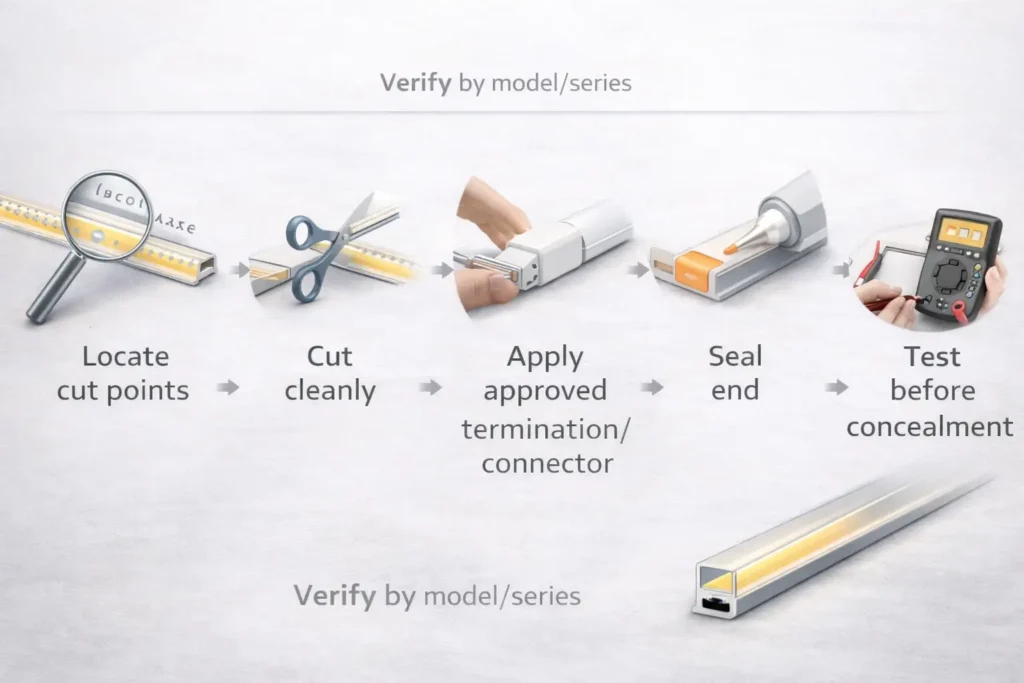
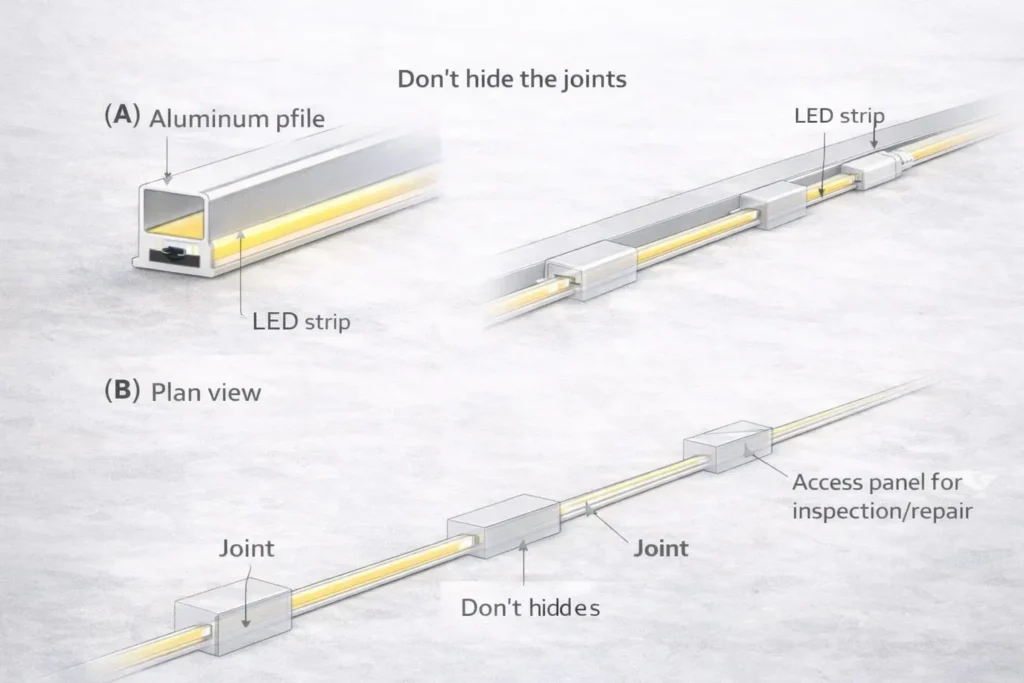
For 230V systems, many failures start at ends, joints, and cut points. Therefore, the safest workflow is clear, model-specific, and checked before the strip is covered.
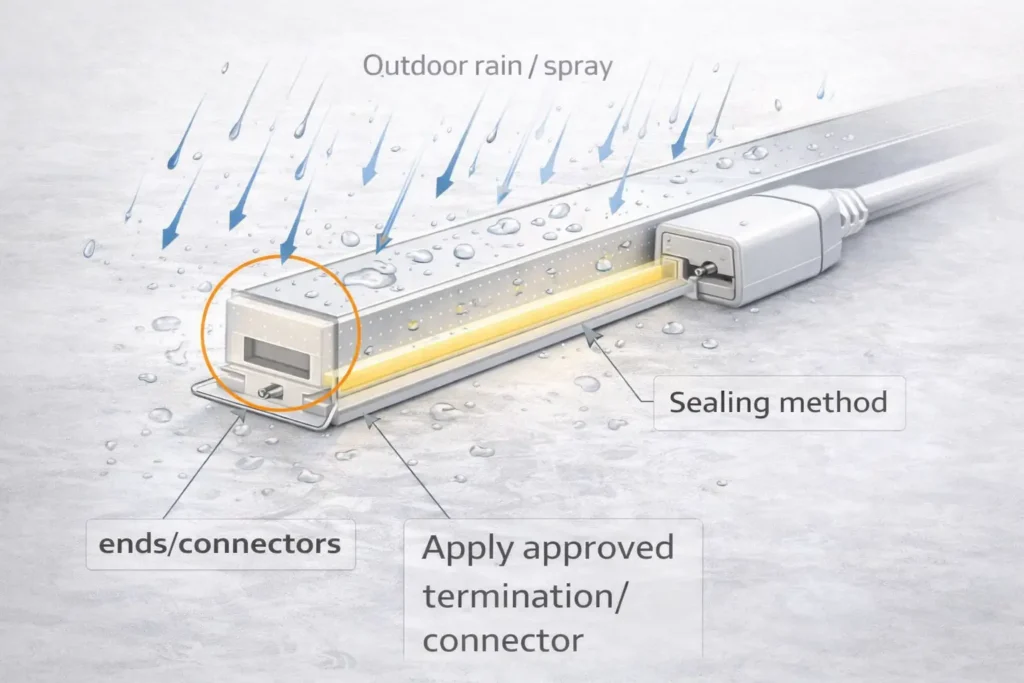
IP ratings describe protection against dust and water entering an enclosure. IEC explains IP ratings as a system under IEC 60529. You can review the IEC overview here: IEC IP ratings.
However, a strip project can fail even when the strip body has a good IP label. In real installs, water often enters through end caps, connectors, cable exits, or cut points.
| Site condition | Common IP direction | What to check |
|---|---|---|
| Dry indoor cove | IP20 direction | Focus on mounting, heat, and access. |
| Damp indoor area | IP65 direction | Check end caps, cable exits, and seal steps. |
| Sheltered outdoor area | IP65 to IP67 direction | Protect ends, connectors, and cable entry points. |
| Exposed outdoor rain or spray | Often IP67 direction | Verify the IP scope, accessory set, seal method, and service access. |
A 230V COB strip sits in a mains-voltage context. Therefore, buyers should not treat cutting, end work, and sealing as simple craft steps. Local electrical rules and qualified practice still matter.
For EU projects, the European Commission explains that the Low Voltage Directive aims to protect users of electrical equipment within set voltage limits. You can review the overview here: European Commission Low Voltage Directive overview.
Rules vary by country and use case. Therefore, avoid broad claims such as “compliant everywhere” unless the supplier provides model-specific proof for the target market.
Early failures often come from stress, heat, poor mounting, hidden joints, or weak end work. Therefore, the install plan matters as much as the strip feature list.
Aluminum profiles and channels can reduce risk in many jobs. For example, they can protect the strip edge, support a cleaner install, and help move heat away from the strip when the design allows.
However, profiles are not magic. Tight cavities can still trap heat. Also, adhesive-only mounting may fail on dusty, damp, or uneven surfaces.
Avoid claims such as “no voltage drop” unless the supplier datasheet supports them for the exact model and run length. Instead, follow the model limits and install guide.
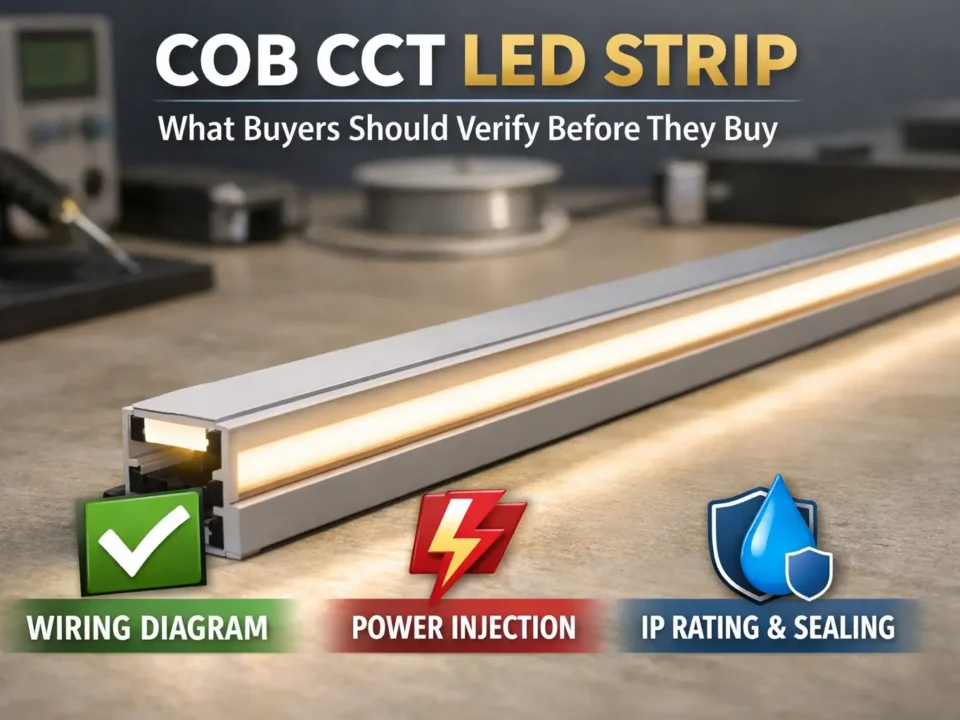
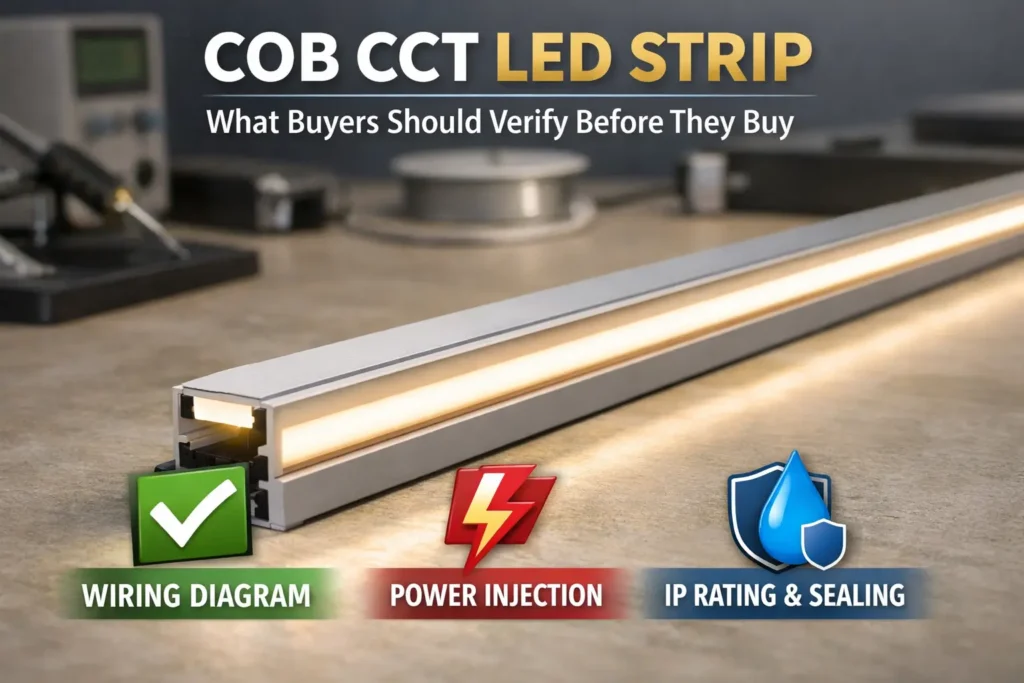
The fastest way to lower project risk is to treat 230V COB strips as a system. Therefore, your buying process should request documents, end parts, dimming notes, and a sample test plan before volume orders.
| Item | Why it matters | What to write in the spec |
|---|---|---|
| Dimming scope | Helps prevent flicker and site delays. | Confirm dimming method and test with the planned dimmer. |
| End parts and method | Ends are high-risk points on 230V strips. | Use approved parts only. No swaps without written approval. |
| IP scope and seal method | The IP label alone is not enough. | Provide IP notes, seal steps, and accessory set by model. |
| Document pack | Helps installers work the same way. | Provide datasheet, wiring diagram, and install guide before shipment. |
If you want a faster approval loop, prepare a one-page project input sheet. Include the application, indoor or outdoor use, run lengths, mounting method, dimming plan, and target IP rating. Then, ask the supplier for a model-specific confirmation pack before ordering.
This section helps project teams sort common symptoms. However, it does not replace qualified mains-voltage work. If you suspect a safety hazard, stop and follow local safety steps.
| Symptom | Likely cause | First checks | Prevention area |
|---|---|---|---|
| Flicker under dimming | Dimmer and strip mismatch. | Check dimmer type, model dimming scope, and tested dimmer options. | Dimming checklist |
| Section goes out | End fault, connector issue, stress, or poor contact. | Inspect end caps, connectors, and strain relief. | Install workflow |
| Protection trips | Fault, water entry, or wiring issue. | Treat as safety-critical. Isolate and inspect through the right process. | Safety and IP sections |
| Water or condensation appears | Seal failure or wrong exposure match. | Check end caps, connectors, cable exits, and IP scope. | Waterproofing checklist |
| Adhesive fails or strip sags | Surface, heat, or cable stress issue. | Review mounting method and consider profiles or clips. | Mounting and heat |
A 230V COB LED strip is a mains-voltage linear strip for many 220–240V markets. It uses COB LED packing to create a smoother light line. However, it is not automatically dimmable or outdoor-rated.
Choose 230V when you need long light lines, fewer power-supply points, and a trained install team. However, choose 24V when you need more zones, more control choices, or lower voltage at the strip.
Sometimes, yes. However, the strip must support that dimmer type. Therefore, confirm leading-edge or trailing-edge support by model and test a sample before full use.
Flicker often comes from a dimmer mismatch, weak contact, or site wiring issue. First, check the dimmer type. Then, inspect end connections and test with a known compatible dimmer.
The right IP rating depends on the exposure. For example, sheltered damp areas may need a different approach than direct rain or washdown. More importantly, confirm how the ends and connectors keep the rating.
Cut only at the marked points. Then, use the approved connector or end-cap method for the exact model. Also, test the strip before you cover or close the install area.
Ask for the datasheet, wiring guide, install guide, accessory list, dimming support, IP scope, and cut method. In addition, run a sample test with the planned dimmer, end parts, and mounting method.
For outdoor projects, dimming-critical jobs, or long hidden runs, complete a short pre-order review. Share the site, run lengths, mounting method, and control plan with the supplier. Then, request model-specific documents and sample-test guidance before you commit to volume.

