Therefore, replacing the strip should not be the first step. First, match the flicker pattern. Next, check power, connectors, controls, and visible damage. Then, stop checking if you see heat, odor, sparks, buzzing, or damaged wiring.
For related internal resources, review Elstar’s مصابيح شريطية LED, LED power supplies, وحدات تحكم الصمام الثنائي الباعث للضوءو contact page. For external electrical basics, see SparkFun’s voltage, current, and resistance guide and the U.S. Department of Energy’s LED lighting overview.
Why LED Strip Flicker Happens
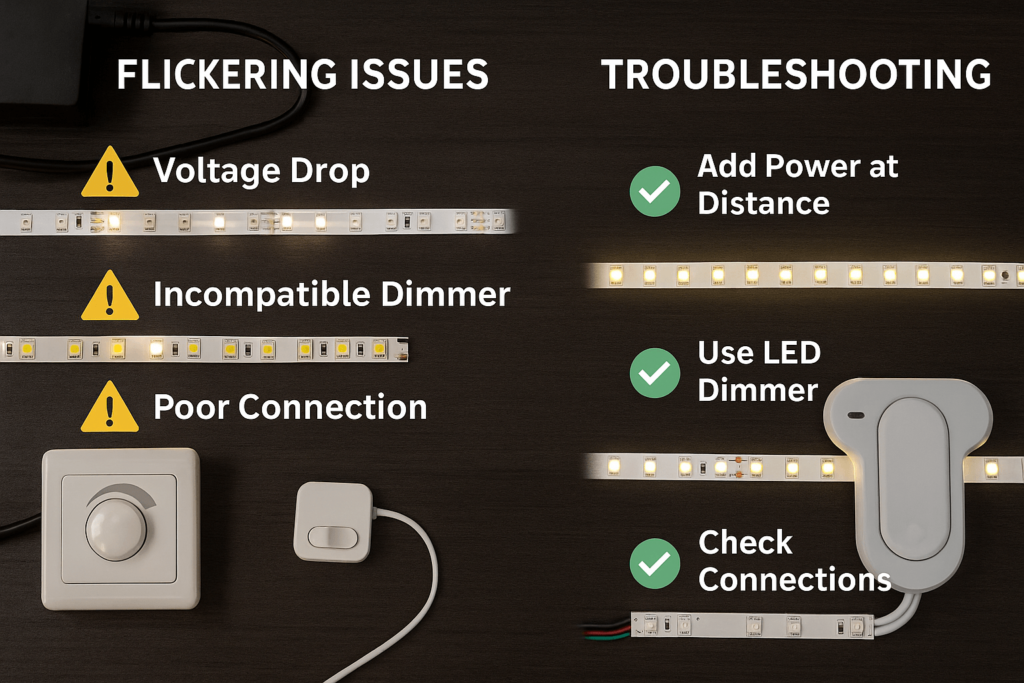
LED strip lights often flicker because the strip does not receive stable or compatible power. For example, common causes include a weak power supply, voltage drop, loose connectors, poor solder joints, dimmer mismatch, controller mismatch, or damage on one strip section.
As a result, the safest approach is to narrow the issue before replacing parts. Start with the flicker pattern, then check the most likely cause.
Match the LED Strip Flicker Pattern First
Before changing parts, look at how the strip flickers. As a result, the pattern can help you choose the first safe check.
| Flicker pattern | Possible cause | First check | Next safe action |
|---|---|---|---|
| Whole strip flickers or flashes | Power supply, driver, or controller issue | Check whether the power supply voltage matches the strip rating | Do not swap power sources unless voltage, polarity, connector, and output rating match the strip. |
| Flicker appears near the end | Voltage drop or long-run power loss | Check total run length and whether the far end is dimmer | Review wiring layout and power feed method. |
| Only one section flickers | Loose connector, solder joint, cut point, moisture, or damaged section | Inspect the local connector and strip section | Re-seat the connector or replace the affected section if damage is visible. |
| Flicker happens only when dimmed | Dimmer, controller, or driver mismatch | Test full brightness and compare with dimmed operation | Check component fit before replacing the strip. |
| Flicker is on-and-off | Loose connection, unstable input power, controller fault, or heat issue | Inspect connectors and look for heat or dark marks | Stop use if there is heat, odor, buzzing, or visible damage. |
This table does not prove the fault. Instead, it helps you choose a safer first check.
Common Causes of LED Strip Flicker
In most cases, the most useful checking path is simple. First, check power. Next, check connections. Then, check controls and inspect the strip itself.
| Common cause | What to inspect | Safe first check | When replacement may be needed |
|---|---|---|---|
| Power supply mismatch | Strip voltage rating and power supply output | Confirm that the voltage rating matches the LED strip | If the power supply is unstable, damaged, or not suitable for the load |
| Voltage drop | Long strip runs, long cable runs, and dim end sections | Look for flicker or dimness near the far end | If the layout needs a different power feed or wiring approach |
| Loose connector | Clip connector, solder joint, adapter, or cut point | Turn off power, then inspect and re-seat the connection | If the connector is worn, loose, corroded, or damaged |
| Dimmer or controller mismatch | Dimmer type, controller type, and driver fit | Test whether flicker disappears at full brightness | If the dimmer, controller, or driver is not compatible |
| Damaged strip section | Burn marks, lifted copper pad, water damage, or cracked strip | Inspect the section that flickers | If damage is visible or the same section flickers after connection checks |
| Unstable installation area | Moisture, heat, vibration, or poor mounting | Check for moisture, heat, or movement at joints | If the strip or connectors do not suit the install conditions |
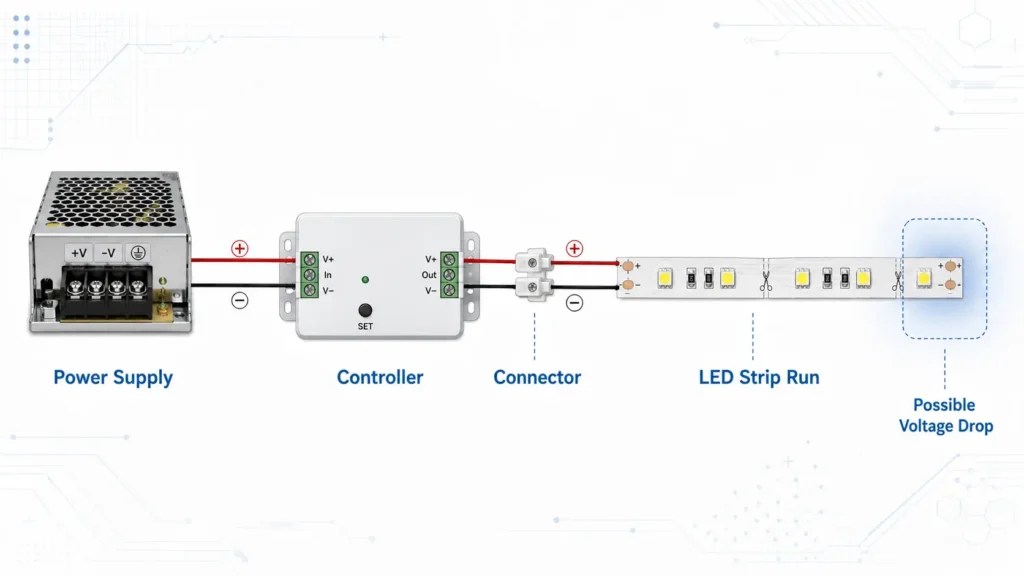
After the pattern check, start with the power source.
Power supply or driver problems
First, a power supply problem can affect the whole strip. Then, the issue may appear as flashing, pulsing, random flicker, or sudden dimming. Therefore, check the voltage rating on the LED strip and compare it with the power supply output.
Do not guess based on connector shape alone. For example, a connector that fits physically does not always mean the power supply is by voltage suitable. Also, if the strip was extended or connected to more accessories, the original supply may no longer be suitable.
Next, review long-run power loss.
Voltage drop on longer runs
If the strip flickers or dims more near the far end, voltage drop may be part of the problem. Also, this is more likely when the run is long, the cable path is long, the strip is powered from only one end, or several sections are linked together.
However, voltage drop is not the only possible cause. Loose connectors, thin wiring, weak solder joints, or an unsuitable power supply can create similar symptoms.
After that, inspect the local connection points.
Loose connectors, solder joints, or damaged sections
If only one section flickers, the issue may be local. First, turn off power. Then, inspect these points:
- clip connectors;
- solder joints;
- cut points;
- copper pads;
- extension cables;
- corner connectors;
- areas exposed to moisture, pressure, or movement.
Next, look for dark marks, rust, lifted pads, cracked coating, or a connector that does not hold the strip firmly. If the same section flickers after the connection check, the strip section or connector may need replacement.
Finally, check dimming behavior if the strip works at full brightness.
Why LED Strip Flicker Happens When Dimmed
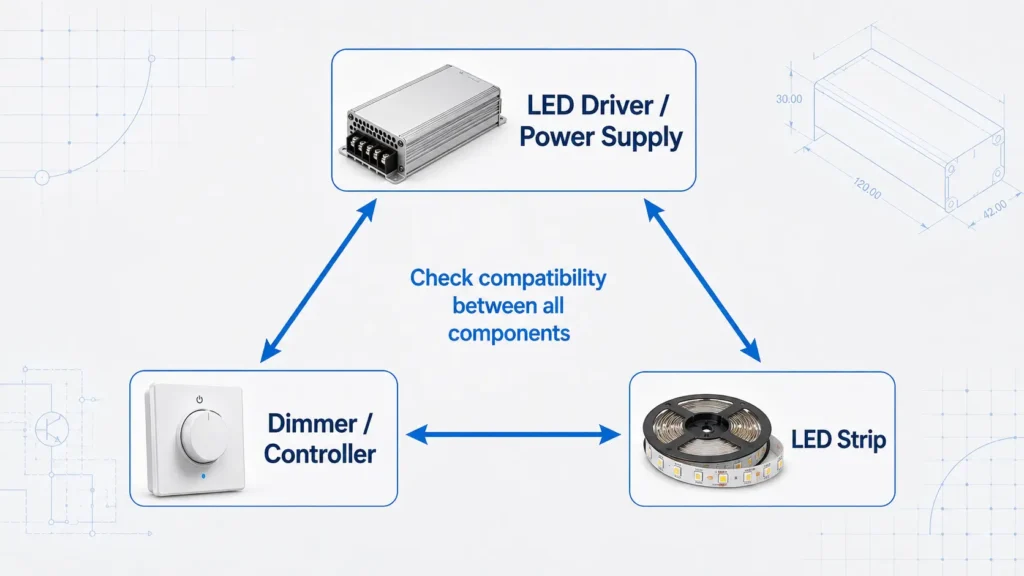
If the strip works normally at full brightness but flickers when dimmed, check the dimming system. In other words, LED strips, drivers, dimmers, and controllers need to work together.
| Item | What to confirm |
|---|---|
| LED strip type | Voltage and strip type match the control system |
| Driver or power supply | Suitable for the strip and dimming setup |
| Dimmer or controller | Compatible with the driver and LED strip |
| Load range | The connected load is within the controller or dimmer rating |
| Wiring layout | Connections are secure and polarity is correct |
| Documentation | Manufacturer notes do not warn against the chosen combination |
| Test result | The same flicker appears only when dimming is used |
Resetting a controller may help if the issue is a temporary control glitch. However, it will not fix an overloaded power supply, damaged strip, bad connector, or not matching dimming setup.
When to Stop Troubleshooting LED Strip Flicker
Some flicker problems are safe to inspect at a basic level. For example, on low-voltage strip systems, you can check visible connectors and product labels. However, some warning signs should stop DIY checking.
- burning or rubber-like smell;
- sparks;
- buzzing from the driver, switch, or wiring;
- hot power supply, controller, connector, or strip section;
- melted insulation or dark marks;
- repeated breaker trips;
- damaged mains wiring;
- flicker that affects several lights or circuits;
- uncertainty about whether the system is mains-voltage or low-voltage.
Do not open sealed drivers, modify mains-voltage wiring, or keep using a system that shows heat, odor, sparks, buzzing, or damaged wiring.
If the issue still continues, collect clear details before asking for support.
What to Tell a Supplier or Installer
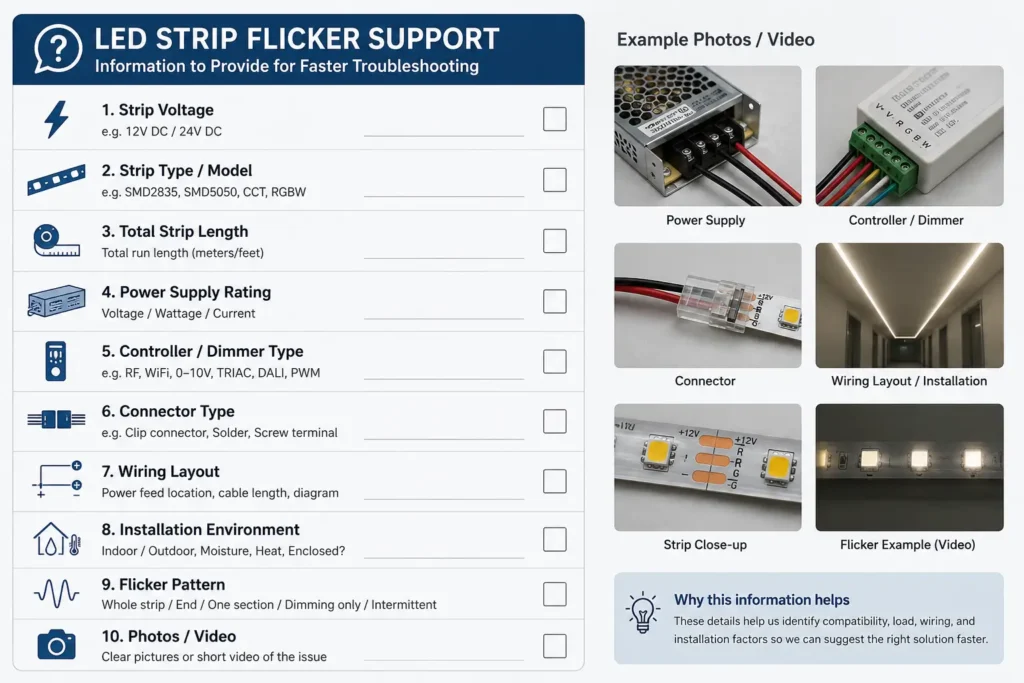
If flickering continues after basic checks, prepare the right details before asking for help. In addition, this is useful for installers, distributors, buying teams, and project buyers.
| Information to prepare | Why it helps |
|---|---|
| LED strip voltage | Helps check power supply and controller match |
| Strip type and model, if available | Helps identify the correct accessory or replacement path |
| Total strip length | Helps review voltage drop and load conditions |
| Power supply rating | Helps check whether the power source is suitable |
| Controller or dimmer type | Helps identify fit issues |
| Wiring layout | Shows where power enters and where flicker appears |
| Connector type | Helps check whether the connection method is reliable |
| Installation environment | Moisture, heat, vibration, or enclosed spaces may affect reliability |
| Flicker pattern | Whole strip, one end, one section, dimming-only, or on-and-off |
| Photos or short video | Helps support staff see the symptom clearly |
For a larger project or repeat order, include this information in the RFQ or support request. As a result, the supplier or installer can review the layout instead of guessing from the symptom alone.
For quick review, use these common questions before replacing parts.
FAQ About LED Strip Flicker
Why are my LED strip lights flickering?
In many cases, LED strip lights flicker because of unstable power, a mismatched power supply, voltage drop, loose connectors, dimmer mismatch, controller mismatch, or a damaged strip section.
How do I stop LED strip flicker?
First, start with low-risk checks. Then, confirm that the power supply voltage matches the strip, inspect connectors, test full brightness, and look for visible damage. If there is heat, odor, buzzing, sparks, or damaged wiring, stop using the system and contact a qualified professional.
How do I know if my LED strip is bad?
A strip section may be damaged if the same segment flickers after connectors and power are checked. Also, burn marks, corrosion, cracked coating, lifted copper pads, or moisture damage can point to a bad section.
Why does my LED strip flicker at one end?
Often, flicker near the far end may point to voltage drop, especially on longer runs. However, wiring, connectors, and power feed layout can also cause the same symptom.
Why do my LED strips flicker when dimmed?
Usually, dimming-only flicker points to a fit issue between the LED strip, driver, dimmer, and controller. Test the strip at full brightness, then review the component documents.
Can I reset LED strip lights to stop flickering?
Sometimes, a reset may help if the controller has a temporary glitch. However, it will not fix a loose connector, damaged strip section, overloaded power supply, voltage drop, or not matching dimmer.
Is LED strip flickering dangerous?
Minor flicker on a low-voltage strip can come from connection or fit issues. However, stop using the system if you notice heat, burning smell, sparks, buzzing, damaged wiring, or repeated breaker trips.
What information should I give a supplier before replacing parts?
Before asking for help, prepare the strip voltage, strip type, total run length, power supply rating, controller type, connector type, wiring layout, installation area, flicker pattern, and photos or video.
Need Help Narrowing Down LED Strip Flicker?
If the flicker continues after basic visual checks, avoid replacing parts by guesswork. Prepare the strip voltage, run length, power supply rating, controller or dimmer type, connector type, installation area, and a short video of the flicker pattern.
Then, share those details with your supplier or installer so they can review the likely cause and suggest the next safe step.


 English
  Spanish
  French
  Arabic