A “waterproof COB LED strip” is an IP-rated COB strip designed to resist moisture—but a reliable wet-area installation depends on the entire system (cut ends, connectors, cable entry, and the power enclosure), not the strip body alone.
COB strips are chosen for a smoother “dotless” line of light; waterproof versions typically add a coating or sleeve that changes installation and serviceability.
Choose the minimum IP level that fits the environment (to avoid over-spec and unnecessary complexity).
Plan how you will cut, connect, and reseal the strip—most water ingress failures start at terminations.
Remember: strip IP ≠ waterproof driver/controller setup. Treat power and enclosure protection as a separate requirement.
Full-system sealing and validation under site conditions
Continuous immersion
IP68 (only with defined conditions)
Treat as a system design + verification exercise
Boundary conditions:
IP ratings describe enclosure protection under defined test conditions; they are not a blanket “always waterproof” promise. See: IEC overview of IP ratings.
What “Waterproof” Means for COB LED Strips (Strip vs System)
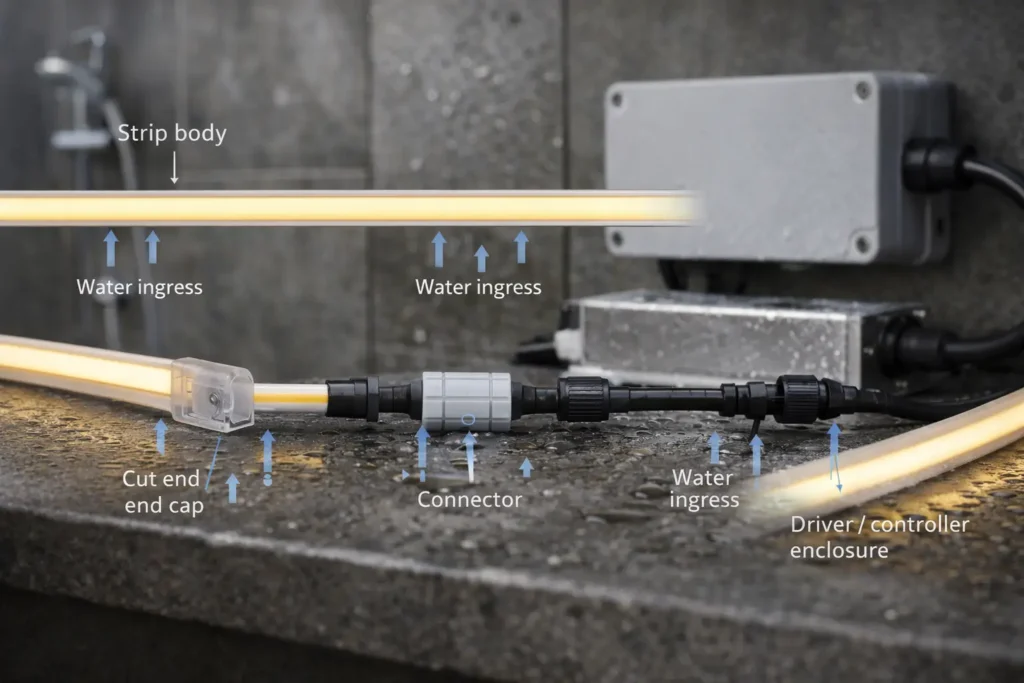
Waterproof performance is a system property: an IP-rated strip body can still fail in wet areas if cut ends, connectors, cable entry points, or power components allow moisture ingress.
Common “system” parts that can break waterproofing:
Cut ends after field trimming
Connectors and splices (especially if not sealed or strain-relieved)
Cable exits and wire entry points
Driver/controller enclosures and cable glands
Why failures happen (typical chain): Moisture enters at a termination → corrosion/short risk increases → flicker, unstable dimming, or failure.
Ingress-point checklist (what to control in wet-area installs)
Ends: every cut must be resealed using the series-appropriate method (end cap + compatible seal approach).
الموصّلات: confirm the connector is intended for wet use, and still seal cable entry points and add strain relief.
Cable routing: use drip loops and avoid routing that funnels water into connectors/enclosures.
Power/control: select a suitable enclosure rating and use proper cable glands/entries.
Boundary conditions:
“Waterproof connectors” are only as good as the assembly and sealing method; do not assume “plug-and-play” equals watertight.
The driver/controller usually needs its own protection even if the strip is IP-rated.
IP65 vs IP67 vs IP68: Choose the Right Waterproof Level by Environment
Choose the IP level based on how water contacts the installation (splash vs rain exposure vs immersion risk), then confirm system sealing and power enclosure protection to match.
Higher IP can increase installation complexity and reduce serviceability—“highest IP” is not always the best decision.
Bathrooms and kitchens often need splash resistance plus good sealing practices, not necessarily immersion-grade assumptions.
Any “immersion” expectation must be defined and validated at the system level (strip + cable exits + connectors + enclosure).
Scenario
Typical exposure
Practical IP direction
Notes that reduce failures
Indoor damp / occasional splash
Humidity + light splashes
IP65 (often)
Focus on ends/connectors and routing; don’t ignore power enclosure
Covered outdoor (eaves)
Wind-driven rain risk
IP67 (often)
Seal cable entry, protect driver/controller in enclosure
Fully exposed outdoor
Rain + pooling risk
IP67/IP68 (project-dependent)
Design drainage and sealing; plan maintenance access
Accidental dunk / standing water
Temporary immersion risk
IP67/IP68 (project-dependent)
Treat as system validation; define conditions in the spec
Continuous immersion
Always submerged
IP68 only (defined conditions)
Not just “strip choice”—requires full system design and verification
Boundary conditions:
IP ratings are defined under IEC’s IP scheme and related standards; do not substitute marketing terms (“waterproof”) for test-scope understanding. See: IEC overview of IP ratings.
Submersion suitability depends on the complete assembly and the site conditions; keep immersion statements bounded and verification-based.
Waterproof Construction Options (Coating vs Silicone Sleeve/Tube) and Trade-Offs
Waterproof COB strips are commonly achieved via surface coating or a silicone sleeve/tube, and the better choice depends on environment severity, termination style, and how much on-site modification/service is expected.
Coatings can be simpler for tight spaces but still require careful resealing at cuts.
Sleeves/tubes can offer stronger environmental buffering but may change flexibility, termination complexity, and service access.
Waterproofing layers can increase reliance on a good thermal path (mounting and profiles matter more).
Waterproof approach
Pros (practical)
Cons / trade-offs
Best fit (typical)
Surface coating (conformal layer)
Slim profile; can be easier in tight channels
Terminations still vulnerable; may need specific reseal materials
Damp/splash environments where low bulk helps
Silicone sleeve/tube encapsulation
Stronger barrier for rain exposure; robust outer layer
More termination complexity; can reduce serviceability
Outdoor exposure where mechanical protection matters
Boundary conditions:
Construction details and compatible end caps/connectors are series/model dependent—verify with the exact datasheet and accessory kit.
More sealing usually means more work to modify or repair on site; plan access and replacement strategy early.
Cutting, Connecting, and Resealing Waterproof COB LED Strips (How to Keep Protection)
Any cut or splice creates a new ingress point—so to keep a waterproof rating meaningful in the field, you must reseal ends and terminations using the correct method for the specific series and environment.
Most “waterproof failures” are termination failures, not LED chip failures.
Quick connectors can be convenient, but wet-area reliability depends on sealing quality and strain relief.
Treat resealing as a controlled process with checks, not an afterthought.
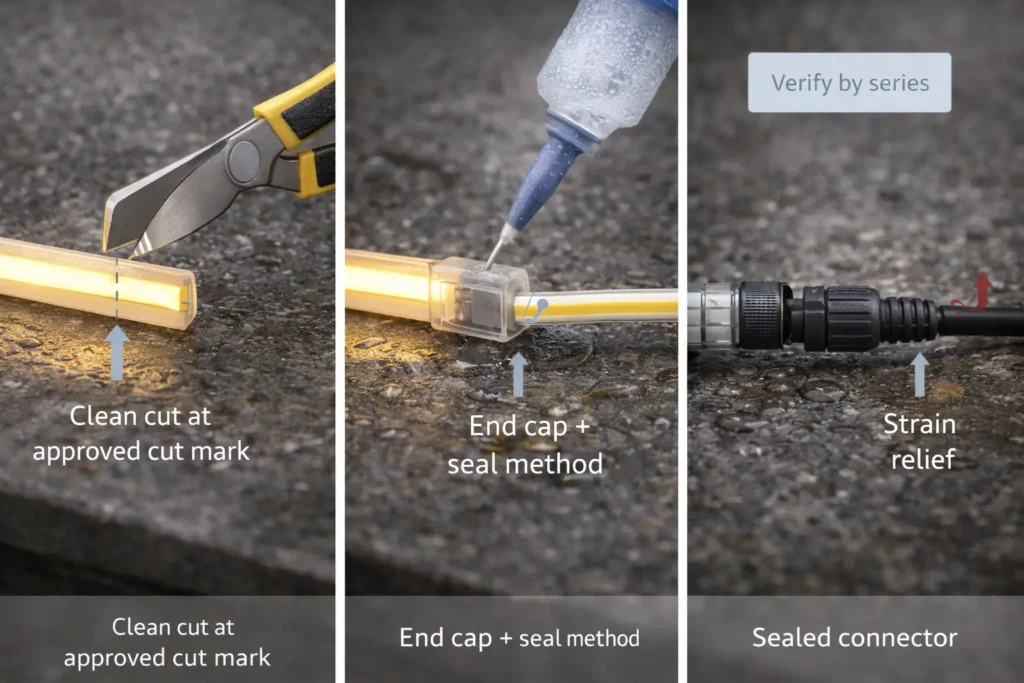
Reseal process (model-agnostic, project-safe)
Confirm the correct cut point from the series documentation (do not guess).
Make a clean cut and avoid tearing the waterproof layer.
Prepare the end (clean/dry; remove debris; ensure adhesion surfaces are uncontaminated).
Apply the correct end cap / end-seal method for that construction (coating vs sleeve/tube).
Seal any connector or cable exit point and add strain relief (so movement does not open micro-gaps).
Respect curing/setting time for the sealing method used (do not energize and “test in place” prematurely).
Inspect: look for gaps, lifted edges, or exposed conductors.
Commission: verify stability under expected operating conditions (including any condensation-prone periods).
What not to do (common field mistakes)
Leaving exposed copper at the cut end (even “temporarily”).
Sealing over moisture, dust, or oily contamination.
No strain relief at connectors (movement opens gaps over time).
Assuming a connector labeled “waterproof” makes the system waterproof without enclosure/cable-entry protection.
Any routing that funnels water into terminations/enclosure?
Enclosure entries tight and properly gland-sealed?
After first operation cycle, re-check for loosened or shifted seals.
Boundary conditions:
Do not assume IP protection is “restored” after cutting unless the correct reseal method is used and validated under project conditions.
Termination materials and methods vary by model/series; follow the supplier’s installation note.
Power, Wiring, and Enclosures for Wet/Outdoor Waterproof COB Strip Systems
Even with an IP-rated strip, wet/outdoor reliability depends on a protected power/control system: appropriate enclosures, sealed cable entries, stable wiring topology, and realistic run planning.
Strip IP does not automatically apply to the driver/controller and wiring junctions.
Most outdoor failures come from enclosure/cable entry issues and termination movement.
Run planning matters: longer runs can amplify instability; address voltage drop risk conceptually and plan injection points as needed (without guessing numbers).
Wet/outdoor power & enclosure checklist
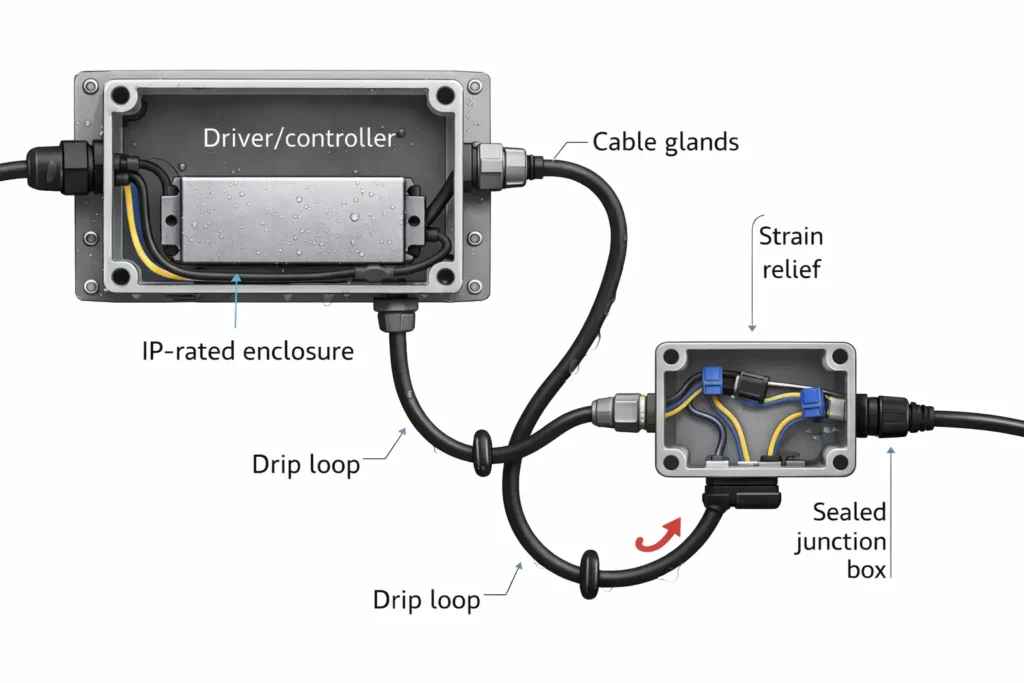
Enclosure:
Use an enclosure suited to the environment (rain exposure, washdown risk, dust).
Provide drainage strategy where appropriate (avoid “sealed box that traps water”).
Cable entries:
Use proper cable glands/entries; avoid open knockouts or improvised penetrations.
Add drip loops so water does not run along the cable into the enclosure.
Junctions and splices:
Keep splices protected and accessible for inspection; avoid hidden, unserviceable “wet” joints.
Routing and support:
Secure cables and connectors so motion/vibration doesn’t work seals loose.
Verification:
Inspect seals during commissioning and after temperature/humidity cycles.
Run planning concepts (non-numeric, project-safe)
Voltage drop: longer runs can reduce voltage at the far end, causing dimming inconsistency or instability.
Power injection: supply power at additional points to stabilize long or high-load runs (design depends on series and site constraints).
Quick dimming/control checks (avoid flicker)
Confirm driver type and dimming method match the controller (protocol and wiring topology).
Keep control wiring practices consistent with the driver/controller requirements (avoid mixing assumptions from different systems).
Use series-appropriate connectors and sealing methods so control lines are not compromised by moisture.
Boundary conditions:
Exact run lengths, wire sizes, and injection spacing are project- and model-dependent; do not generalize without a design and the exact datasheet.
US installations are code- and jurisdiction-dependent—confirm requirements for damp/wet locations with applicable standards and the local authority having jurisdiction (AHJ). Example official context: NFPA blog overview of NEC Article 300.
Heat and Mounting Reliability in Wet Areas (Profiles, Adhesives, Clips)
Waterproof layers can make thermal and mechanical design more important—so projects should treat mounting method (and thermal path) as part of the waterproof reliability plan.
Encapsulation can change how heat leaves the strip; stable mounting and thermal path become more critical.
Adhesive-only mounting often fails earlier in humid/hot cycles; mechanical support reduces movement at seals.
Aluminum profiles can improve stability and heat management and can simplify cleaner installations.
Heat risk checklist (when to be extra cautious)
High ambient temperatures or enclosed channels with poor airflow
Long continuous operation with minimal thermal path
Fully enclosed cavities that trap heat and moisture
Installations where waterproof layers prevent direct heat release to air
Mounting checklist (wet/outdoor reliability)
Prefer profiles or clips when:
The surface is uneven/porous, or adhesives won’t bond reliably
The run is long and movement could stress connectors/ends
You need a defined thermal path and cleaner alignment
Adhesive-only mounting can be acceptable when:
Surface prep is controlled (clean, dry, compatible substrate)
The environment is not harsh and mechanical stress is low
Additional support is used at terminations to reduce movement
Boundary conditions:
Thermal outcomes depend on wattage, substrate, airflow, and profile choice—verify in project conditions.
Adhesive performance varies by surface type and temperature cycles; avoid assuming “industrial tape” is universal.
Safety, Compliance, and Documentation (Model-Dependent Checklist)
IP ratings describe ingress protection scope—not a blanket safety or compliance guarantee—so project teams should request model-specific documentation and confirm scope for the exact series being specified.
Separate “ingress protection” (IP) from regulatory/certification scope (model-dependent).
In wet/outdoor work, system design matters as much as strip selection (enclosures, cable entries, and listed components).
Documentation checklist (project-ready)
Product datasheet for the exact model/series (electrical limits, installation notes, allowable terminations).
Installation note for waterproof termination method (ends, connectors, cable exits).
Wiring diagram and control/dimming compatibility notes (driver/controller assumptions).
Certification scope confirmation by model/series (no blanket assumptions).
Any project-required test or inspection documentation as specified by the contract.
System checks to include in submittals/specs
Enclosure approach for driver/controller (location, entry method, service access).
Termination plan (how cuts/connectors are handled, and what accessory kit is required).
Maintenance and access plan for sealed areas.
Boundary conditions:
Compliance requirements vary by jurisdiction, project type, and AHJ expectations; confirm locally.
Certification scope must be verified per model/series—do not assume coverage across all products.
B2B Sourcing Checklist for Waterproof COB LED Strips (RFQ-Ready)
To source waterproof COB strips successfully, buyers should specify environment, IP direction, termination plan, and documentation in one RFQ—so the supplier can quote the correct construction and accessory kit without on-site improvisation.
A good RFQ prevents “IP-rated strip, failed installation” outcomes by forcing system-level clarity.
The accessory kit is often as important as the strip selection (end caps, connectors, sealing guidance).
Numeric performance specs must come from the exact datasheet for the ordered model/series.
Do not assume lead times, warranties, or blanket certifications; confirm scope and terms per order.
FAQ: Waterproof COB LED Strip Lights (IP, Installation, Sourcing)
What does “waterproof COB LED strip” mean?
It means the strip body is designed for moisture resistance (per an IP rating), but the installation must also protect cut ends, connectors, cable entry points, and the power enclosure for real wet-area reliability.
What is the difference between IP65, IP67, and IP68 for LED strip lights?
IP65 is commonly used where splashes or water jets may occur, IP67 is often used for stronger exposure and some temporary immersion risk, and IP68 is intended for immersion conditions defined by the manufacturer—always treat immersion expectations as system-level and verification-based.
Is IP65 waterproof enough for a bathroom or kitchen?
Often yes for damp/splash zones, but only if terminations and connectors are sealed correctly and the power/control components are protected appropriately; do not treat IP65 as a substitute for good sealing and routing practices.
Can IP67 or IP68 COB LED strips be submerged in water?
Sometimes, but it depends on how “submerged” is defined and whether the entire system (strip, cable exits, connectors, enclosure) is built and validated for those conditions; avoid blanket submersion claims without defined limits and testing.
How do you seal the ends after cutting a waterproof COB LED strip?
Use the series-approved cut point and reseal method (end cap + compatible sealing approach), add strain relief, and inspect the seal before commissioning; do not assume any cut is waterproof until resealed correctly and validated.
Are waterproof LED strip connectors actually waterproof?
Some are designed for wet use, but waterproofing still depends on correct assembly, sealing of cable entry points, and strain relief; many “waterproof connector” failures come from movement, contamination, or unsealed exits.
What power supply and enclosure setup should be used for outdoor waterproof LED strips?
Use a driver/controller setup protected for the environment (enclosure plus proper cable glands and routing), and treat the strip IP rating as separate from the enclosure requirements; confirm design and code expectations locally for the installation environment.
What should I ask a supplier before ordering waterproof COB LED strips for a project?
Ask for the environment-based IP recommendation, construction method, termination/reseal method after cutting, required accessory kit, and a documentation pack (datasheet, installation note, wiring/control notes, certification scope confirmation) so the order matches real installation needs.
Summary & Next Steps (Project Checklist + Contact Triggers)
System waterproofing (ends/connectors/cable entry/power enclosure) determines real reliability—strip IP alone is not enough.
Pick IP by environment severity and don’t over-spec without a reason; complexity and serviceability matter.
Treat cutting and resealing as a controlled process with checks; most failures begin at terminations.
Align sourcing with installation reality: accessories + documents + validation plan reduce rework and callbacks.
Scenario-based next steps (practical)
Damp/splash installs: lock down termination method and routing, then choose IP direction and accessory kit.
Outdoor exposure: define enclosure approach and cable entry method before ordering.
Any immersion language in the spec: write conditions explicitly and require a system-level validation plan aligned to the contract requirements.
If you need a waterproof COB strip solution for a project (custom lengths, cable exits, wet-area terminations, or documentation for approvals), prepare these inputs before requesting a quote: environment description, target IP level, whether on-site cutting is required, driver/controller location, and any certification scope constraints.


