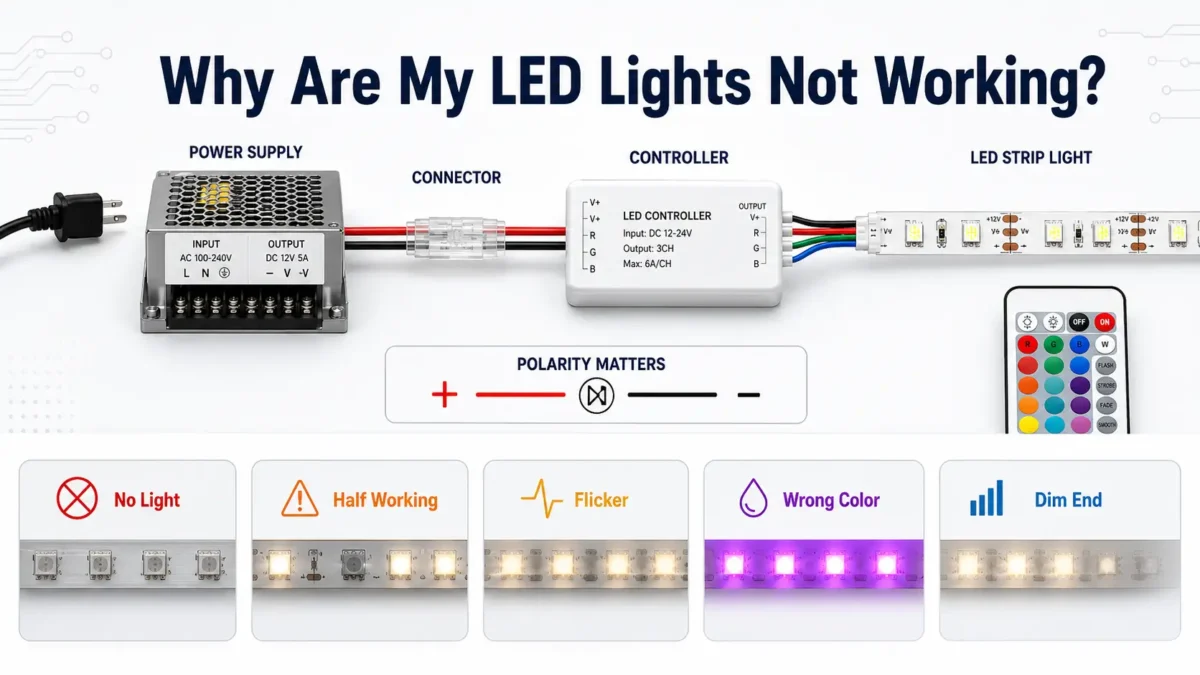
LED lights can stop working for many reasons. However, the cause is not always the LED strip itself. In many cases, the fault is in the power supply, connector, controller, remote, cut point, plus and minus marks, or the way the strip was set up.
This guide focuses on low-voltage LED strip lights and related parts, such as power supplies, connectors, controllers, and remotes. However, it does not cover car tail lights, solar lights, Christmas string lights, TV backlights, or health-related questions.
If your LED lights are not working, first check the symptom. For example, no light usually points to power, wiring, the controller, or a failed strip. Meanwhile, a strip that only works in part often points to a connector, cut point, plus and minus mark, or damaged section. Also, remote issues may come from the path between the remote and controller. Before you touch strip links or wires, always disconnect power. Finally, call a qualified electrician if you see signs of a building-wiring issue.
Before you check an LED strip, disconnect power to the strip or to the power supply output. Also, do not touch connectors, copper pads, or strip terminals while the system has power.
This guide is for basic visual checks and low-voltage strip checks. However, stop checking the strip and call a qualified electrician if you notice any of these signs:
Also, do not open mains-side wiring, change wall circuits, or bypass safety devices. If the issue is on the building electrical side, it is not a normal LED strip task. For wider home electrical safety tips, refer to Electrical Safety Foundation International home safety resources.
First, start with the symptom. This helps you avoid replacing the wrong part.
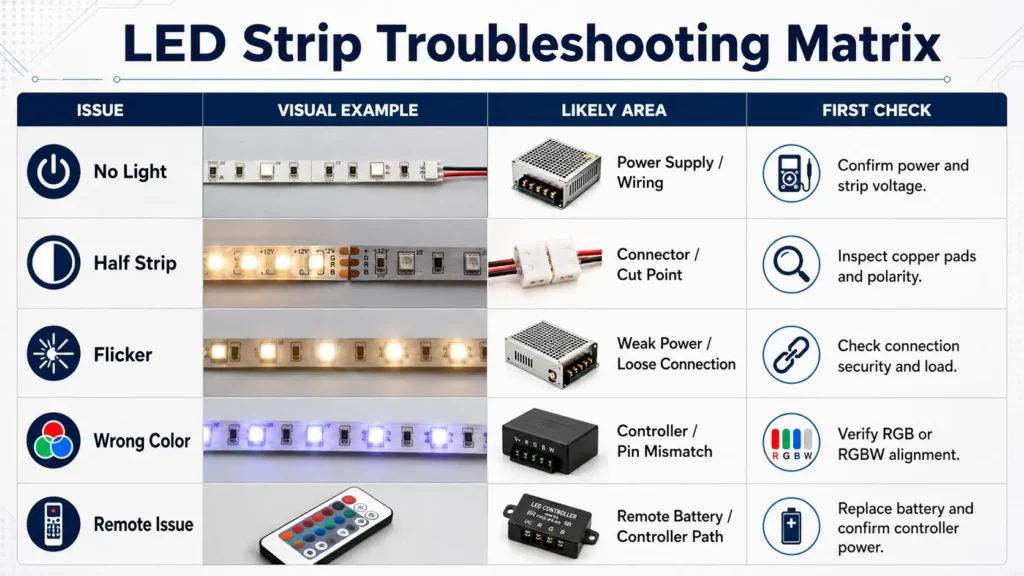
| Symptom | Likely Area to Check | Safe First Check | Next Step |
|---|---|---|---|
| No lights turn on | Power source, power supply, controller, wiring path, strip input | Check that the power supply is connected and that the strip voltage matches the power supply rating | Next, test without extra parts if it is safe, or ask supplier support |
| Only half the strip works | Connector, cut point, plus and minus marks, damaged section | Check the cut mark, copper pad contact, connector fit, and plus/minus marks | Then, replace the connector or damaged part if the fault is clear |
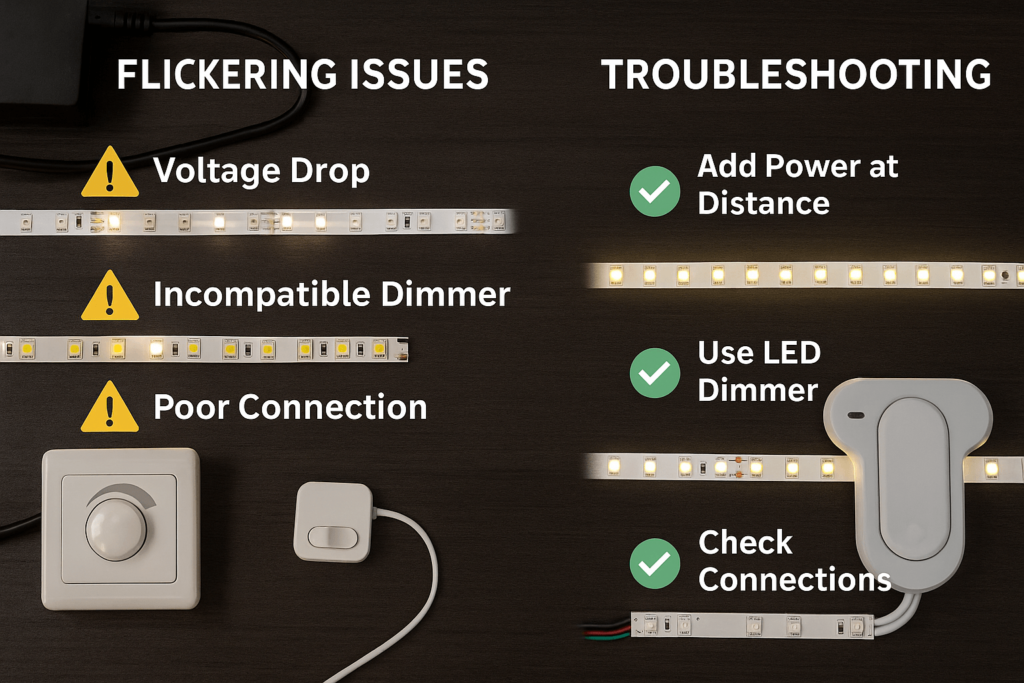
| Lights flicker | Weak power, loose connector, overloaded run, voltage drop, controller issue | Check for loose links and make sure the power supply fits the strip length | Next, shorten the run, improve the link, or check power supply size |
| Wrong color appears | RGB/RGBW pin mismatch, controller mismatch, wrong wire order | Check pin order and make sure the controller matches the strip type | Then, use the right controller and connector type |
| Remote does not work | Remote battery, receiver, controller, signal path | Replace the battery, check the receiver spot, and confirm controller power | Next, use the model manual or ask the supplier for reset steps |
| Lights stopped after cutting | Cut point, plus and minus marks, copper pad contact, connector fit | Check that the strip was cut only at the marked cut point | Then, reconnect it with the right connector or replace the bad section |
| Strip works without controller but not with controller | Controller, dimmer, remote, extra wiring | If the manual allows it, test the controller path by itself to narrow the fault | If you are not sure, ask the supplier or a qualified technician |
| Strip is dim at the far end | Long run, voltage drop, small power supply, weak link | Compare the brightness near the power input and at the far end | Next, review the power layout or ask the supplier for system advice |
A common reason LED strip lights do not work is a mismatch between the strip and the power supply. However, this does not always mean the strip is defective.
Before you replace the strip, check the labels.
| What to Check | Why It Matters | Warning Sign | Next Step |
|---|---|---|---|
| Strip voltage | The strip and power supply need matching voltage ratings | The strip does not light or acts in odd ways | Use a power supply with the right voltage rating |
| Power supply output | The supply must support the strip load | Lights flicker, dim, or shut off | Next, check total strip length and power need |
| Power supply link | Loose DC plugs or terminals can break the circuit | No light, or light that turns on and off | Turn power off, then reconnect firmly |
| Run length | Long runs can cause voltage drop | The end of the strip is dimmer | Use shorter runs, a better wire layout, or supplier advice |
| Controller input and output | A controller between the supply and strip can be the failed part | The strip works only when the controller path is tested as allowed by the manual or supplier | Check the controller rating and wire path |
Also, do not guess based only on how the strip looks. A strip may look fine but still fail because the power supply, controller, or wiring path is wrong. If you need to replace the strip, first compare voltage, color type, width, length, and use area before choosing new مصابيح شريطية LED.
If only part of your LED strip works, the issue often starts near a connector, cut point, or plus/minus mark.
Most LED strips have marked cut points. Therefore, cutting outside the marked area can damage the circuit path. Also, whether both sides work after cutting depends on the strip design, the cut point, and how the cut part is linked again.
Use this checklist:
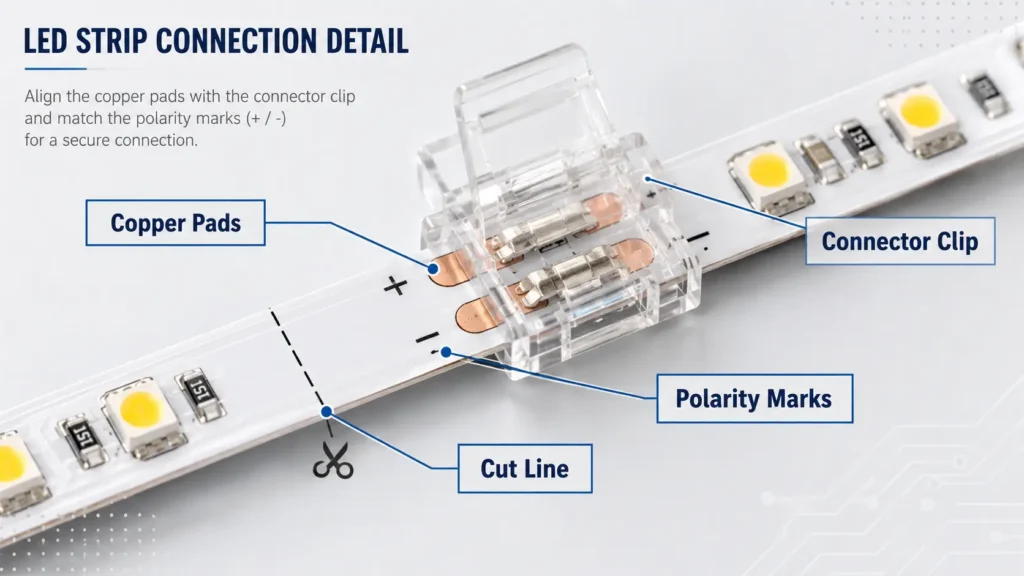
However, do not assume a connector fits just because it closes around the strip. Pin count, strip width, plus/minus direction, and contact pressure all matter. When you replace a connector, compare the strip width, pin count, and strip type before choosing an موصل شريط الصمام الثنائي الباعث للضوء LED.
A half-working strip can have several causes. For example, the issue may be one of these:
First, start at the point where the strip stops working. Then, check the nearest connector, cut point, solder joint, or bend. If the failure starts right after a connector or cut, that link is the first place to check. For a deeper connector-focused guide, see Elstar’s article on LED strip connection problems.
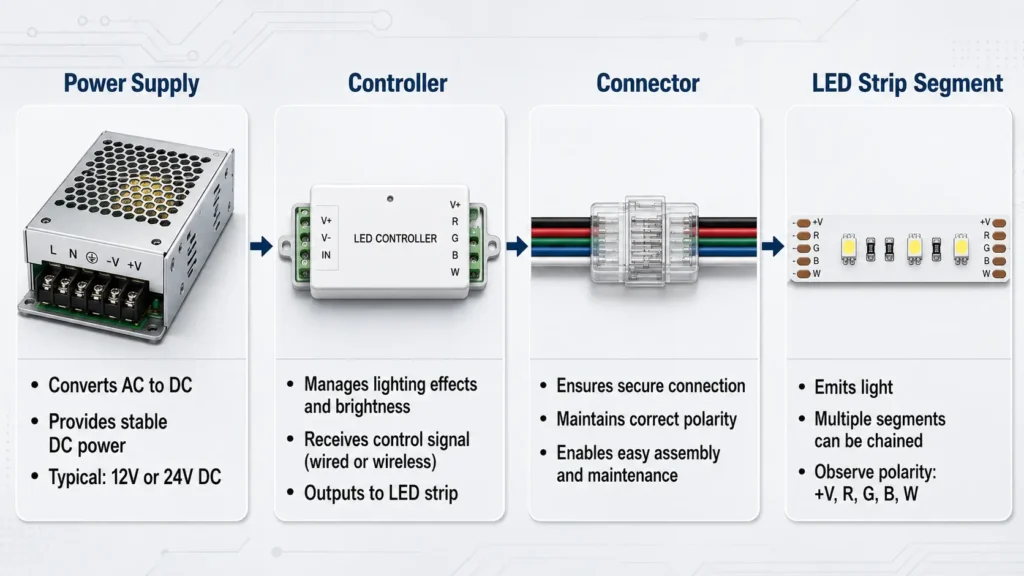
If the LED strip has power but does not respond well, the issue may be in the controller or remote path instead of the strip.
First, check these common items:
Also, avoid using one reset method for every LED controller. Reset steps vary by model. For app-controlled, Bluetooth, Wi-Fi, RGB, RGBW, or addressable systems, follow the manual or supplier guide. If you need a new control part, compare the strip type, channels, voltage, and load before reviewing LED strip controllers and amplifiers.
Not every “not working” problem means the strip is fully dead. Instead, the strip may have a power, wire, or control issue.
Flickering may come from a loose link, weak power supply, overloaded run, controller issue, voltage drop, or building-wiring issue. However, if flickering is linked to outlets, switches, buzzing, heat, burning smell, or other building electrical warning signs, stop and call a qualified electrician.
Wrong colors usually point to a controller, connector, wire order, or strip-type mismatch. For example, an RGB strip, RGBW strip, and addressable strip do not use the same control logic. As a result, a connector or controller that looks similar may still be the wrong type.
A dim section near the end of a strip can be caused by voltage drop, long run length, weak power, or a poor link. Therefore, if the strip is part of a larger setup, check the full system layout instead of only replacing the dim section.
Replace parts only after you narrow the fault path. Otherwise, you may replace the strip when the real problem is the power supply, controller, connector, or setup.
Use this logic:
| Situation | Likely Next Step |
|---|---|
| Power supply label does not match strip voltage | Use the correct matching power supply |
| Strip works when the controller or extra part path is tested as allowed by the manual or supplier | Check or replace the controller path |
| Failure starts after a connector | Check connector type, contact, plus/minus marks, and strip width |
| Failure starts after a cut | Check the cut point, copper pad condition, and link method |
| Strip has burn marks, torn pads, or clear damage | Replace the damaged section or strip |
| Building-wiring warning signs appear | Stop and call a qualified electrician |
| You cannot find the part causing the issue | Prepare system details and ask supplier support |
For installers, sellers, and project buyers, this step is important. A failure report with clear photos and basic specs is much more useful than a short message that says, “the lights do not work.”
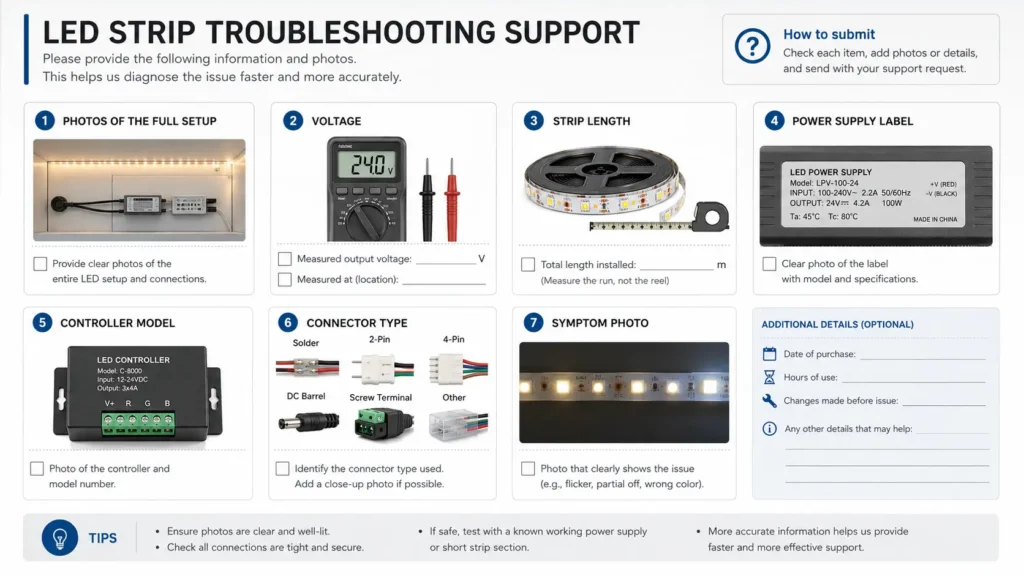
If you need help from a supplier, prepare the key details before asking for support or replacement advice.
Include:
For B2B projects, also include quantity, expected use, a layout drawing if you have one, and any needed documents. As a result, the supplier can better tell whether the issue is part choice, setup method, or product damage.
The issue may be in the power supply, controller, connector, plus/minus direction, wiring path, or LED strip itself. First, check whether the power supply rating matches the strip. Then, check whether the strip is linked in the right direction. If the power path is correct, check the controller and connectors next.
Start with safe checks. First, disconnect power. Then, check the connector, confirm that the power supply and strip ratings match, check the plus and minus marks, and see whether the issue affects the whole strip or only one section. However, if the issue involves building wiring, burning smell, buzzing, warm outlets, dark marks, or repeated circuit flicker, call a qualified electrician.
Reset steps depend on the controller model. For example, some controllers use a button sequence, some use an app, and some need power cycling. Therefore, check the controller manual or supplier guide. Also, avoid using a random reset method if you are not sure it matches your controller.
A half-working LED strip often points to a connector, cut point, plus/minus issue, damaged section, or voltage drop. First, check the point where the strip stops working. If the failure starts after a cut or connector, check the copper pads, connector fit, and plus/minus marks first.
It depends on the strip design and where you cut it. Many LED strips are made to be cut only at marked cut points. Therefore, cutting outside those points can damage the circuit. Also, the cut section needs the right connector, plus/minus direction, and power path before it will work.
The remote battery, receiver, controller power, signal path, or controller-strip match may be the issue. First, check the battery and make sure the receiver is not blocked. Then, check whether the controller has power and whether the strip type matches the controller.
Send photos of the strip, connectors, cut points, power supply label, controller model, strip voltage, total run length, and the exact symptom. Also, explain whether the strip never worked, stopped suddenly, failed after cutting, or works only in some sections.
Stop if you notice burning smell, buzzing, warm outlets or switches, dark marks, or repeated flicker linked to the building circuit. These signs may involve building electrical issues, not just the LED strip system.
If your LED strip still does not work after the basic checks, prepare photos, strip voltage, total run length, power supply label, controller model, connector type, and the failure symptom. Then, share those details with your supplier. This helps them narrow whether the issue is the strip, power supply, controller, connector, or setup.


 English
  Spanish
  French
  Arabic